Add a logo on the Web term sheet
![]() According to your configuration, it is possible that the step 1 is completed.
According to your configuration, it is possible that the step 1 is completed.
![]() If it is not completed and if you do not have access to the "Workflow's setting management" window, contact your internal supervisor.
If it is not completed and if you do not have access to the "Workflow's setting management" window, contact your internal supervisor.
Step 1
1.On the ribbon "Workflow", click on ![]() (Settings) and the option "Configuration" to open the "Workflow's setting management" window.
(Settings) and the option "Configuration" to open the "Workflow's setting management" window.
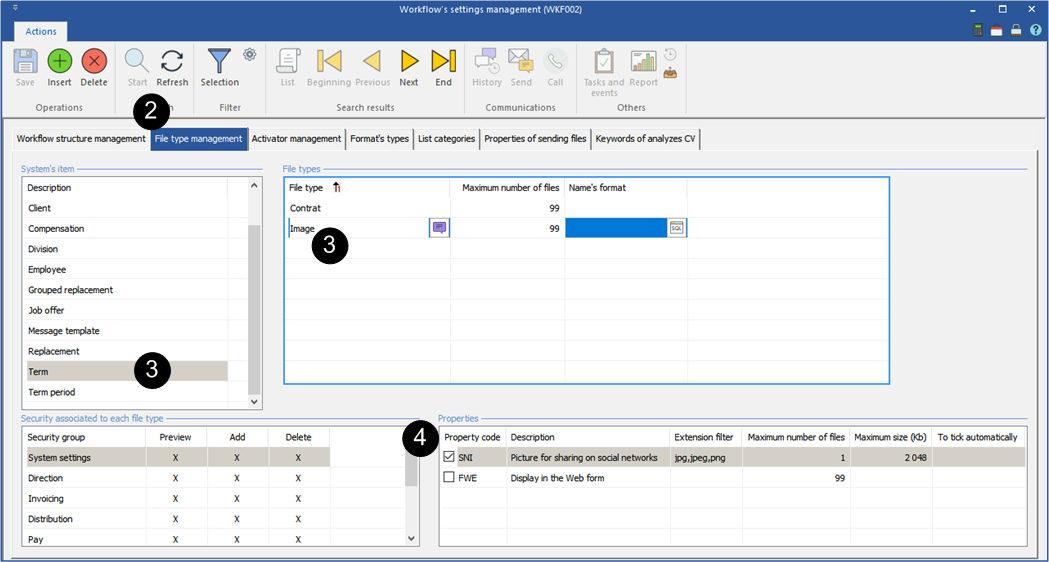
2.Move under the "File type management" tab.
3.Select "Term" in the "System's item" and the file type "Picture".
4.In the section "Properties", check the box "Picture for sharing on social networks".
Step 2
5.Check the box "Picture for sharing on social networks" in the section "Properties" of the logo which was added under the "Documents management" tab in the file of the client or in the term sheet.
![]() In order for the logo to be displayed on the term sheet, make sure that besides your positive interest for an application, the client and the candidate also expressed their positive interest.
In order for the logo to be displayed on the term sheet, make sure that besides your positive interest for an application, the client and the candidate also expressed their positive interest.
PRIM looks for the picture to be displayed on the term sheets according to a priority order
I.Picture added under the "Document management" tab of the term sheet. (If PRIM does not find a picture, it will go to the next level).
II.Picture added under the "Document management" tab in the file of the client. (If PRIM does not find a picture, it will go to the next level).
III.Picture of the division associated to this client.

