Pay and invoicing codes

Contents
On the PRIM ribbon, click on ![]() of the configuration section to open the ''Settings'' window.
of the configuration section to open the ''Settings'' window.
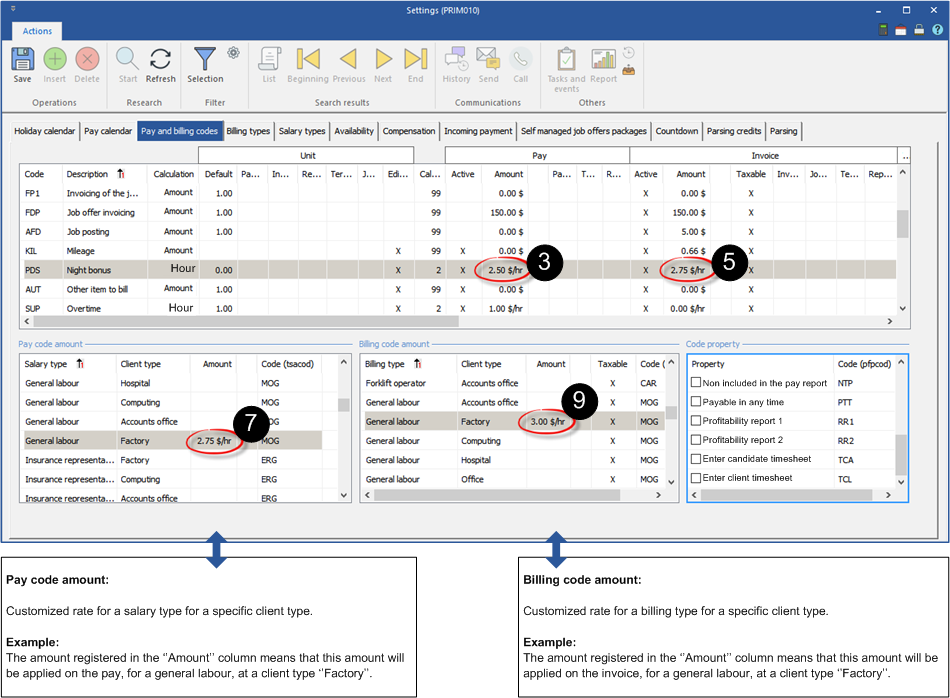
In the example below, the hourly rate for the night bonus will be changed for the pay and invoicing. This amount will automatically be entered when this code is added to an application request.
![]() The procedure is identical for all the codes available in this section.
The procedure is identical for all the codes available in this section.
1.Move under the ''Pay and billing codes'' tab.
2.In the main section, select the code on which you want to apply a customization.
3.In the ''Pay'' section, click on the icon ![]() (Edit) of the ''Amount'' column to open the ''Price history'' window.
(Edit) of the ''Amount'' column to open the ''Price history'' window.
4.Enter the new amount and click on ![]() (Save) to confirm the changes.
(Save) to confirm the changes.
5.In the ''Invoice'' section, click on the icon ![]() (Edit) of the ''Amount'' column to open the ''Price history'' window.
(Edit) of the ''Amount'' column to open the ''Price history'' window.
6.Enter the new amount and click on ![]() (Save) to confirm the changes.
(Save) to confirm the changes.
It is also possible to apply customizations in both sections related to payroll and billing.
7.In the section ''Pay code amount'', click on the icon ![]() (Edit) of the ''Amount'' column to open the ''Price history'' window.
(Edit) of the ''Amount'' column to open the ''Price history'' window.
8.Enter the new amount and click on ![]() (Save) to confirm the changes.
(Save) to confirm the changes.
9.In the section ''Billing code amount'', click on the icon ![]() (Edit) of the ''Amount'' column to open the ''Price history'' window.
(Edit) of the ''Amount'' column to open the ''Price history'' window.
10.Enter the new amount and click on ![]() (Save) to confirm the changes.
(Save) to confirm the changes.