Replacements import
PRIM allows the import of a list of replacements which comes from another application.
![]() Our integration team will give you a file template, make sure you respect the data format to have a file that conforms to the template and thus facilitate the import procedure.
Our integration team will give you a file template, make sure you respect the data format to have a file that conforms to the template and thus facilitate the import procedure.
![]() You will also receive a document to help you recognize column headers to link to PRIM fields and allow you to check imported data easily. The required data to be found in the import file are the "Client" fields, the replacement date, the replacement time, the work shift and the type of replacement.
You will also receive a document to help you recognize column headers to link to PRIM fields and allow you to check imported data easily. The required data to be found in the import file are the "Client" fields, the replacement date, the replacement time, the work shift and the type of replacement.
Step 1: Export your requests from your current application. Follow your application's export instructions to obtain an "EXCEL" file.
Step 2: Convert EXCEL file to CSV file.
![]() It is important not to change the names of the column headers which are the references PRIM uses for import.
It is important not to change the names of the column headers which are the references PRIM uses for import.
1.Open Excel and the file obtained after exporting your data and validate the exported data.
2.If you are satisfied with the result, proceed to the next step. Otherwise make the necessary corrections before the conversion of the file in order to have a file conform to the import model.
3.Depending on your Excel version, click on the "File" tab, select the "Save As" option or press the F12 key on your keyboard to open the "Save as" window.
4.In the list of file type choices, choose CSV UTF-8.

 Import the replacements
In the example below, the replacements added in another application will be imported into PRIM.
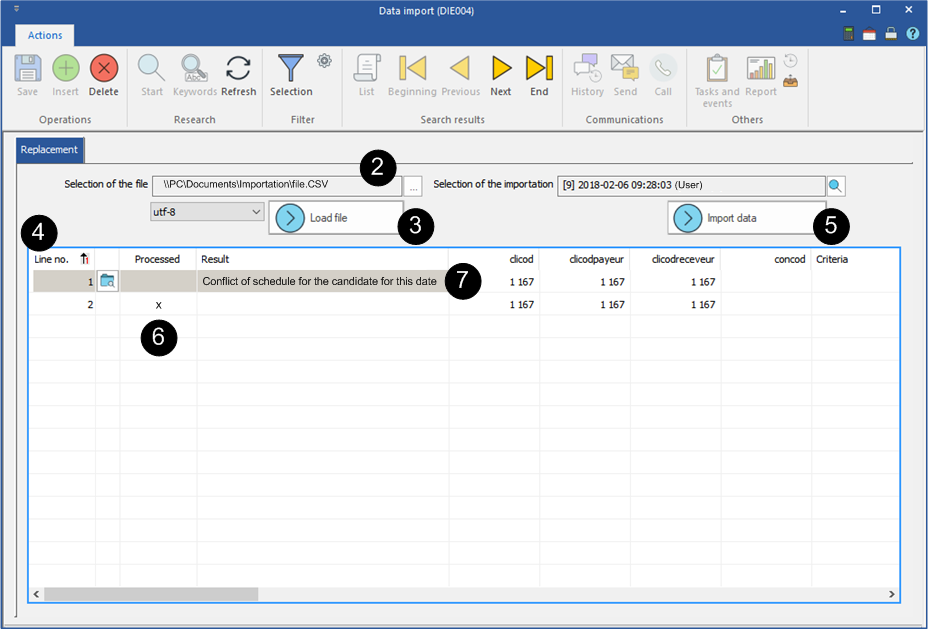
1.Open the ''Data import'' window. 2.Select the import file on your workstation. Be sure to select the file with a CSV extension. 3.Click on 4.Consult the list obtained and make corrections if necessary. 5.Click on 6.An "X" in the "Processed" column indicates that these replacements have been imported and added to PRIM. 7.A message in the "Result" column indicates that one or more replacements have not been imported.
8.You can make a correction in a record with an error message, save the change and click on 9.The corrected replacements will be imported, the message in the "Result" column will be erased and an "X" in the "Processed" column will be added. 10.Properly imported replacements will not be imported a second time.
|

