Create and save a data export template

Contents
Saving an export template allows you to save a canvas with the name and the order of the fields to export in order to use it in a recurring way.
Click on the icon ![]() (Export) on the main toolbar of a PRIM window or from a list to open the "Exporting data on the screen" window.
(Export) on the main toolbar of a PRIM window or from a list to open the "Exporting data on the screen" window.
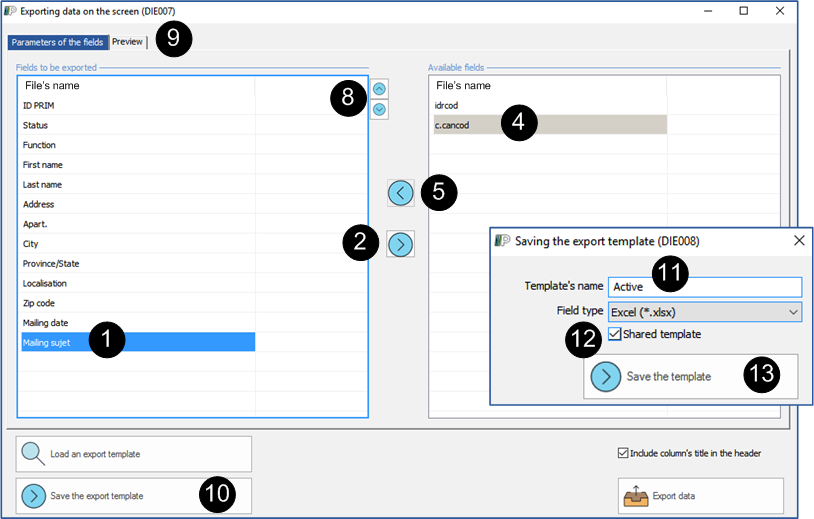
At the opening of the window, PRIM adds all the fields in the section “Fields to export” under the tab “Fields settings”.
If you do not wish to export all the fields, you can move one or more fields in the section “Fields available”. The elements of the section “Fields to be exported” will be found in an Excel file.
Remove fields:
1.Select a field in the list "Fields to be exported".
2.Click the blue arrow located in the middle, it will then point to the right.
3.The field will be in the "Available fields" area.
Add fields:
4.Select a field in the list "Available fields".
5.Click on the blue arrow located in the middle, it will then point to the left.
6.The field will be in the "Fields to be exported" area.
Change the order of the fields located in the list "Fields to export".
7.Select a field in the list.
8.Click on the "Up" or "Down” arrow in order to move the fields in the desired order.
9.Click on the ''Preview'' tab to visualize the result before the export.
10.If the order of the fields is appropriate, click on ![]() , the ''Saving the export template'' window is displayed.
, the ''Saving the export template'' window is displayed.
11.Type a meaningful name for the template.
12.Check the box for "Shared template" if you want other users to use this template.
13.Click on ![]() .
.