|
Navigation: Training plan > Section 1 - Basic concepts, interface and common manipulations > The common manipulations > Filters Punctual filters |
Scroll Prev Top Next More |
Punctual filters
A punctual filter can be applied in all PRIM Logix windows, on one or more columns in a list or from a field in a window in search mode.
To apply a filter to a field or a column header, right-click on it.
ⅰ The filter types will vary depending on the selected field or header.
 Apply a filter to a column of field
ⅰ To facilitate the work with columns, it is recommended to first apply all the required filters in order to reduce the list as much as possible, then remove the filters that are not necessary. For example, if a list contains a filter on column 1, but the user wants to work with a filter on columns 2 and 3, it is better to apply the filters on columns 2 and 3, then remove the filter on column 1.
ⅰTo apply a filter to a green field in a window in search mode, right-click in the field to display the filter selection window.
In the example below, we use the "Shift management" window to display the list of vacant shifts.
1-Open the "Shift management" window 2-Move to the "Status" column and right-click on the column header. 3-The filter selection window is displayed. 4-Sélectionnez le type de filtre « Inclure items cochés ». 5-Select the filter type "Include checked items". 6-Click on ⅰTo cumulate several filters on several columns, select a column, configure the first filter and then click on the button
|

 . Repeat this operation with the other columns until you have finished. You can then click on the button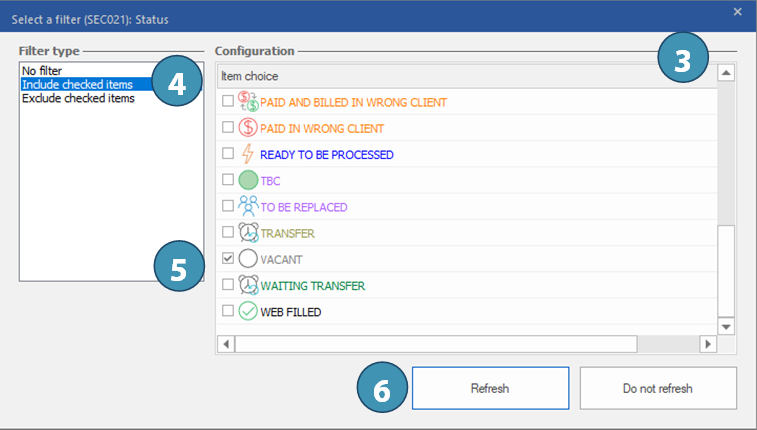
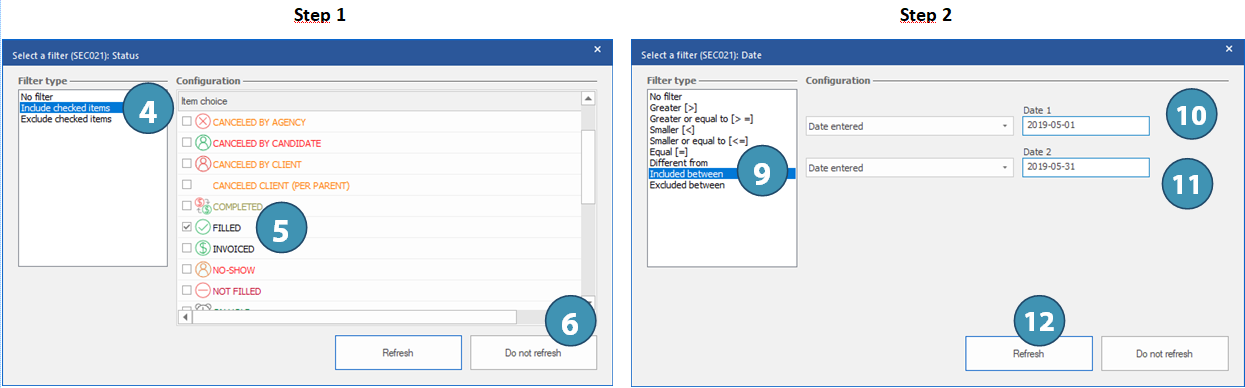
Display shifts with the status "Filled" for a specific period of timeIn the example below, we use the "Shift management" window to display the list of filled shifts for the month of May 2019.
Step 1:
1-Open the "Shift management" window. 2-Move to the "Status" column and right-click on the column header. 3-The filter selection window is displayed. 4-Select the filter type "Include checked items". 5-Check the "Filled" box". 6-Click on
Step 2 :
7-Right-click on the header of the "Date" column in the "Shift" section. 8-The filter selection window is displayed. 9-Select the option "Included between". 10-Select "Date entered", double-click in the criteria area to access the calendar or enter the date manually. 11-Select "Date entered", double-click in the criteria area to access the calendar or enter the date manually. 12-Click on
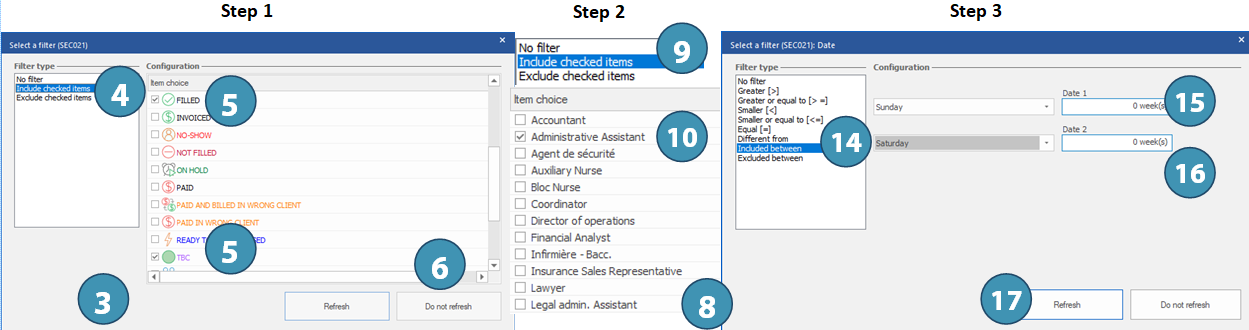
Display all administrative assistants assigned for the current weekIn the example below, we use the "Shift management" window to display the list of assignments for a request type, for the current week.
Step 1:
1.Open the "Shift management" window. 2.Move to the "Status" column and right-click on the column header. 3.The filter selection window is displayed. 4.Select the filter type "Include checked items". 5.Check the "Filled" and "To be confirmed" boxes. 6.Click on
Step 2:
7.Right-click on the header of the "Request type" column. 8.The filter selection window is displayed. 9.Select the filter type "Include checked items". 10. In the "Item choice" list, check the "Administrative assistant" function. 11. Click on
Step 3:
12. Right-click on the header of the "Date" column in the "Shift" section. 13. The filter selection window is displayed.. 14. Select the option "Included between". 15. Select "Sunday" to indicate the Sunday of the current week. 16. Select "Saturday" to indicate the Saturday of the current week and also to indicate the last day of the week. 17. Click on
|
Created with Help+Manual 8 and styled with Premium Pack Version 4 © by EC Software