Availability management

Contents
The management of the availabilities is an important functionality, it makes it possible for PRIM to make the correspondence between the client and the candidate. The availabilities are registered in the file of the candidate at the time of his registration on the platform Web or at the creation of its file at your office.
The availabilities of the candidate are took in consideration for the replacements, however it will be possible to assign a candidate to a replacement if its availabilities are not in conformity. He will be displayed in the list of the candidates available under the ''Non-standard schedule'' section or under the ''Unspecified availability'' section in the ''Replacement management'' window.
The availabilities are not taken into consideration for a term or a job. These types of longer-term requests could be of interest to a candidate who had offered different availabilities.
Availability icons
The green dial ![]() indicates that the candidate is available for the work shift.
indicates that the candidate is available for the work shift.
The red dial ![]() indicates that the candidate is not available for the work shift.
indicates that the candidate is not available for the work shift.
The orange dial ![]() indicates that the candidate has not specified his availabilities for the work shift.
indicates that the candidate has not specified his availabilities for the work shift.
 Register or modify the candidate's availability
1.If you are still in the candidate file, click on the "Calendar" tab.
•Otherwise, open a "Candidate" window, you are in search mode, you will notice that the fields are green. •Enter the name of the candidate sought in the field "Candidate", and click on the icon •If you are in search mode, you can also click on the icon •Click on the "Calendar" tab. 2.Double-click in the main zone of the calendar or click on the button
Regular schedule 3.For each day, click on the icon 4.The displayed beginning and end hours are default settings, you can manually change the beginning and end hours of the work shifts, if needed. 5.If you choose the ''Non available'' option, click on the arrow to the right of the column to display the list of reasons for unavailability. 6.Make a choice among the proposed options. 7.Click on
Specific schedule
8.Select the day for which you want to modify the candidate availabilities. Make sure to choose the right date for the changes. According to the display option of the calendar, the schedule may be displayed for more than one week. 9.Click on the icon 10.The displayed beginning and end hours are default settings, you can manually change the beginning and end hours of the work shifts, if needed. 11.If you choose the ''Non available'' option, click on the arrow to the right of the column to display the list of reasons for unavailability. 12.Make a choice among the proposed options. 13.Click on
Modification or removal of availability
•In one or both sections of the window, select the shift or day to be modified. •Enter the changes and click on •To erase the availabilities for an entire day, click on the icon •To erase the availabilities for a work shift, click on the dial and choose the option ''Not specified''.
|

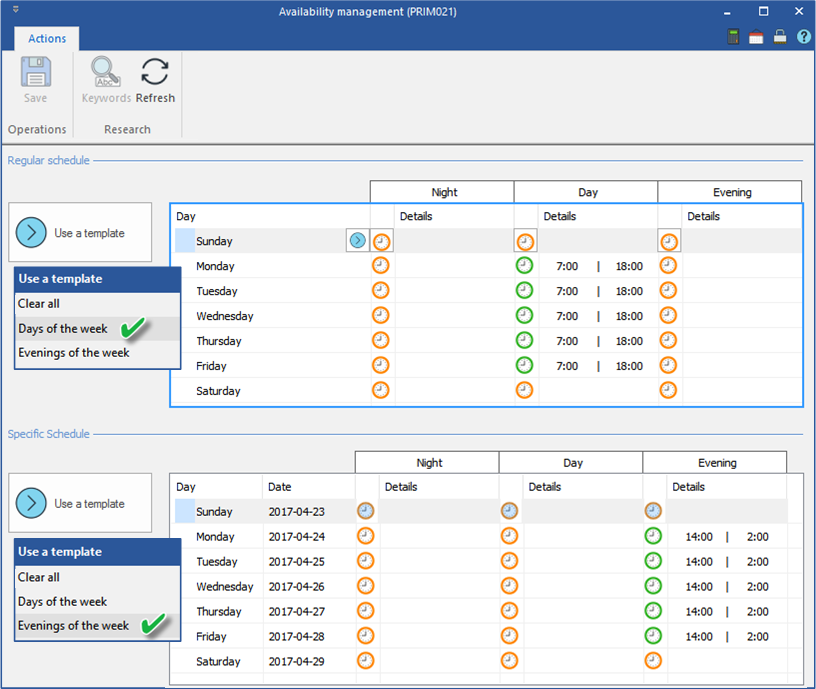
Use a template
Some templates are available to facilitate the registration of the availabilities of your candidates. They are usually used at the registration of the regular schedule.
In the example below, we will use the template ''Days of the week'' for the regular schedule and the template ''Evenings of the week'' for the specific schedule.
The candidate has changed his availability for a whole week, he will not be available for day shifts, but will be available for evening shifts. In this situation it is possible to use a template to speed up the entry.
1.Open the ''Availability management'' window. 2.In the section ''Regular schedule'', click on 3.The availabilities are automatically added. 4.Repeat the operation for the ''Specific schedule''. This schedule will have priority for the selected dates.
|
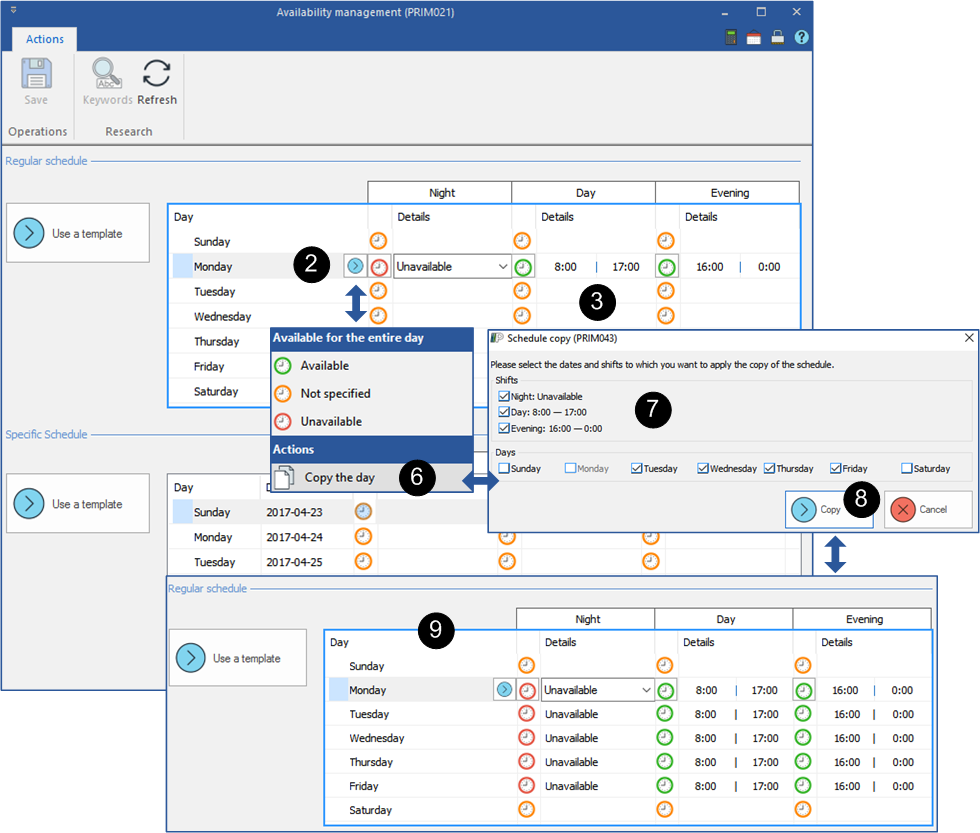
Copy the availability of the usual schedule to speed up data entry
The possibility of copying the availabilities of a candidate is useful at the creation of its file.
In the example below, the availabilities registered for Monday will be copied for the whole week.
1.Open the ''Availability management'' window. 2.In the section "Regular schedule", select Monday. 3.Register the candidate's availability for each shift, change the beginning and end hours, if needed. 4.Click on 5.You are still positioned on Monday, click on the icon 6.Check the shifts and days for which you want to apply the copy of the schedule. 7.Select the option ''Copy the day''. 8.Click on 9.The day of Monday is copied for the days that have been checked.
|
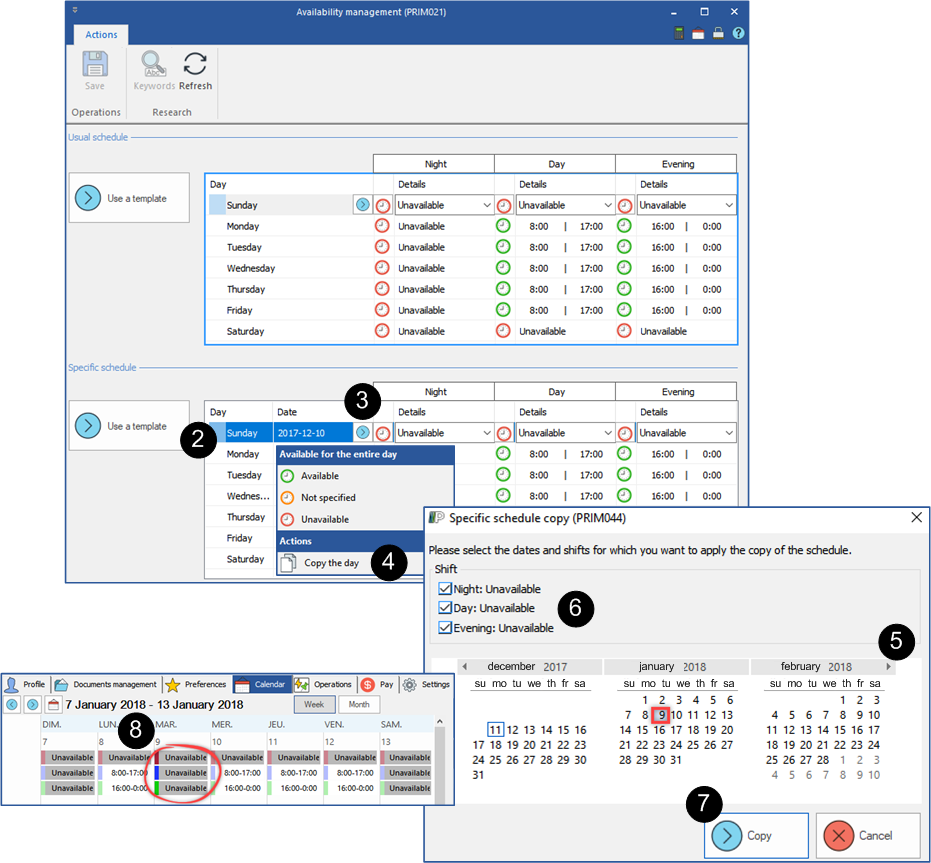
Copy the availability of the specific schedule for a specific date
A candidate notifies you that he will not be available for a specific date.
A quick way to add this availability is to use a specific availability already entered in the calendar and copy it for the date mentioned by the candidate.
In the example below, the day of Sunday will be copied for January 9th, 2018.
1.Open the ''Availability management'' window. 2.Select Sunday in the "Specific schedule" section. 3.Click on the icon 4.Select the option "Copy the day", the calendar is displayed. 5.If needed, use the navigation arrows to select the date. 6.Check the shifts for which you want to apply the copy. 7.Click on 8.Sunday is copied for the selected date.
|