Exportations de PRIM vers QuickBooks Desktop
To set up data exports from PRIM Logix to Quickbooks, a series of initial checks must be carried out.
PRIM Transfer codesYour export codes should reflect your item codes used in QuickBooks. To configure your export codes, follow these steps: 1.Go to the “System” ribbon 2.Click on the “Settings” button 3.Go to the “Transfer codes” tab You will have to create a mapping of PRIM’s codes vs QuickBooks services and payroll items.
Invoice types1.Create a new line in the list 2.Select “Invoice type” 3.Description: give a name that represents this item 4.Transfer code: give the exact name used in QuickBooks for this service (case sensitive) 5.Save 6.In the sub list on the right part of the tab: check all the items that should go under this service in QuickBooks. 7.Save
Note: In the basic template of invoice export, PRIM does not export the tax amount to QuickBooks. This could result in slight differences of tax amounts, due to rounding techniques that can differ between the two systems. Adjustments could be needed if you want to balance the taxes exactly.
Invoice Codes1.Create a new line in the list 2.Select “Invoice code” 3.Description: give a name that represents this item 4.Transfer code: give the exact name used in QuickBooks for this service (case sensitive) 5.Save 6.In the sub list on the right part of the tab: check all the items that should go under this service in QuickBooks. 7.Save
Salary types1.Create a new line in the list 2.Select “Salary type” 3.Description: give a name that represents this item 4.Transfer code: give the exact name used in QuickBooks for this service and payroll item (case sensitive). (Important note: in the basic export template for the Time Tracking: PRIM uses the same name to fill in the service and payroll item. If your QuickBooks configuration differs from that, please advise your integrator)
Pay codes1.Create a new line in the list 2.Select “Salary code” 3.Description: give a name that represents this item 4.Transfer code: give the exact name used in QuickBooks for this service and payroll item (case sensitive) (important note: in the basic export template for the Time Tracking: PRIM uses the same name to fill in the service and payroll item. If your QuickBooks configuration differs from that, please advise your integrator) Important note: the pay codes used to transfer to QuickBooks can only be hours. Since QuickBooks allows only import of Time Tracking, and not payroll it can not import anything else than hours.
Payment type1.Create a new line in the list 2.Select “Payment type” 3.Description: give a name that represents this item 4.Transfer code: give a code that represents this item. Important note: exceptionally, the export template passes the name of the payment method, and not the “Transfer code”. It is therefore important to verify that the payment methods are named accordingly to QB terminology. To modify your payment method labels in PRIM, follow these steps: 1.“PRIM” ribbon 2.“Settings button” 3.“Incoming payment” tab 4.Click on the translation icon (purple chat bubble) and update the description 5.Save
Important step when your transfer codes are insertedOnce you have entered all your transfer codes, it is crucial that you proceed with this step: -Click on the button “Update the export configuration” located in the bottom left corner of the “Transfer codes” tab.
PRIM Export templatesYour export templates should be setup with the QuickBooks Protocols. Contact your integrator to obtain the export templates.
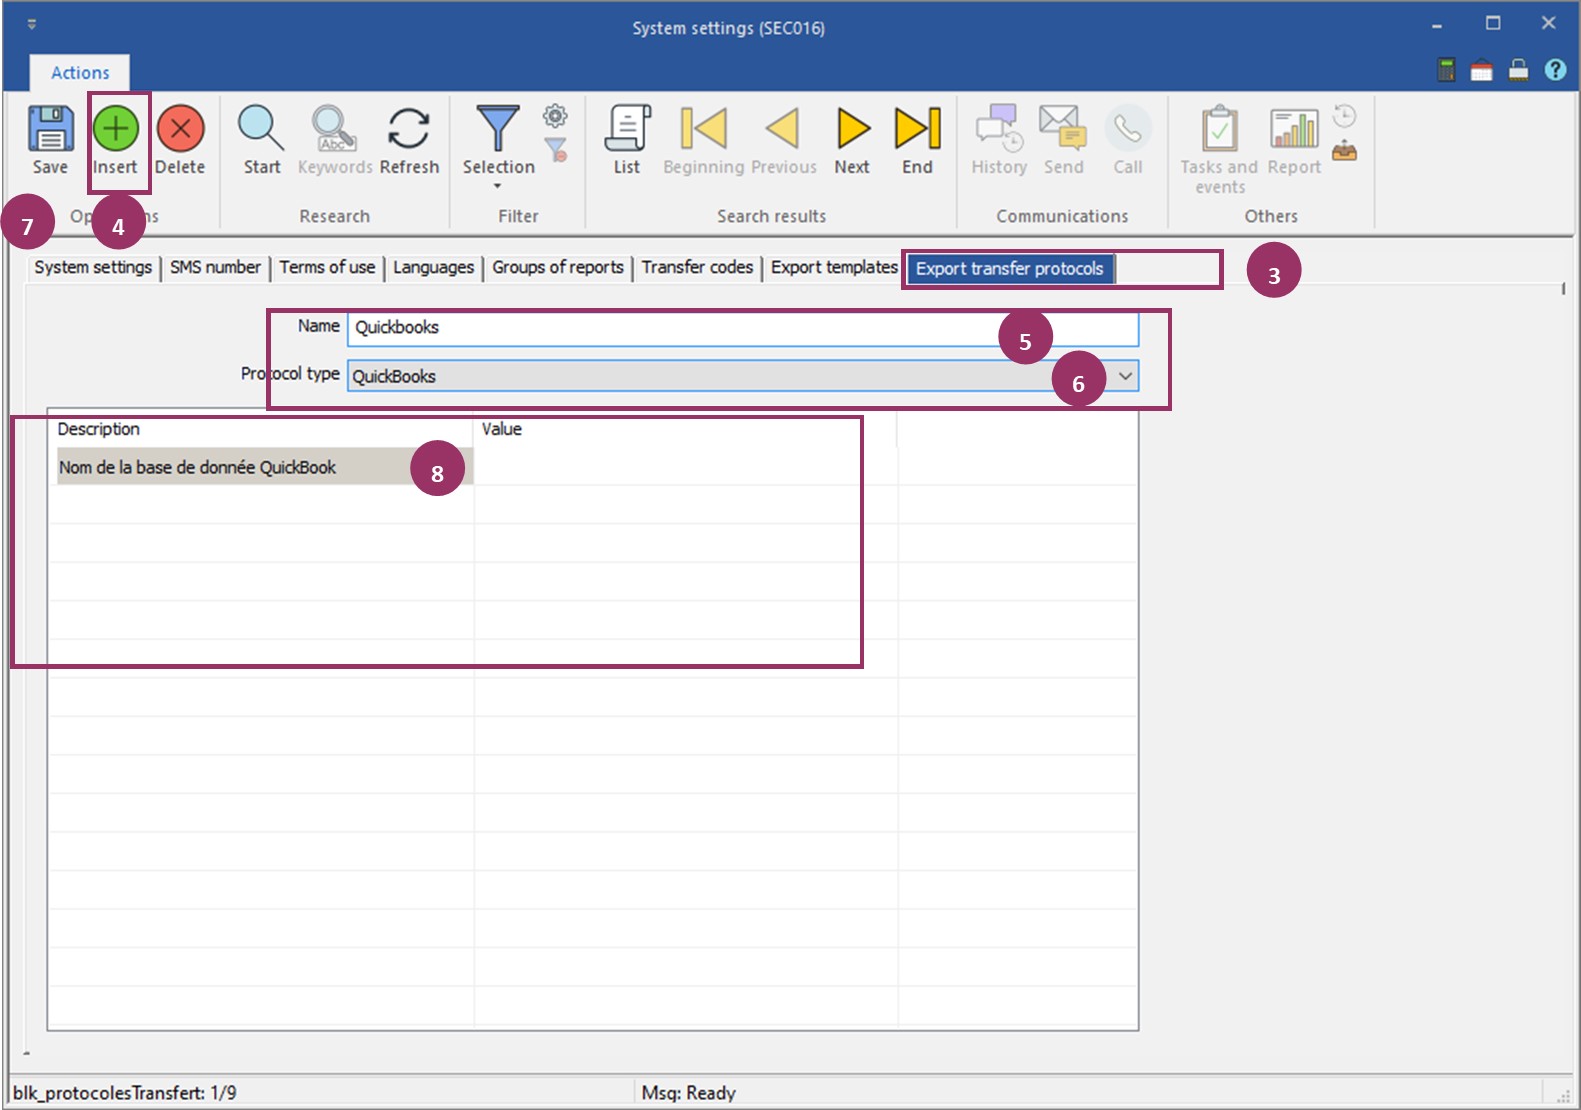
Protocols setupsEach division may export in a different QuickBooks database. We need to setup a transfer protocol for each QuickBooks database in which we will need to transfer data. 1.“System” ribbon 2.“Settings” button 3.“Export transfer protocols” tab 4.Click on “Insert” 5.Name: give a name to the protocol (it could be “QuickBooks – Name of the division”) 6.Protocol type: select “QuickBooks” 7.Save 8.On the line “QuickBooks database name”, enter the full path of the QuickBooks database for the division you are setting up 9.Save 10.Repeat for every QuickBooks database
Divisions setupsFor each division, we have to setup what template to use for each data type. 1.“PRIM” ribbon 2.“Division” button 3.“Settings” tab 4.“Exportat” subtab 5.Candidate: a.Template: select “QuickBooks – Candidate (EmployeeAdd)” template b.Protocol: select the QuickBooks protocol for the division 6.Client: a.Template: select “QuickBooks – Clients (CustomerAdd)” template b.Protocol: select the QuickBooks protocol for the division 7.Invoice: a.Template: select “QuickBooks – Invoice” template b.Protocol: select the QuickBooks protocol for the division 8.Pay: a.Template: select “QuickBooks – Payroll (Time Tracking)” template b.Protocol: select the QuickBooks protocol for the division 9.Incoming payment: a.Template: select “QuickBooks – Receive Payment” template b.Protocol: select the QuickBooks protocol for the division
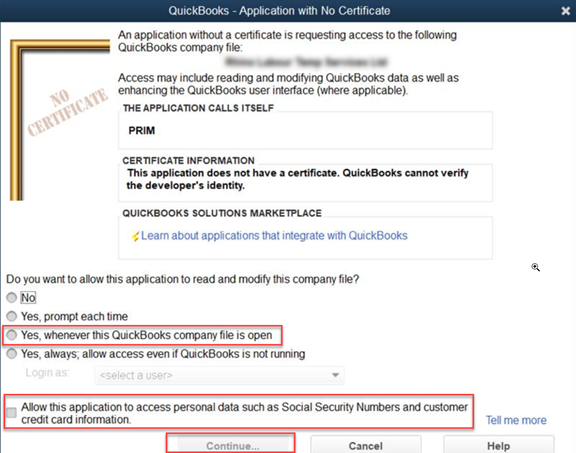
Repeat these steps for every division. For each QuickBooks company file – Give access to PRIMYou need to give access to PRIM to connect to QuickBooks, for each of your company files. 1.Log in PRIM 2.Log in QuickBooks as an administrator, in single user mode 3.Try to export one record (a candidate, for example) (see article about exporting candidates in the online help documentation) 4.There will be a popup from QuickBooks to authorize the connection between PRIM and QuickBooks: a.Click “Yes, whenever this QuickBooks company file is open” b.Click “Allow this application to access personal data such as Social Security Numbers and customer credit card information c.Click “Continue”
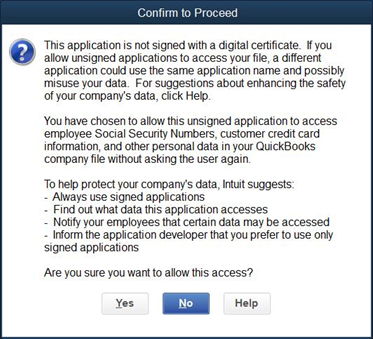
5.There will be a prompt for confirmation a.Click “Yes”
6.There will be an access confirmation message b.Click “Done”
|
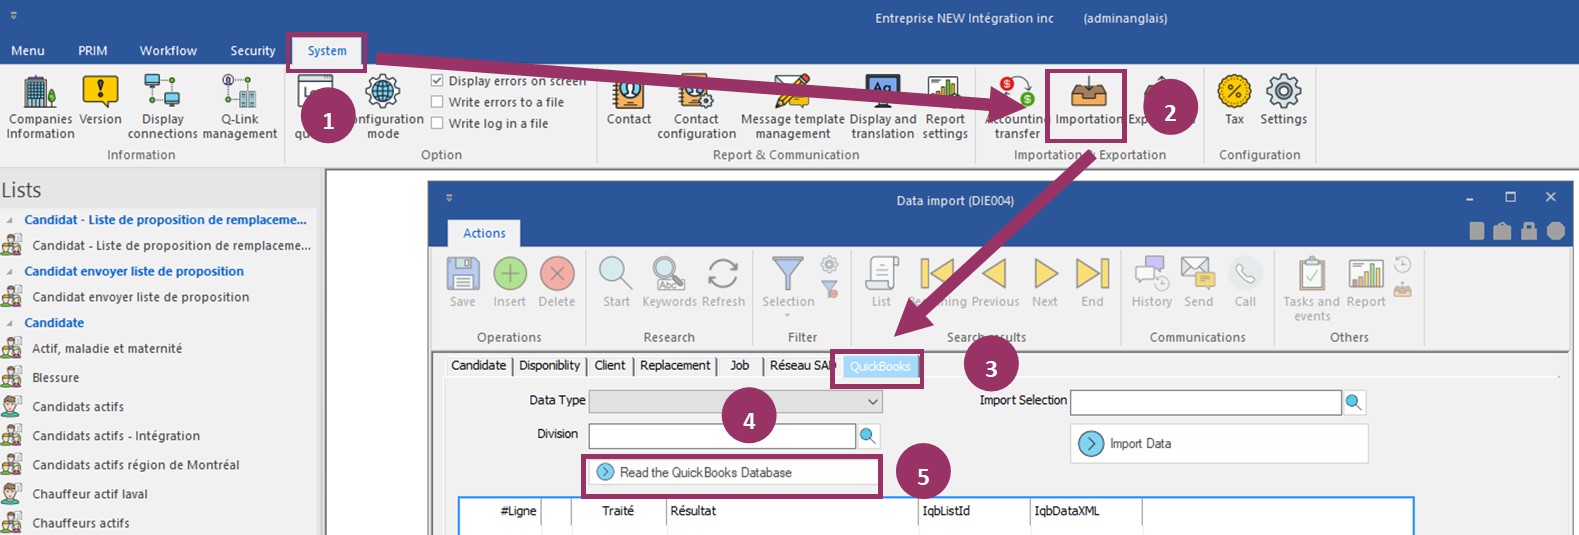
PRIM has a list of candidates and a list of clients. QuickBooks also has these lists. The ID that QuickBooks uses is hidden from the users. To map the lists between the two systems, we need to do this initial manipulation: 1.“System” ribbon 2.“Import” button 3.“QuickBooks” tab 4.Fill these fields: a.Data type: “Candidate” b.Division: Select the division of your choice 5.Click on “Read QuickBooks database” 6.Click on “Import data”. This will simply import QuickBooks list ID into PRIM for each candidate we found a match. 7.Repeat steps 4, 5 and 6 for each division 8.Fill these fields: a.Data type: “Client” b.Division: Select the division of your choice 9.Click on “Read QuickBooks database” 10.Click on “Import data”. This simply import QuickBooks list ID into PRIM for each client we found a match. 11.Repeat steps 8, 9 and 10 for each division
|
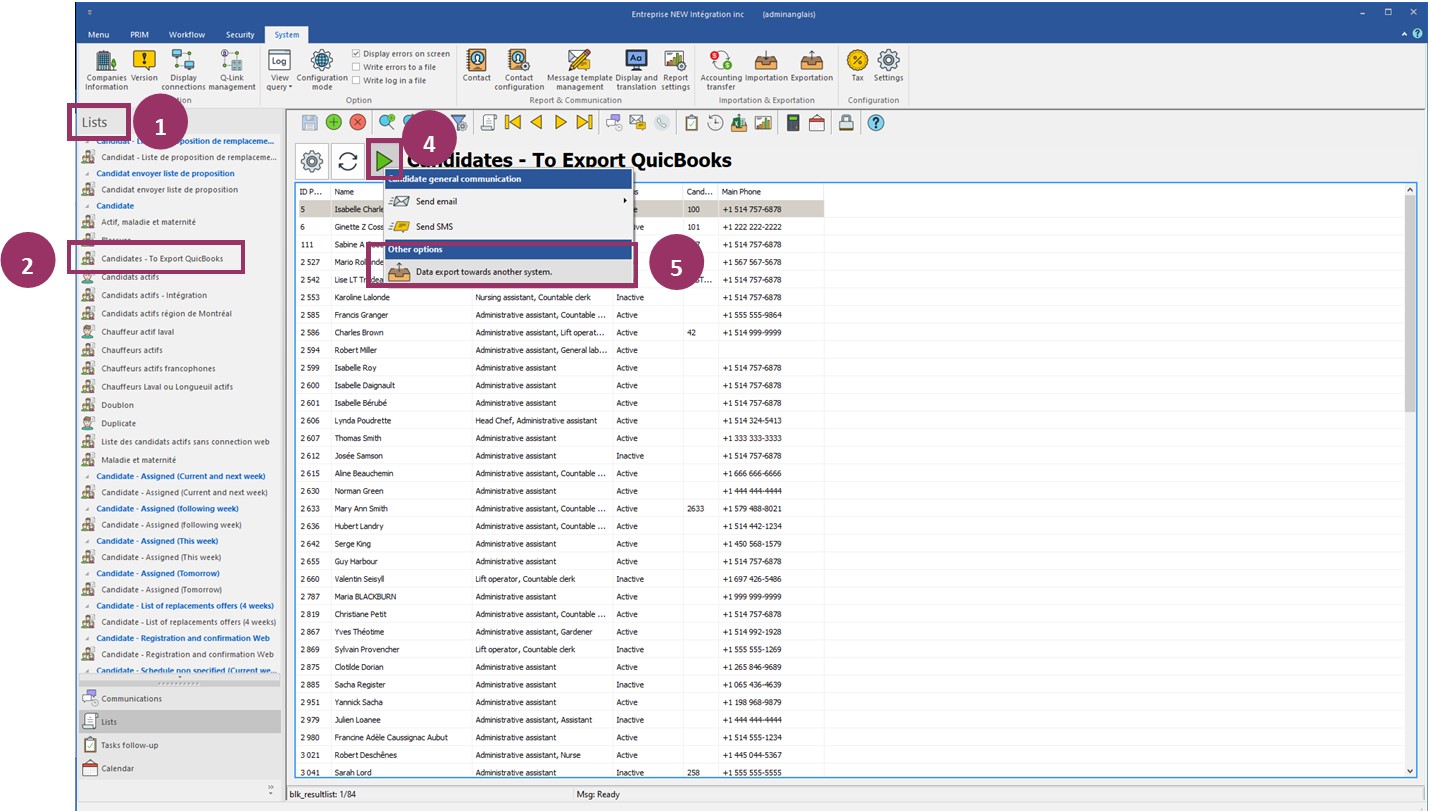
Export of CandidatesThe list “Candidates – To export” displays the candidates that changed since the last export to QuickBooks, and the new candidates that need to be exported to QuickBooks. 1.“List” pane 2.Click on “Candidates – To Export” 3.Filter the list to show candidates of your division 4.Click on the action arrow 5.Select “Data export towards another system” 6.Select the division 7.Select all candidates by clicking in the checkbox in the header of the list 8.Click on “Export” This operation should be done everyday that a payroll needs to be processed.
Export of ClientsThe list “Clients – To export” displays the clients that changed since the last export to QuickBooks, and the new clients that need to be exported to QuickBooks. 1.“List” pane 2.Click on “Clients – To Export” 3.Filter the list to show clients of your division 4.Click on the action arrow 5.Select “Data export towards another system” 6.Select the division 7.Select all clients by clicking in the checkbox in the header of the list 8.Click on “Export”
This operation should be done everyday that invoices need to be processed.
Export of InvoicesRefer to the online documentation to learn how to export invoices.
Export of PaymentsRefer to the online documentation to learn how to export payments.
Export of Time TrackingRefer to the online documentation to learn how to export time tracking.
|
Before exportingMake sure that all windows in QuickBooks are closed before exporting data from PRIM to QuickBooks. When errors occurWhen an export is done, it is essential to verify if there was an error in the “result” column. If so, it may have occurred at the beginning, in the middle or at the end of the process. QuickBooks may have received part of the info. The user should verify what was transferred in QuickBooks and take the appropriate action to complete the |
*Time tracking enabling
|
||||||||||||||||||||||||||||||||||||


