Tab - Availability
This tab allows the addition or the modification of an availability template to facilitate the management of the availabilities of your candidates.
Open a ''Settings'', window, move under the ''Availability'' tab.
 Availability templates per shift
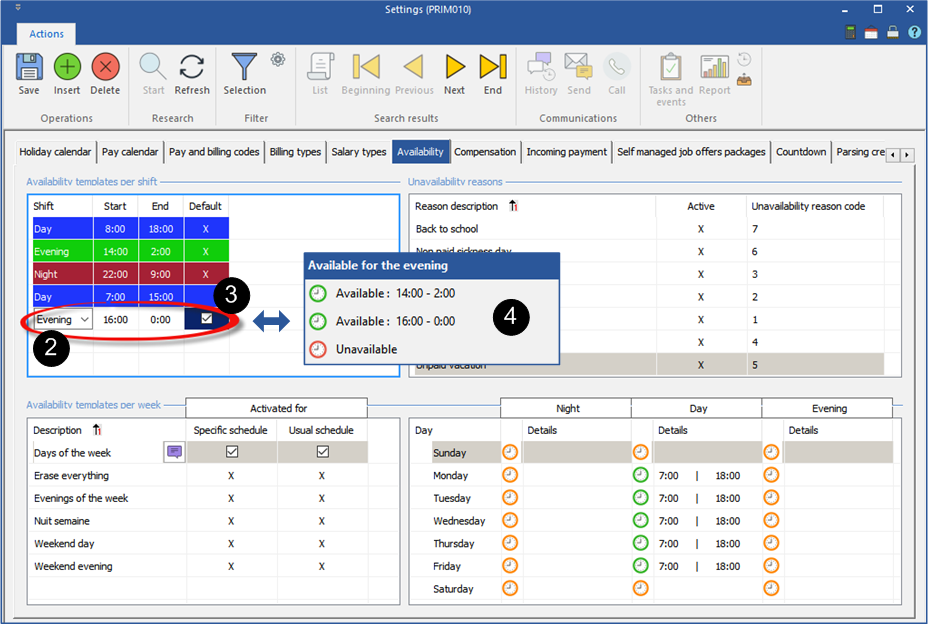
The section ''Availability templates per shift'' displays the beginning and end hours for each of the work shift.
It is possible to add new templates, they will be added in a list and could be selected for you to add an availability template per week.
1.Click on a blank line to add a new item. 2.Select the work shift, enter the beginning and end hours. 3.If you check the box in the ''Default'' column the beginning and end hours of this new template will be displayed at the selection of availabilities for an entire day. 4.If the box is not checked, this template will be added in a list of choices for the beginning and end hours of a work shift. 5.You can delete a template, if it is not the template to use by default. 6.Click on
|
 Add an availability template per week
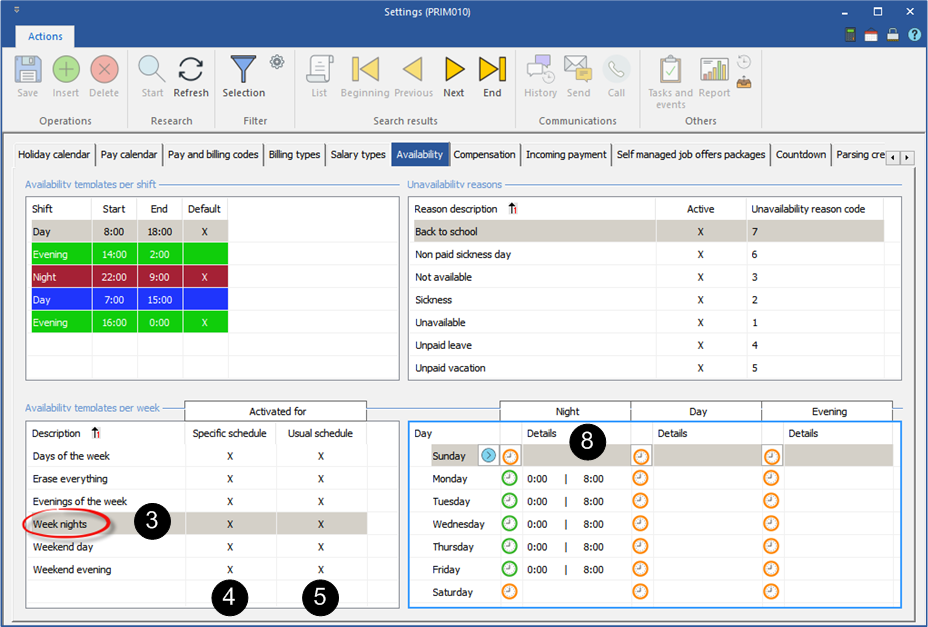
In the example below, we will add a new template to the list, ''Week nights''.
1.Move in the section ''Availability templates per week''. 2.Click on a blank line in the main zone or click on the icon 3.In the column ''Description'', enter the name of your template. 4.Check the box in the ''Specific schedule'' column if the template is going to be used to change the specific availabilities of your candidates (for a particular date). 5.Check the box in the ''Regular schedule'' column if the template is going to be used to change the usual availabilities of your candidates. 6.Click on 7.In the section at your right, click on the dial of the night shift to display the list of choices. 8.For each day (in our example, from Monday to Friday) and for each work shift (in our example, night), click on the arrow 9.If needed, change the beginning and end hours of the work shift or choose a template in the list. 10.Click on
|
 Add an unavailability reason to the list
In the example below, we will add a new item to the list, ''Back to school''.
1.Move in the section ''Unavailability reasons''. 2.Click on a blank line in the main zone or click on the icon 3.In the column ''Reason description'', enter a brief description. 4.The box of the ''Active'' column must be checked to display the item in the list. 5.PRIM will automatically add a code in the column ''Unavailability reason code'' when you save. 6.Click on
|


