Tab - Pay and billing codes

Contents
This tab allows to add or modify a pay code, a billing code or a pay and billing code. To customize these codes in the bottom section of the window, consult the ''Accounting'' unit.
Here some examples:
Pay code - A bonus offered by the agency and paid to candidates who accept a double shift.
Billing code - Invoicing to the client for a job posting by the agency.
Pay and billing code - A night bonus granted to candidates who accept a night work shift, the bonus will be paid to candidates and billed to clients.
![]() Some columns in this list are configurable by our integration team and will not be explained, nor will the addition of codes automatically in your requests.
Some columns in this list are configurable by our integration team and will not be explained, nor will the addition of codes automatically in your requests.
![]() For data entry, click on the icon
For data entry, click on the icon ![]() (Edit), on the icon
(Edit), on the icon ![]() (Translation) or enter data directly in the field.
(Translation) or enter data directly in the field.
![]() For some codes, it is possible to select more than 2 decimal places in the rate accuracy columns.
For some codes, it is possible to select more than 2 decimal places in the rate accuracy columns.
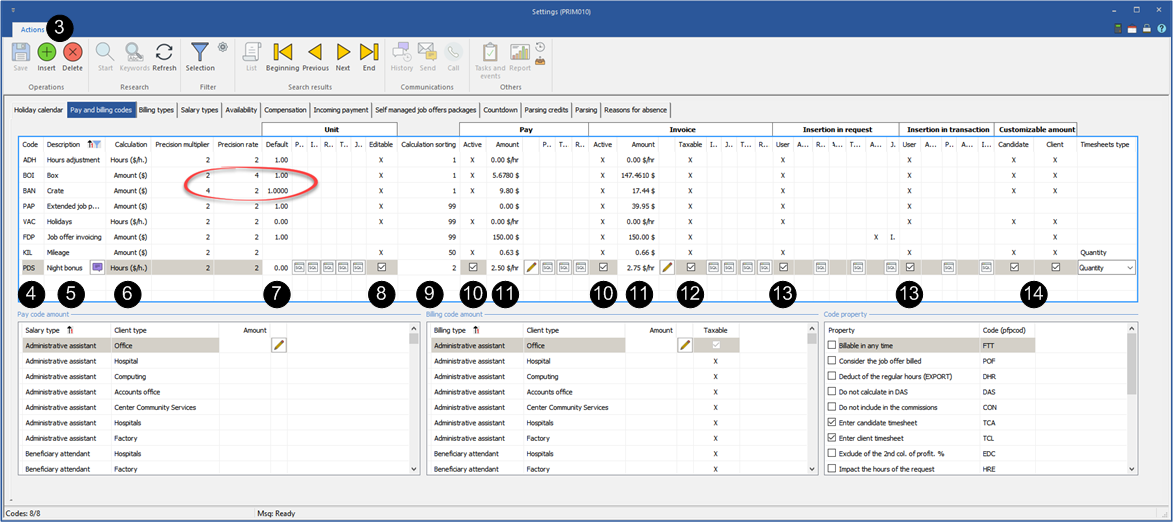
In the example below, we will add a new pay and billing code, a night bonus, which will be manually added to your transactions.
1.Open a ''Settings'' window.
2.Move under the ''Pay and billing codes'' tab.
3.Click on a blank line in the main zone or click on the icon ![]() (Insert) to add a new record.
(Insert) to add a new record.
4.In the ''Code'' column, enter a new 3 characters code.
5.In the ''Description'' column, enter a brief description.
6.In the ''Calculation'' column, in the list of choices, choose the calculation option for this code, ''Hour'', ''Amount'' or ''Percentage''.
7.In the ''Default'' column, enter the quantity that will be displayed by default in the "Qty" column when this code is added to a request.
8.Check the box in the ''Editable'' column o have the option to modify the quantity entered in the "Qty" column when adding this code to a request.
9.In the ''Calculation sorting'' column, enter in which order the code will be calculated by PRIM. In the example, we have entered 2, this code will have priority over another code with order 1, but regardless of the order, the codes added in this section always have priority over the usual hourly rate.
10.The boxes which are checked in the ''Active'' column in the sections ''Pay'' and ''Invoice'' indicate that the added code is active in the section where the box is checked.
11.In the ''Amount'' column of the sections ''Pay'' and ''Invoice'', enter the amounts to add to the basic hourly rate.
12.The box ''Taxable'' is checked by default in the section ''Invoice'', you can uncheck it if you want.
13.Check the box in the ''User'' column of the sections ''Insertion in request'' and ''Insertion in transaction'' to allow modification of the code from the request (replacement, term or job offer) or the transaction (pay or invoice).
14.Check the box in the ''Candidate'' and ''Client'' column in the section ''Customization amount'' to allow the code rate to be changed from the files, "Candidate" and "Client".
15.The rates can be customized in the lists at the bottom of the window according to the “Invoice” type or the “Pay” type and the client type.
16.Click on ![]() (Save).
(Save).