Create a grouped replacement
The creation of a grouped replacement is done from the window "Grouped replacements".
![]() PRIM offers 3 locations to open this window and add a grouped replacement:
PRIM offers 3 locations to open this window and add a grouped replacement:
•"Quick actions" menu of the "Client" window
•"Operations" tab - sub-tab "Replacements" of the "Client" window
•"Grouped replacement" window in the "Request" section of the PRIM ribbon
 Create a grouped replacement
You have a request for several replacements of the same type for a more or less long period of time, creating a grouped replacement is a good solution.
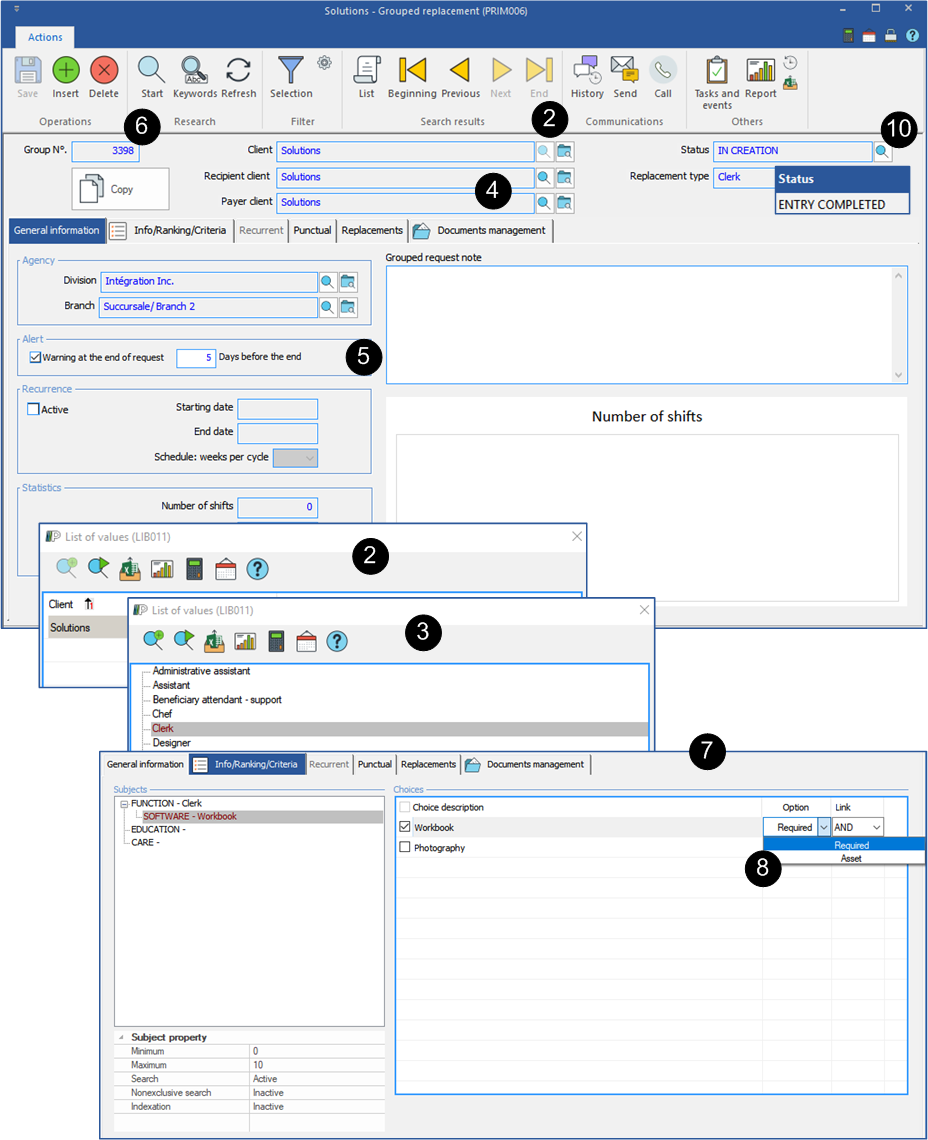
1.Open a "Grouped replacement" window, to create a new request, click on the icon 2.Click on the icon 3.The "Selection of values" window is displayed, select the type of replacement among the suggested list, click 4.The information related to the recipient and payer clients comes from the relations added to the client's file, use the icon 5.In order for a task to remind you to follow up with your client a few days before the end of the request, check "Warning at the end of the request" and enter the number of days in the box. 6.Click on the icon 7.Move under the tab "Info/Ranking/Criteria", choose and check the options that apply to your request. 8.Check if the criteria and options checked are required or considered an asset. Make changes if necessary. 9.Click on the icon 10.The entry of the criteria for this grouped replacement is completed, click on the magnifying glass and choose "Entry completed". 11.The grouped replacement becomes "Assigning".
|
 Add punctual requests
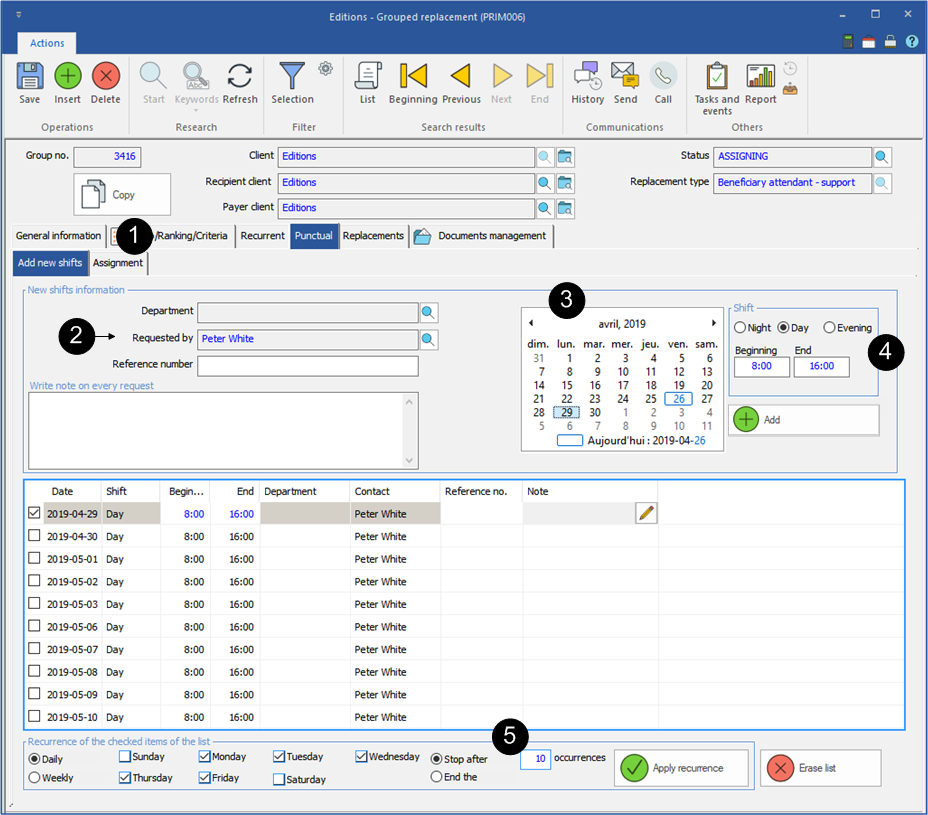
The example below illustrates the addition of punctual requests in a group for a period of 2 weeks.
1.Move to the "Punctual" tab and the "Add new shifts" sub-tab to create replacements. 2.If necessary, select a department, a contact, add a reference number and a note.
3.Use the calendar to select the date. 4.Check the shift and change the beginning and end times, if necessary. Click on 5.You can create replacements individually or use the recurrence to add replacements more quickly. 6.Click on the icon 7.You will find the replacements under the "Replacements" tab.
|
 Add a recurrence
A recurrence in a replacement is the repetition of a schedule established on a cycle of 1 to 4 weeks.
Here are two examples:
•A client asks for a candidate with a day schedule for the first week and an evening schedule for the second week, for a period of approximately 2 months, without a known end date. •A client makes a request for 2 weeks and would like a specific candidate for all the work shifts. However, this candidate is not available for all those work shifts, you can replace him to completely fill the request.
You are still in grouped replacement file in creation.
To activate the recurrence, move to the "General Information" tab.
1.Check the box "Active". 2.Enter the starting date of the recurrence. 3.If it is known, enter the end date of the recurrence. 4.Specify the number of weeks per cycle. 5.Click on the icon
|
 Categories
In a grouped replacement, a category is a set of schedules or shifts.
A candidate is assigned to a category rather than a schedule or shift. If there is only one category, the selected candidate will be assigned to all shifts in the group
If it is necessary to assign more than one candidate to a group, you must create additional categories, for example:
•In the same day, the request includes a day shift, from 8 h to 11 h and an evening shift, from 17 h to 20 h. Two categories are needed. •On the same day, the request includes a day shift, from 7 a.m. to 10 a.m. and from 2 p.m. to 5 p.m. Two categories will be required if the same candidate cannot be assigned to both schedules. •If there are multiple types of services to give according to the day of the week, and we would like to assign different people depending on the care to give. Multiple categories are needed. •The service must be given in three different departments according to the schedule, and we would like to assign different people according to the departments. Three categories are needed. •There will be two work shifts in a day, one during the day and one during the evening for the classification. Two categories are needed.
You are still in the grouped replacement file, under the “Recurrence” tab.
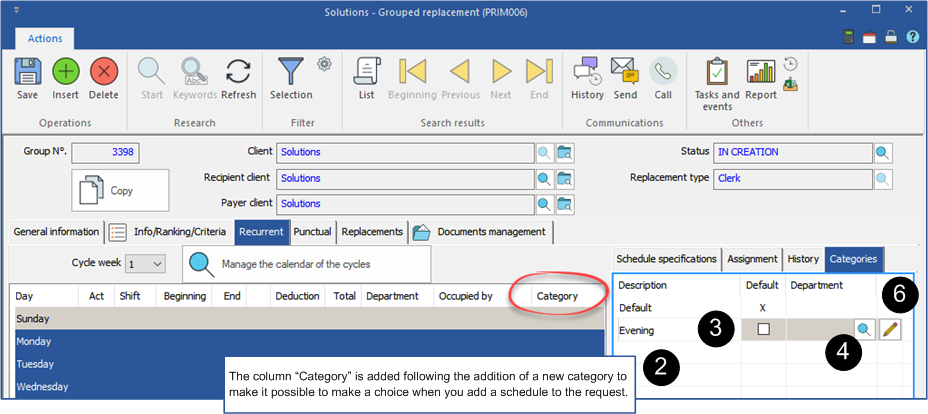
1.Move to the tab "Categories". 2.Click in the area to insert a line. 3.Assign a name to the new category. For example, evening. 4.If applicable, click the icon 5.Click on the icon 6.If applicable, click the icon 7.Click on the icon
|
 Schedule in the recurrence
Each week up to the end date of the grouped replacement, PRIM will create replacements according to the schedule that you have registered.
If you have not entered an end date, PRIM will continue to create new replacements until you specify an end date.
You are still in the grouped replacement file, under the "Recurrence" tab.
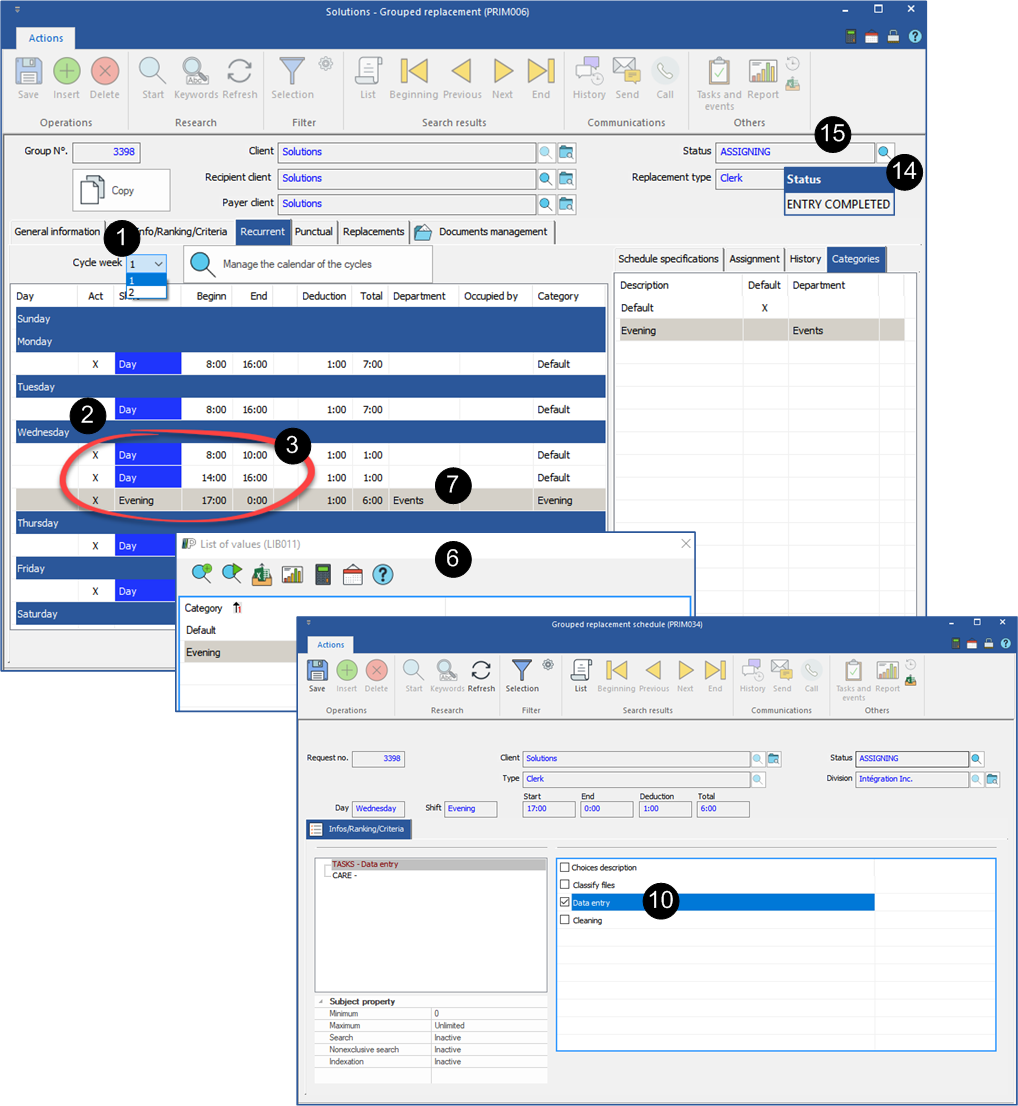
In the example below, we will add a schedule which will be repeated every 2 weeks.
1.Select the week for which you want to add a schedule. It is preferable to start with the week 1 of the cycle. 2.Select a day and click on the icon 3.Repeat this operation to complete this day schedule. 4.You can change the start and end hours if they are different from the proposed schedule. 5.If applicable, select a record, click on the icon 6.Choose a category, click on 7.If applicable, select a record, click on the icon 8.Click on 9.If there are services to specify for this schedule which are not checked in the category, move to the tab "Schedule specifications". 10.Under this tab, click on 11.Repeat these operations for the second week to complete your schedule.
12.Click on 13.Close the window. 14.When the schedule is completed for the two weeks, click on the icon 15.The status of the grouped replacement will change from "In Creation" to "Assigning". 16.The replacements will be displayed under the "Replacements" tab.
|
 Add a specific request in a recurrence
It is possible to easily add one or several specific requests to a grouped replacement. This request has no recurrence and will not be duplicated as other replacements of the group.
You are still in the grouped replacement file, under the “Punctual” tab.
1.Move to the tab "Add new shifts". 2.Fill in the information in the section "New shifts information". 3.In the calendar, select the date. 4.Select the shift and change the start and end hours, if applicable. 5.Click on 6.Repeat the operations 2, 3, 4 and 5 if necessary. 7.If the additions are convenient , click on the icon 8.You will find them under the tab "Replacements".
If needed, see "Create a batch request" for more details.
|


