|
WARNING: This section is intended for advanced users and "Super users" of PRIM Logix.
The configuration items presented in this section may indeed have an impact on your operations.
If in doubt, consult your system administrator.
Please note that only users in the appropriate security groups can access the software configuration windows. |

Geolocated Punch settings - Division
The geolocated punch allows the candidate to indicate when they have started or finished their shift using a geolocated punch on the Web portal. In addition, if the function is activated, the candidate will also be able to indicate their movements within a shift. This will allow you to see not only when a candidate started and ended their shift, but also where they were at the time of data entry during their various movements.
 A range can be set for the geolocation, allowing you to quickly see if the candidate was in the right place. If not, a visual indicator
  will be displayed on the timesheet and the entry will be in red in the report.
Default values have been built into the basic configuration and are applied at the division level. However, you have the option to customize these settings at the division or client level. If custom settings have been defined at the division AND client level, the client settings will prevail.
In order to access and change these settings.
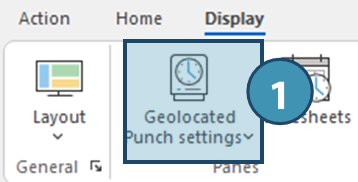
1.In the Display ribbon of the relevant window (Division or Client), clickon Geolocated Punch settings in order to display the corresponding pane.
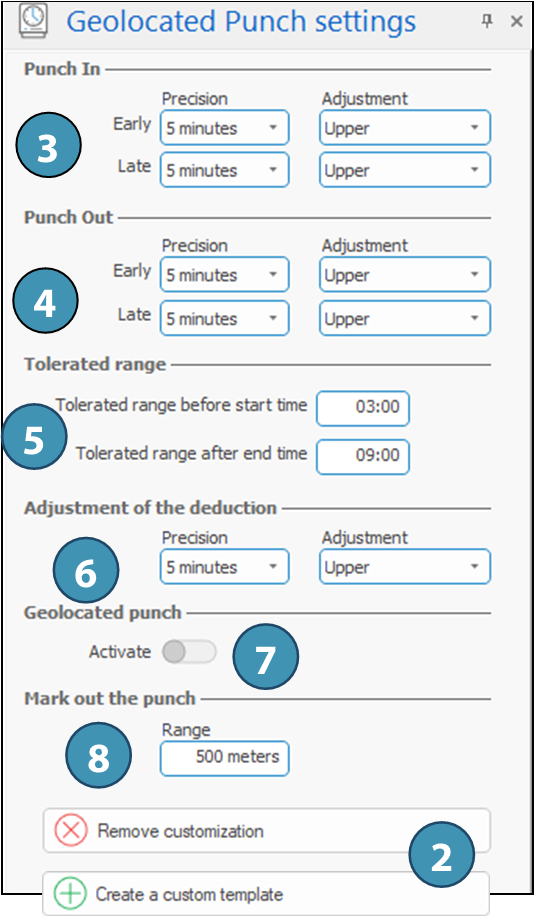
2.In Geolocated Punch settings pane, click on Create a custom template.
When a custom template is created, default values will display and the button used to create will change to Remove customization.
If there is no customized template at the client level, settings of the division will be used.
3.To change the values for precision and adjustment (rounding) that will be applied on start time for the shift, change the corresponding values under Punch in.
4.To change the values for precision and adjustment (rounding) that will be applied on end time for the shift, change the corresponding values under Punch out.
5.To specify how much time before or after a shift a candidate can use the punch, indicate the Tolerated range before start time and Tolerated range after end time.
6.To specify the adjustment (rounding) of the deduction that will be applied to breaks, if applicable, change the corresponding values under Adjustment of the deduction.
7.To activate the geolocated punch during a shift for situations where a candidate has to move push the Activate toggle to the right.
8.Specify the acceptable range for localization.
9.Click on Save in Home ribbon.
Outside the tolerated range, the candidate will not see, and therefore will not be able to use the punch, but he will still be able to enter time in the timesheet.
The candidate will be able to use the punch even if he/she is not within the indicated radius. However, if this is the case, a visual indicator will be displayed on the timesheet and the entry will be in red in the report.