|
Navigation: Training plan > Section 4 - Agency > Window - Division Division settings |
Scroll Prev Top Next More |
|
WARNING: This section is intended for advanced users and "Super users" of PRIM Logix.
The configuration items presented in this section may indeed have an impact on your operations.
If in doubt, consult your system administrator.
Please note that only users in the appropriate security groups can access the software configuration windows. |
This section is under construction and some items may be missing from the online help. However, you can refer to the corresponding pages of the online help of version 4.60. Although the interface has changed, the missing items are basically working the same way.
Division settings
 Settings tab / Sub-Tab - General
.
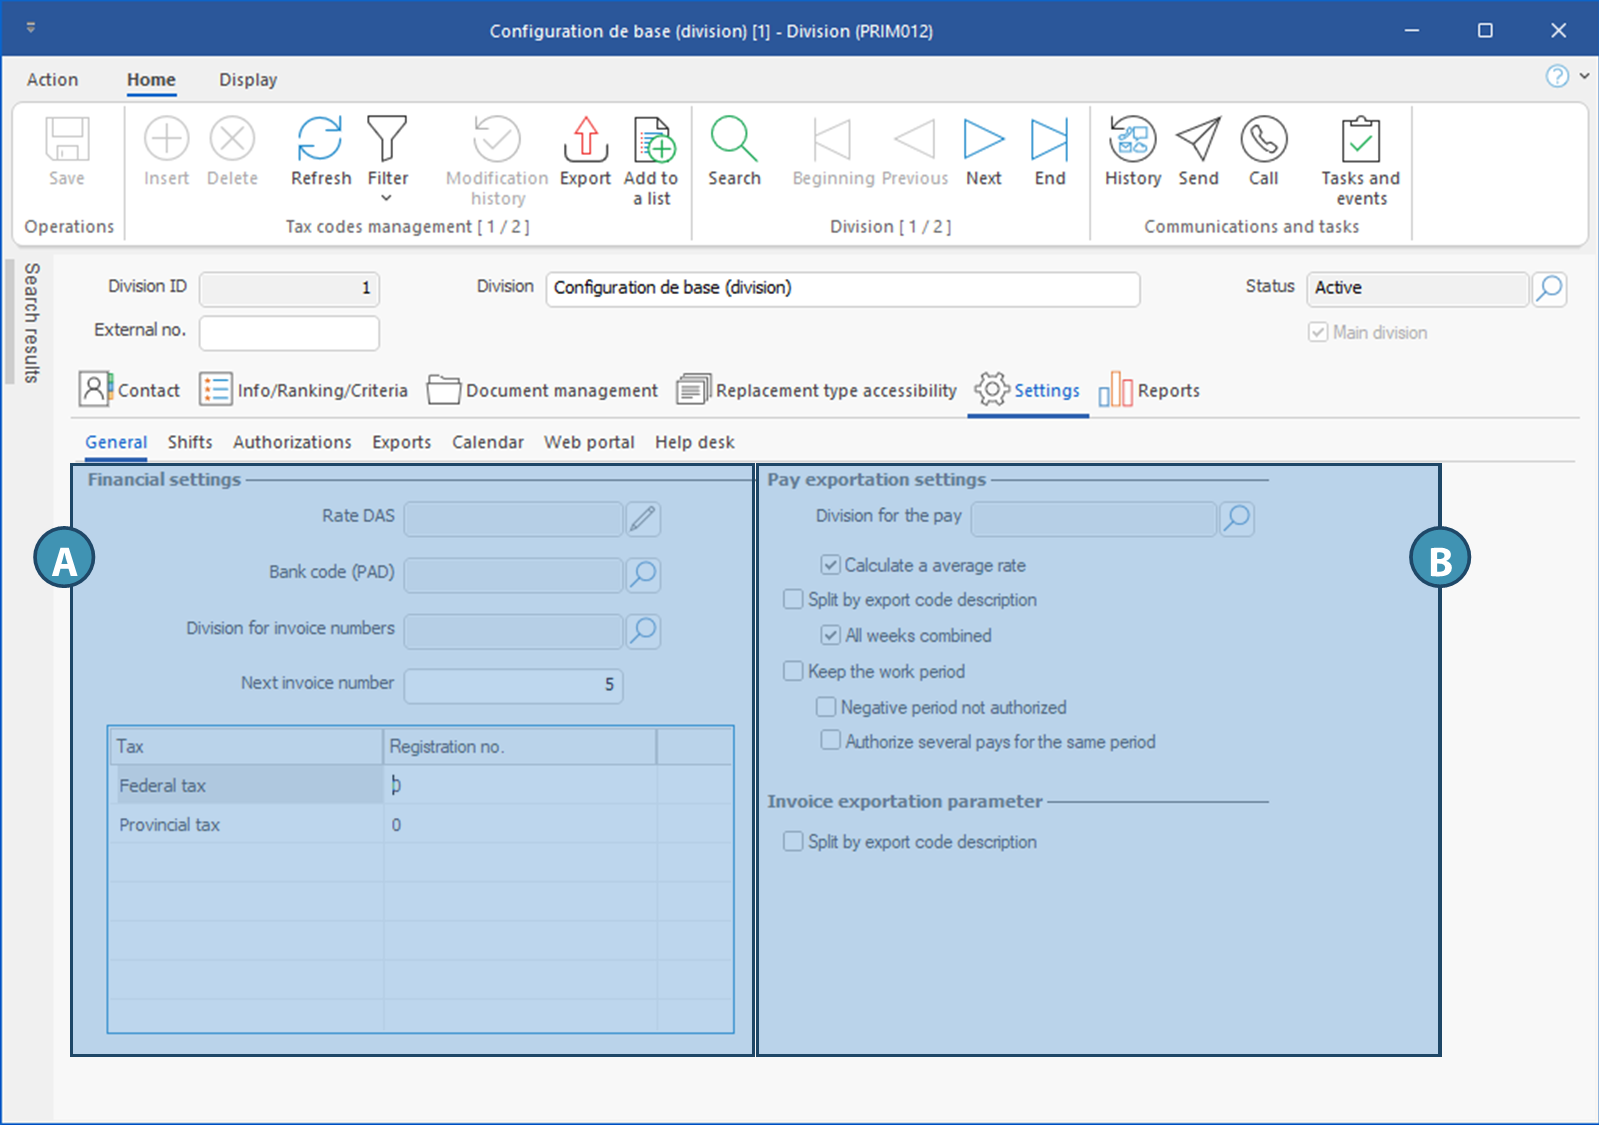
This sub-tab contains some configuration items for your divisions, especially financial and pay/invoices exportation settings.
A.Financial settings •Rate DAS: Rate to be registered manually for deductions at source. •Bank code (PAD): Code to select in a list, for the pre-authorized debits. •Division for invoice numbers: If this field is empty, the division will have its own range of invoice numbers. If another division has been selected, PRIM will use the invoice numbering of this other division
•Next invoice number: The next invoice will be assigned with the number displayed in this field. •Enter the tax registrations numbers here, if this division holds different tax numbers.
B.Pay and invoices exportation settings
•Division for pay If a company has several divisions, it is possible to specify which division will be responsible for paying the candidates' pay. If a division is responsible for its own payroll, leave this field blank.
•Calculate an average rate If this box is checked, the rate displayed on export will be the average hourly rate paid to the candidate. For example, for a pay period, a candidate worked 10 hours at an hourly rate of $20 and 10 hours at an hourly rate of $30. The export data will display 20 hours at an hourly rate of $25. Otherwise, the data will display 10h at an hourly rate of $20 on one line and 10h at an hourly rate of $30 on the next line.
•Split by export code description (division selected for payroll) If this box is checked, the export function will split the amounts to be transferred with the same transfer code on several lines, according to the description associated to the code. If unchecked, all amounts associated with the transfer code, regardless of description, will be on the same line.
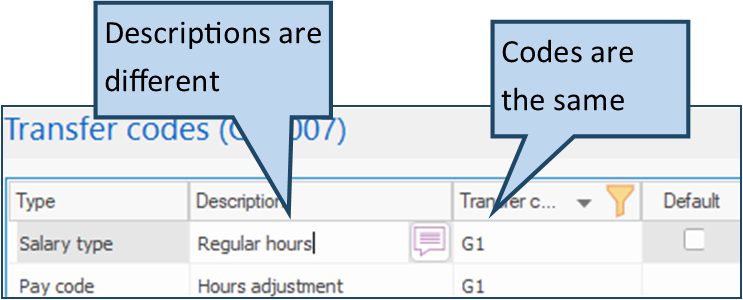
Example: In the example below, we will use the code G1 – Regular hours: In Transfer codes (CFG007) pane of the configuration window, we create 2 lines in the transfer codes with this code, since they are all regular hours (the hours worked in the request + any corrections to hours worked added to the bottom list in the "payroll and invoicing" tab of the request.)
In the case of a request that includes 8 hours worked + 1 hour adjustment:
The standard export behavior (if box is not checked) will be as follows:
PRIM exports 9 hours with code G1 (on a single line) :
Checking the box split by export code description, will therefore modify this behavior :
PRIM exports 8 hours with code G1 + 1 with G1 on 2 separate lines, as long as the descriptions are different in the transfer codes list within the division:
•All weeks combined If this box is checked, the export data will be displayed for each week of the pay period. For example, for a 2-week pay period, a candidate worked 35 hours each week at an hourly rate of $20. The export data will display 35 hours at an hourly rate of $20 on one line and 35 hours at an hourly rate of $20 on the next line. Otherwise, the data will display a total of 70 hours at an hourly rate of $20.
•Keep the work period If this box is checked, the exported dates will be linked to the pay period. For example, payroll for period 10 includes a correction for a request worked in period 7, and the export data will display the correction in payroll period 7. Otherwise, the correction will be included in pay period 10.
•Negative period not authorized If this box is checked, negative corrections will be included in the current pay period. For example, in period 10, which is the current period and has a total payable of $500, there is a negative correction of $50 related to a request worked in period 7, which will be applied to period 10, for a total of $450. Otherwise, the negative correction of $50 will be applied over period 7.
•Authorize several pays for the same period (division selected for payroll) If this box is checked, it will be possible to add several payrolls in the same period. The payroll(s) in a period must have the status "Completed" in order for PRIM to add new payrolls, otherwise the items will be added to a payroll with the status "In progress".
•Invoice exportation parameter
|
 Settings tab /Sub-tab - Shifts
In this sub-tab, you can define various settings relating to authorizations for shift types, double shifts, tolerance for schedule conflicts, and split shifts.
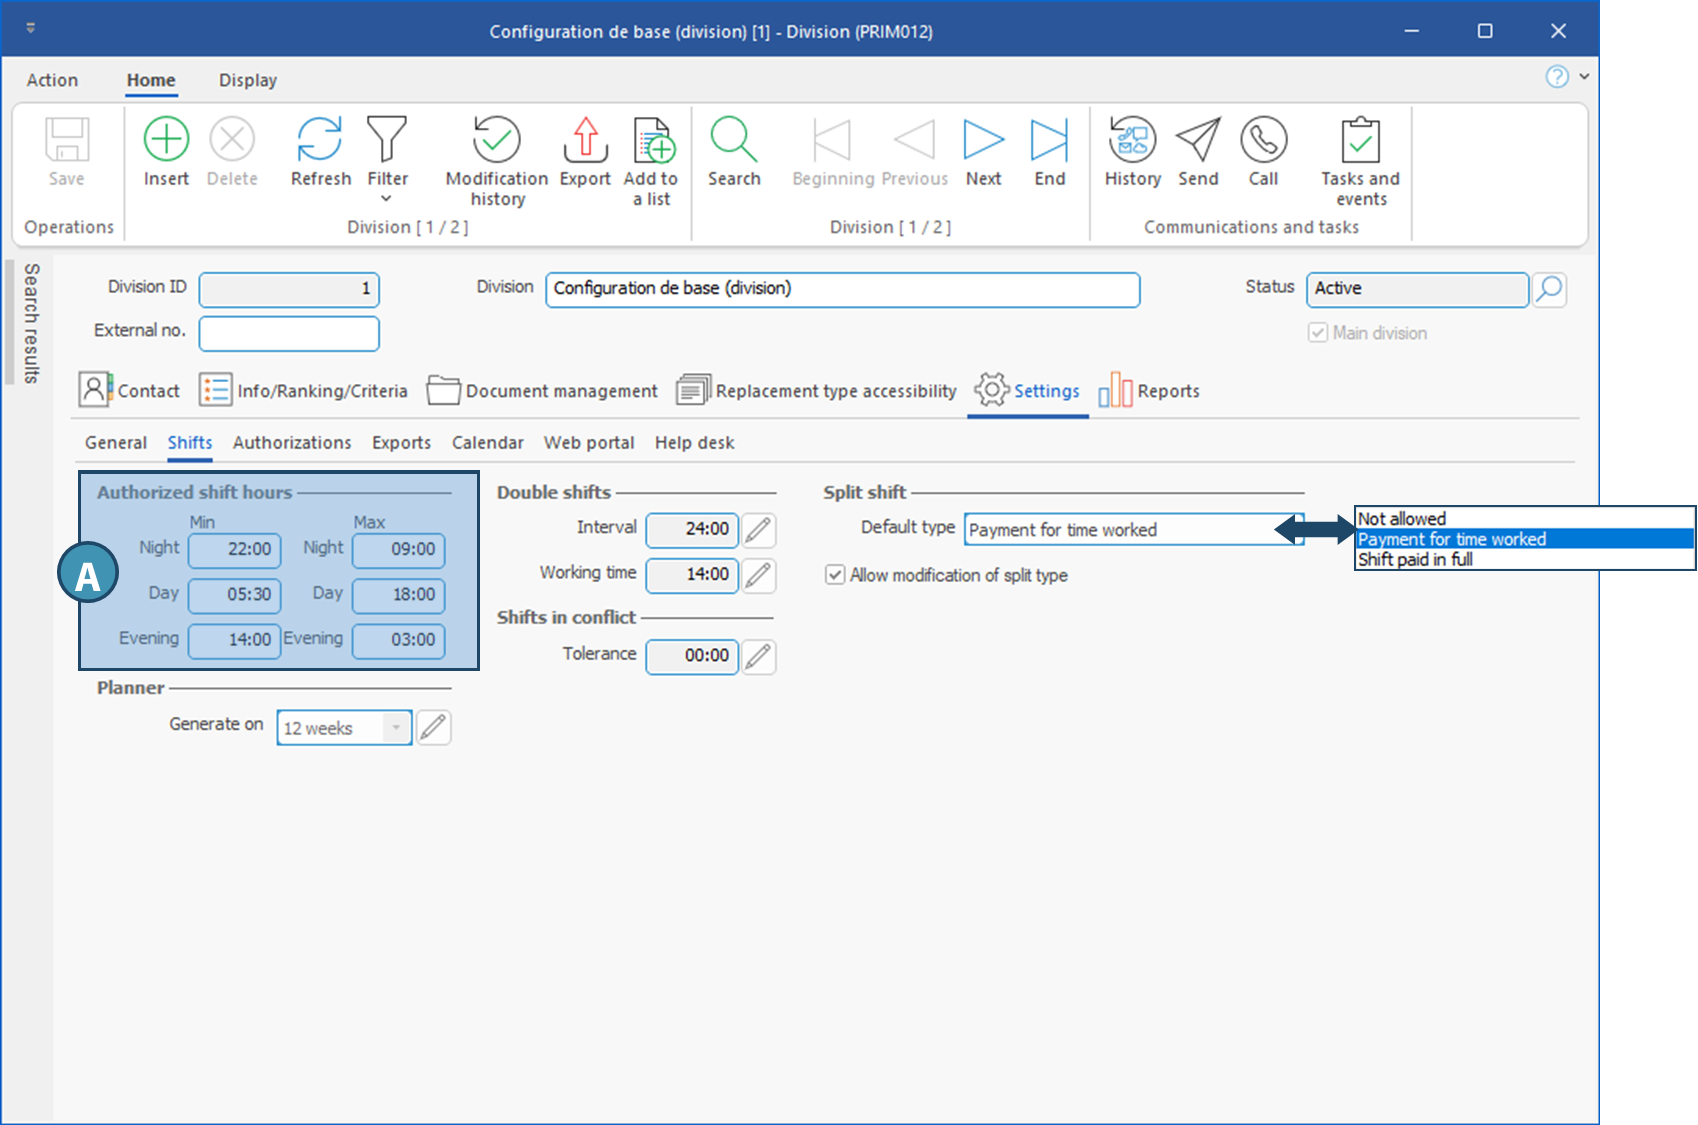
Presentation of the tab and fields descriptionAuthorized shift hours (A) : For each shift type (Night, Day, Evening), you can define here the minimum start hour (Min) at which a shift can start, the maximum end hour (Max) at which a shift can end. The shifts of each type must therefore fall within the defined time frame. Thus, in the example below, a night shift can start at 10:00 PM the day before at the earliest, and end at 9:00 AM at the latest.
•"Night" : The shift can start the day before. The date of the shift will be the date the shift ends. •"Day" : The shift must start and end the same day. The start hour (min) must therefore be before the end hour (max). •"Evening" : Can start one day and end the day after. The date of the shift will be the start date. •In all cases, the authorized hours range cannot total more than 23:59. Planner - Generate on: The value indicated in this field will be used for Recurrent schedules of grouped requests. It determines the number of weeks that will be visible in the planner for a schedule of this type. For example, for a recurrent schedule starting on October 1st, the data for availability or schedule conflicts of potential candidates or any other item taken into account to propose candidates will be calculated and displayed up to December 24, if the value is 12 weeks. . Double shifts:The two fields in this section are closely linked and work hand in hand: •Interval: The time interval taken into account to calculate double shifts. In order to determine if assigning a candidate to a shift would be considered as a double shift, we take into account the start hour of the request that comes first and add the interval duration. For example, if the start hour of the first request is 3:00 PM, and the interval is 24 hours, the accounting period will be from 3:00 PM on the first day, to 3:00 PM the day after. •Working time: Total og hours after which a candidate is considered to work a double shift within the accounting period. So, when assigning a candidate to a request, the planner checks the total number of hours of requests within the reference period to determine whether the candidate will be on double shift if assigned. If the candidate has been assigned to another request in the interval preceding or following the request to be assigned, the system takes into account the start time of the first shift and calculates the total number of hours of both shifts up to the end of the accounting period. If both shifts are totally included in the accounting period, the total duration of both requests is taken into account. If the second request ends before the end of the accounting period, the system calculates the total number of hours of the first request, and the number of hours between the start time of the second request and the end of the accounting period to determine whether the candidate will be on double shift.
Example: In an agency, the Interval used to calculate double shifts is 24 hours. The Working time specified for double shifts is 14 hours. oA candidate is already assigned to a shift on September 16, from 3:00 PM to 11:00 PM, for a total of 8 hours. He is then assigned to a shift on September 17, from 11:00 AM to 7:00 PM. The accounting period to determine if this shift will be considered a double shift is from September 16, 3:00 PM to September 17, 3:00 PM. Since the 2nd shift ends before the end of the accounting period, we calculate the total of hours from the start hour (11:00 AM) up to the end of the accounting period (3:00 PM), for a total of 4 hours. If we add these 4 hours to the 8 hours of the first shift, we have a total of 12 hours. As such, it is not considered a double shift. oThe same candidate could be assigned to 2 different requests on September 18. The first one is from 5:00 AM to 1:00 PM. The previous shift starting at 11:00 AM, the accounting period is from September 17m 11:00 AM to September 18, 11:00 AM. So we calculate the number of hours between 5:00 AM and 11:00 AM, for a total of 6 hours for this shift. If we add 8 hours for the previous shift, we have a total of 14 hours. If the candidate is assigned to this shift, it will be a double shift. oThe second request is from 6:00 AM to2:00 PM. The accounting period is the same, so we calculate hours from 6:00 AM to 11:00 AM, for a total of 5 hours. If we add these hours to the 8 hours of the previous shift, we have a total of 13 hours. The shift will not be a double shift if the candidate is assigned.
Shifts in conflicts - Tolerance : If a time frame is specified in this field, this means that a candidate with a schedule conflict can be assigned, as long as this conflict is less than the specified time. For example, if a candidate finish a shift at 3:00 PM and we want to assign him to a shift starting at 2:45 PM, the tolerance must be 15 minutes to allow assignation of the candidate. •Default type: Drop-down menu allowing you to select the default split type for a split shift within the division. oNot allowed: If this option is selected, it will not be possible to create split shifts for this division. oPayment for time worked: If this option is selected, only hours included in work periods will be counted as hours worked. Total of hours between work periods will be counted as a deduction. oShift paid in full: The candidate will be paid and the client will be billed for the total number of hours of the shift, including periods not worked. No deduction is applied. •Allow modification of split type: This check box allow you to specify if it will be possible or not to modify the split type of a shift, whether at creation or later on. If the check box is not ticked, only the default split time will be allowed for requests of this division.
|
 Settings tab / Sub-Tab - Authorization
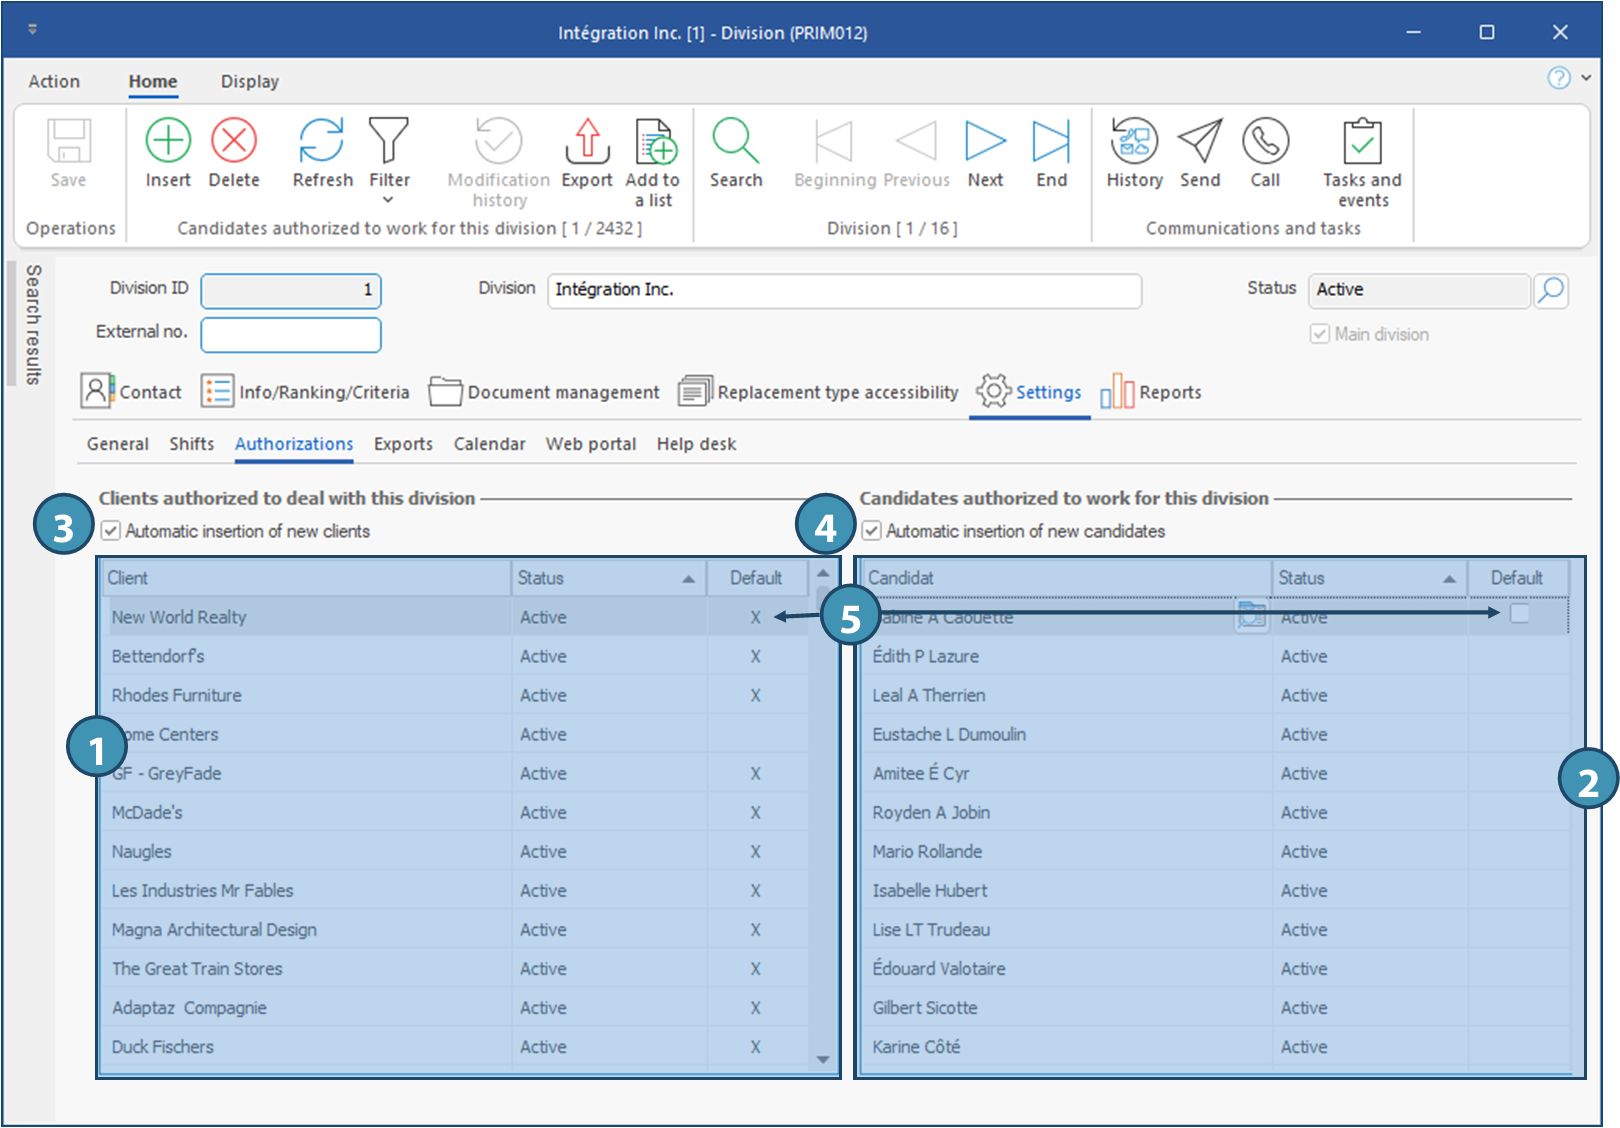
This sub-tab contains the list of clients and candidates authorized to deal with this division.
1.Add in this list the clients authorized to deal with the division: •Click on an empty line or on the icon •In the displayed list, select (tick) the clients to be added and click on OK.
2.Add in this list the candidates authorized to work for this division. •Click on an empty line or on the icon •In the displayed list, select (tick) the candidates to be added and click on OK.
3.If the Automatic insertion of new clients check box is ticked, this division will be added automatically in new client's files, so you won't have to add them manually. 4.If the Automatic insertion of new candidates check box is ticked, this division will be added automatically in new candidate's files, so you won't have to add them manually. 5.In each section, the Default check box allow you to specify it the division is the default one for the client or the candidate on that line. 6.Click on
|
 Settings tab / Sub-Tab - Exportation
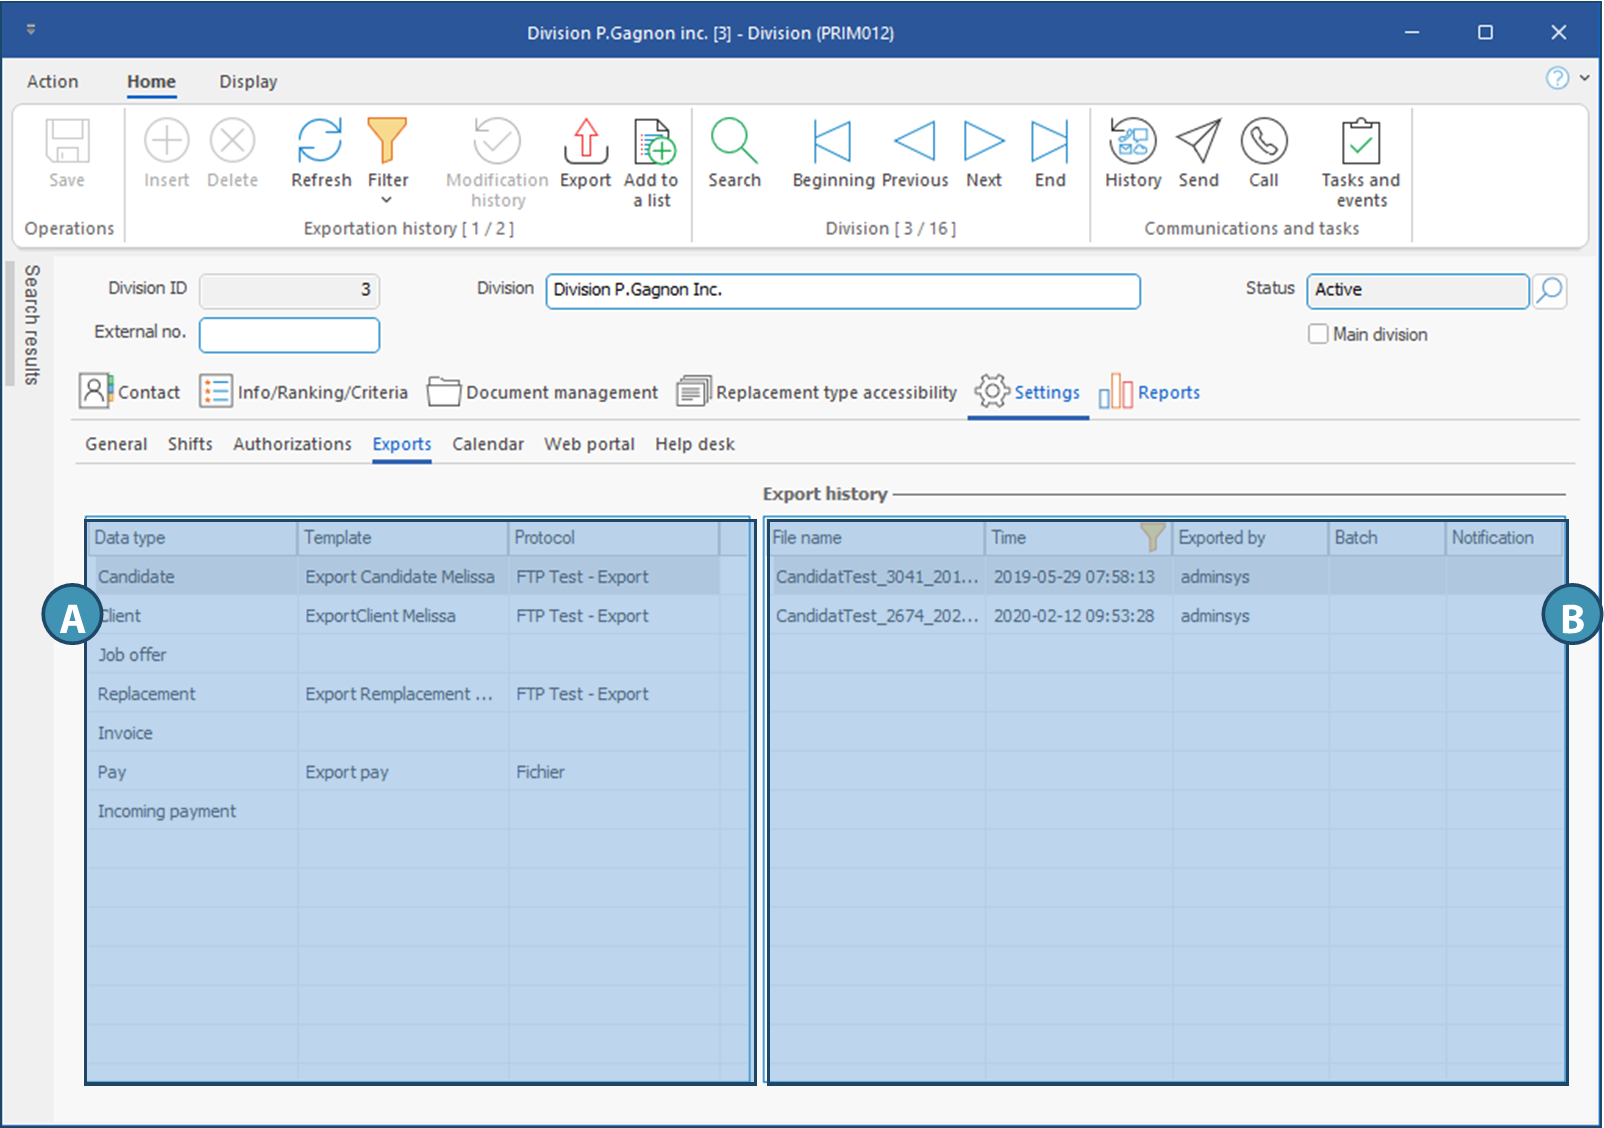
This tab contains configuration settings for exporting your data (A), as well as history of data exports performed (B) for each data set.
|
 Settings tab / Sub-Tab - Calendar
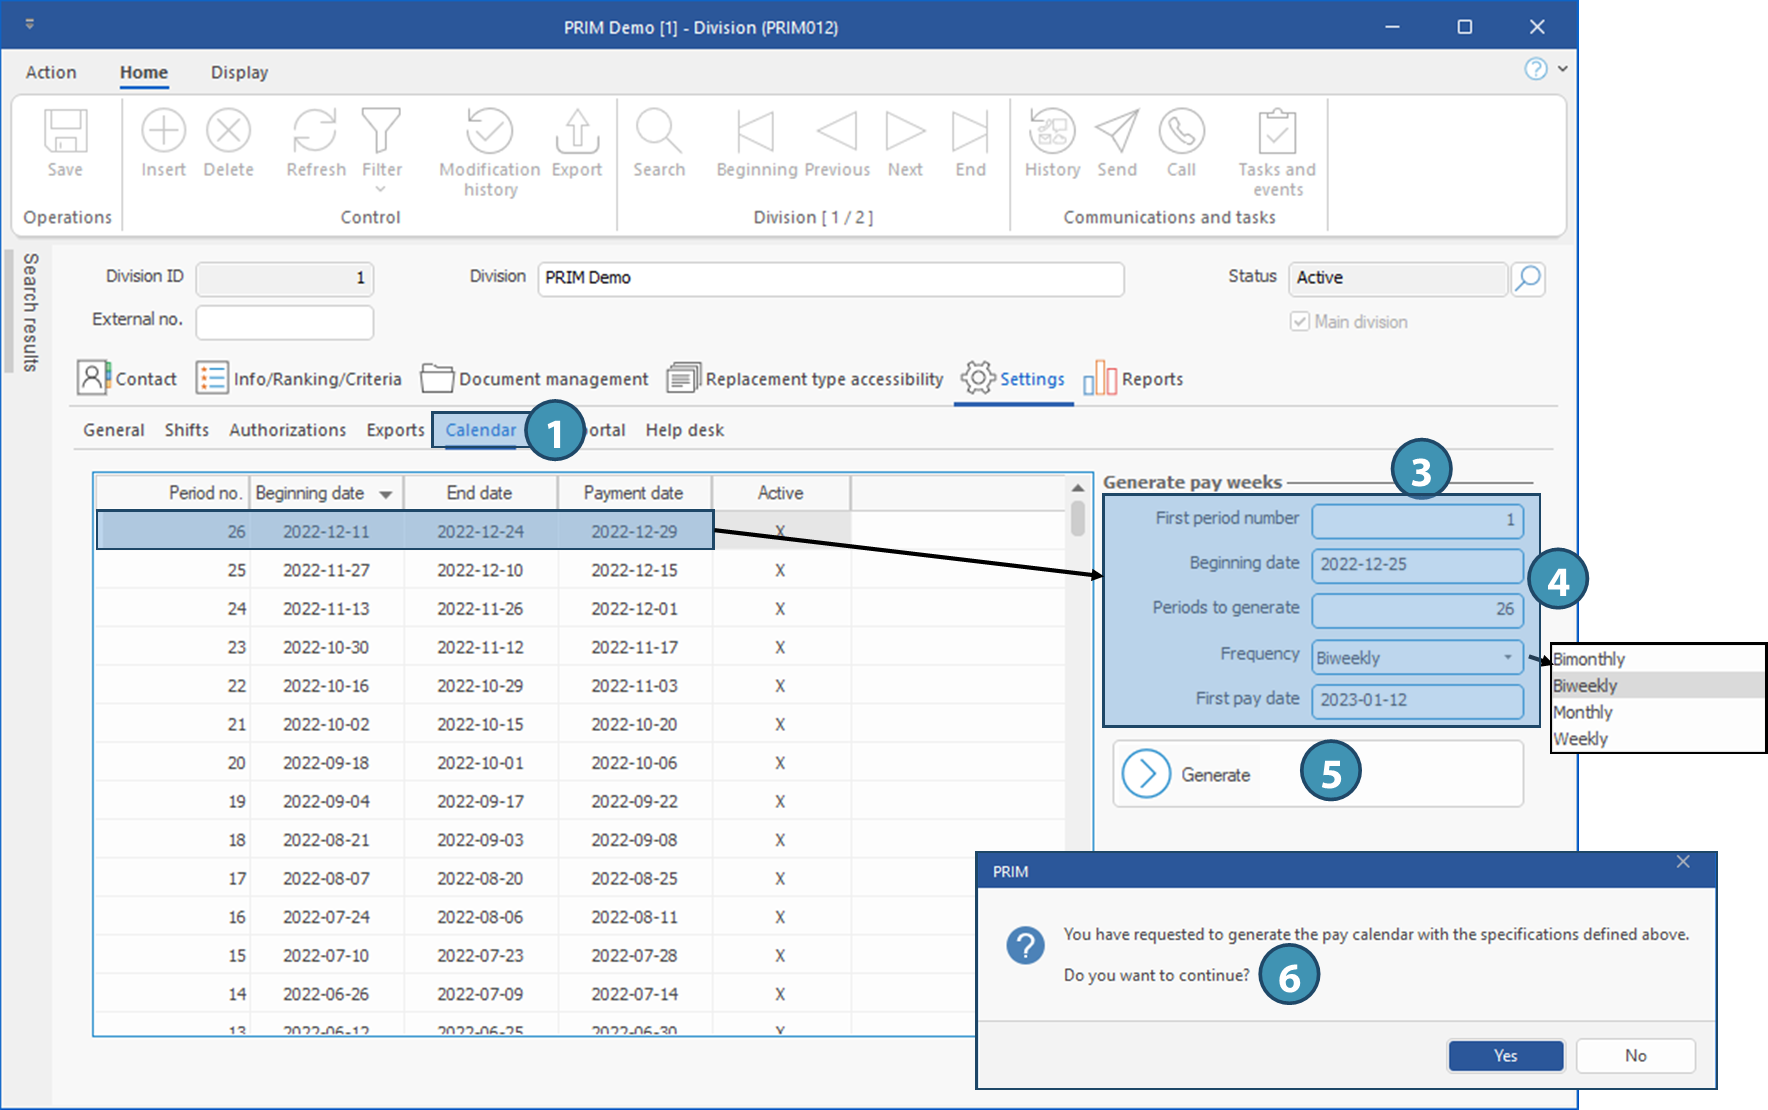
This sub-tab allows you to quickly generate the pay periods in your calendar for the year to come.
1.Move to Calendar tab. 2.Make sure the pay periods for the year you want to create don't already exist in the list.
3.Move to section Generate pay weeks. 4.Register the new data for each field based on the data from the last period of the current year. For example, if the end date of the last pay period is December 24, as in the example below, the beginning date of the first period of the next year will be December 25. Also specify the number of periods to generate and the frequency. 5.Click on Generate in order to create the calendar for the next year. 6.Click on Yes to add the new periods to the list.
|
Created with Help+Manual 8 and styled with Premium Pack Version 4 © by EC Software



 (Insert) to launch the client selection window
 to search clients in the list.
