!WARNING: This section is intended for advanced users and "Super users" of PRIM Logix.
The configuration items presented in this section may indeed have an impact on your operations.
If in doubt, consult your system administrator.
Please note that only users in the appropriate security groups can access the software configuration windows.
Manage security groups
The management of security groups is done from the "Security Groups Management" window.
This window allows the addition, the modification or the removal of the user accesses for each of the security groups.
Security groups allow you to manage rights and permissions in the various PRIM Logix windows, as well as for certain other elements, such as access to files in document management, the visibility of fields in a window, events and tasks, restrictions based on certain criteria, statuses, access to reports and scheduled lists, and so on. Every user in your company belongs to one or more security groups.
On the "Security" ribbon, click on  (Groups) to open the window.
General description of items in the window
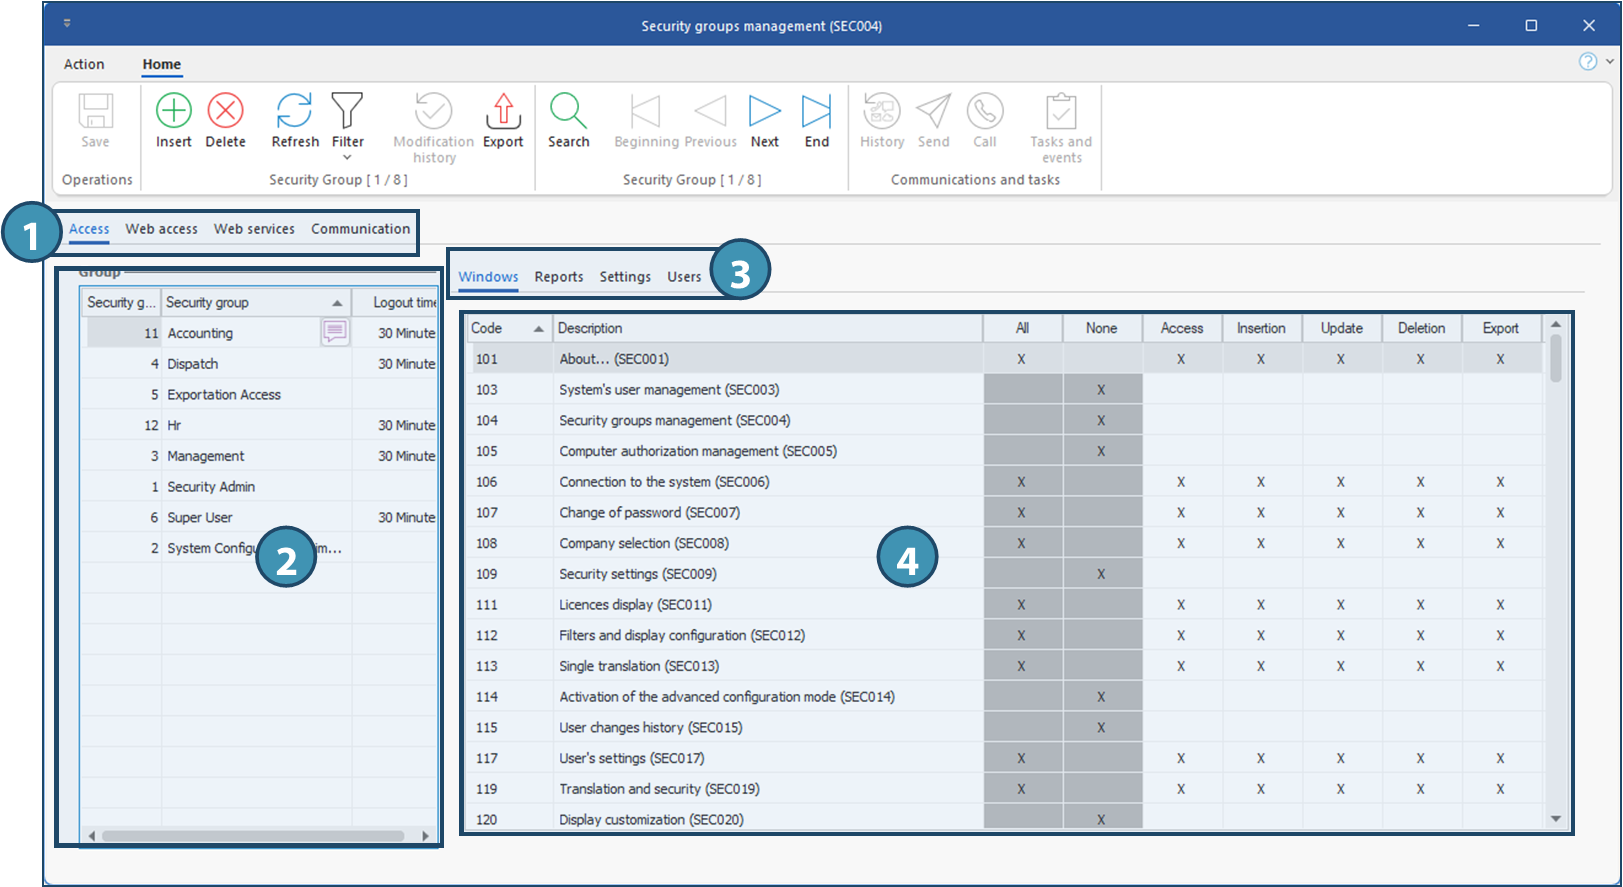
1. The security groups management window has 4 main tabs:
•Access - To define access and specific permissions of each security group to each window in PRIM Logix. The numerical codes associated with each window can be an indicator of the type of window or its use:
- 100 = security
- 500 =workflow (events and tasks, document management, lists, contact management, etc.)
- 700 = printing and communication
- 900 = data import and export
- 1500 = operations
- 2000 = panes of PRIM windows
•Web access - To define access groups to Web portal for each entity: Candidate, Client and Employee.
•Web services - To define access to the various Web services.
•Communication - To define security groups for communication management.
2. Select the security group for which you want to make adjustments. Use the translation button ( ) to change the name of the group.
ⅰTo create a new security group, see section below.
3. Security groups access is divided in 3 sub-sections:
•Windows: Allow to define permissions to access windows in PRIM Logix.
•Reports: Allow to define permissions to view and generate reports.
•Settings: Allow to define permissions to access panes in the Configuration window.
•Users: this tab lets you view the users in a security group, and add or remove users.
4. For each section, check the actions that can be performed by members of the security group. Use the columns "All" or "None" to check or uncheck rapidly all elements. Otherwise, you can check or uncheck one by one.
RIGTHS AND ACCESS
|
DESCRIPTION
|
Access
|
Allows the access to this window.
|
Insertion
|
Allows the creation of an element in this window.
|
Update
|
Allows the update of an element of this window..
|
Deletion
|
Allows the removal of an element of this window.
|
Export
|
Allows the export of the data of this window in ''Excel'' format.
|
|
By default, when a new security group is created, all access rights essential to the proper functioning of PRIM will be included in the security group.
Note that in addition to the window access permissions defined directly in the security group, there are a number of additional items that must be checked and possibly configured with the security groups. You will find a list of these under “Additional Items to Check or Configure.”
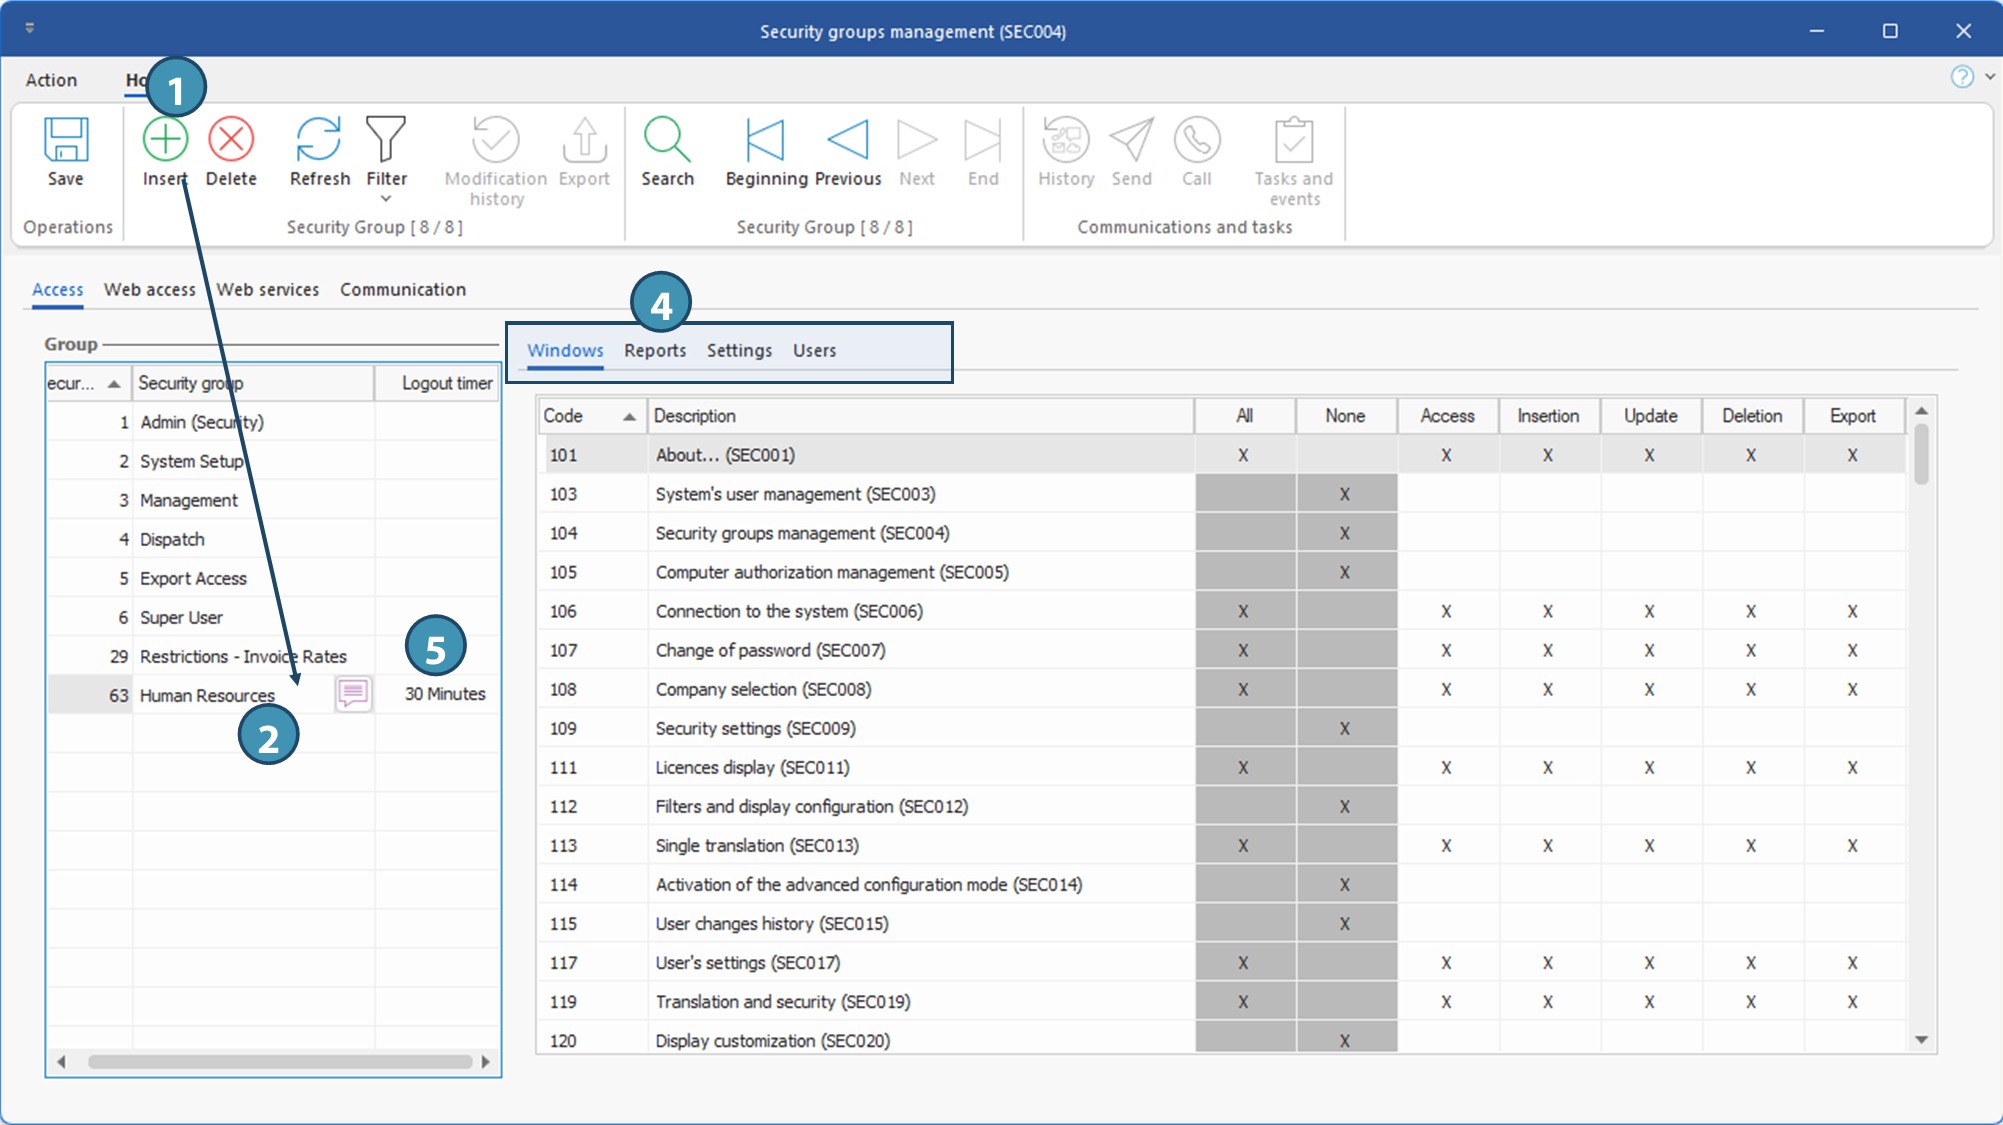
1.In the Group section, click on the icon  (Insert) or on a blank line to add a new item. (Insert) or on a blank line to add a new item.
2.Enter a significant name for your new group.
3.Click on  (Save). (Save).
ⅰ By default, all the basic accesses required for PRIM to function properly are checked.
4.Move in the Windows ; Reports and Settings section and tabs and provide or remove access and permissions for each window.
5.Add a timeout if needed.
6.Click on (Save).
ⅰ You can select an existing group from the list to apply modifications.
ⅰ If you do not have the necessary rights for all access assignments, please contact your system administrator.
Additional items to check or configure
In addition to the rights to access, insert, update, delete, and export in each window—which are defined directly in the security group—security groups are also used in various other contexts. It is therefore necessary to verify whether additional permissions or restrictions need to be defined for the new security group. Here is an overview of the different contexts to check:
•Security settings for each window: adding restrictions or default values
•Recurring filters: visibility of recurring filters and default filters in each window
•Display layouts for movable panes: visibility of layouts and default layouts in each window
•File types: access to the various directories in document management for the relevant windows
•Events and tasks: permissions to view, add, modify, and transfer. (CFG039 pane of the configuration window
•Indexing criteria: configuration of restrictions based on the security group.
•Statuses: Restrictions on status changes
•Access to scheduled lists
•Access to reports.
If you need help verifying or configuring these access permissions, please contact our customer service team.
|
PRIM Logix allows the connection of a certain number of users according to the number of licenses your company holds
For example, if you hold 5 licenses, a sixth user will not be able to open the application. You can enter a logout delay that will lock a session after a time of inactivity so that another user can log in.
ⅰ The inactivity time begins as soon as the user ceases all exchange with the database.
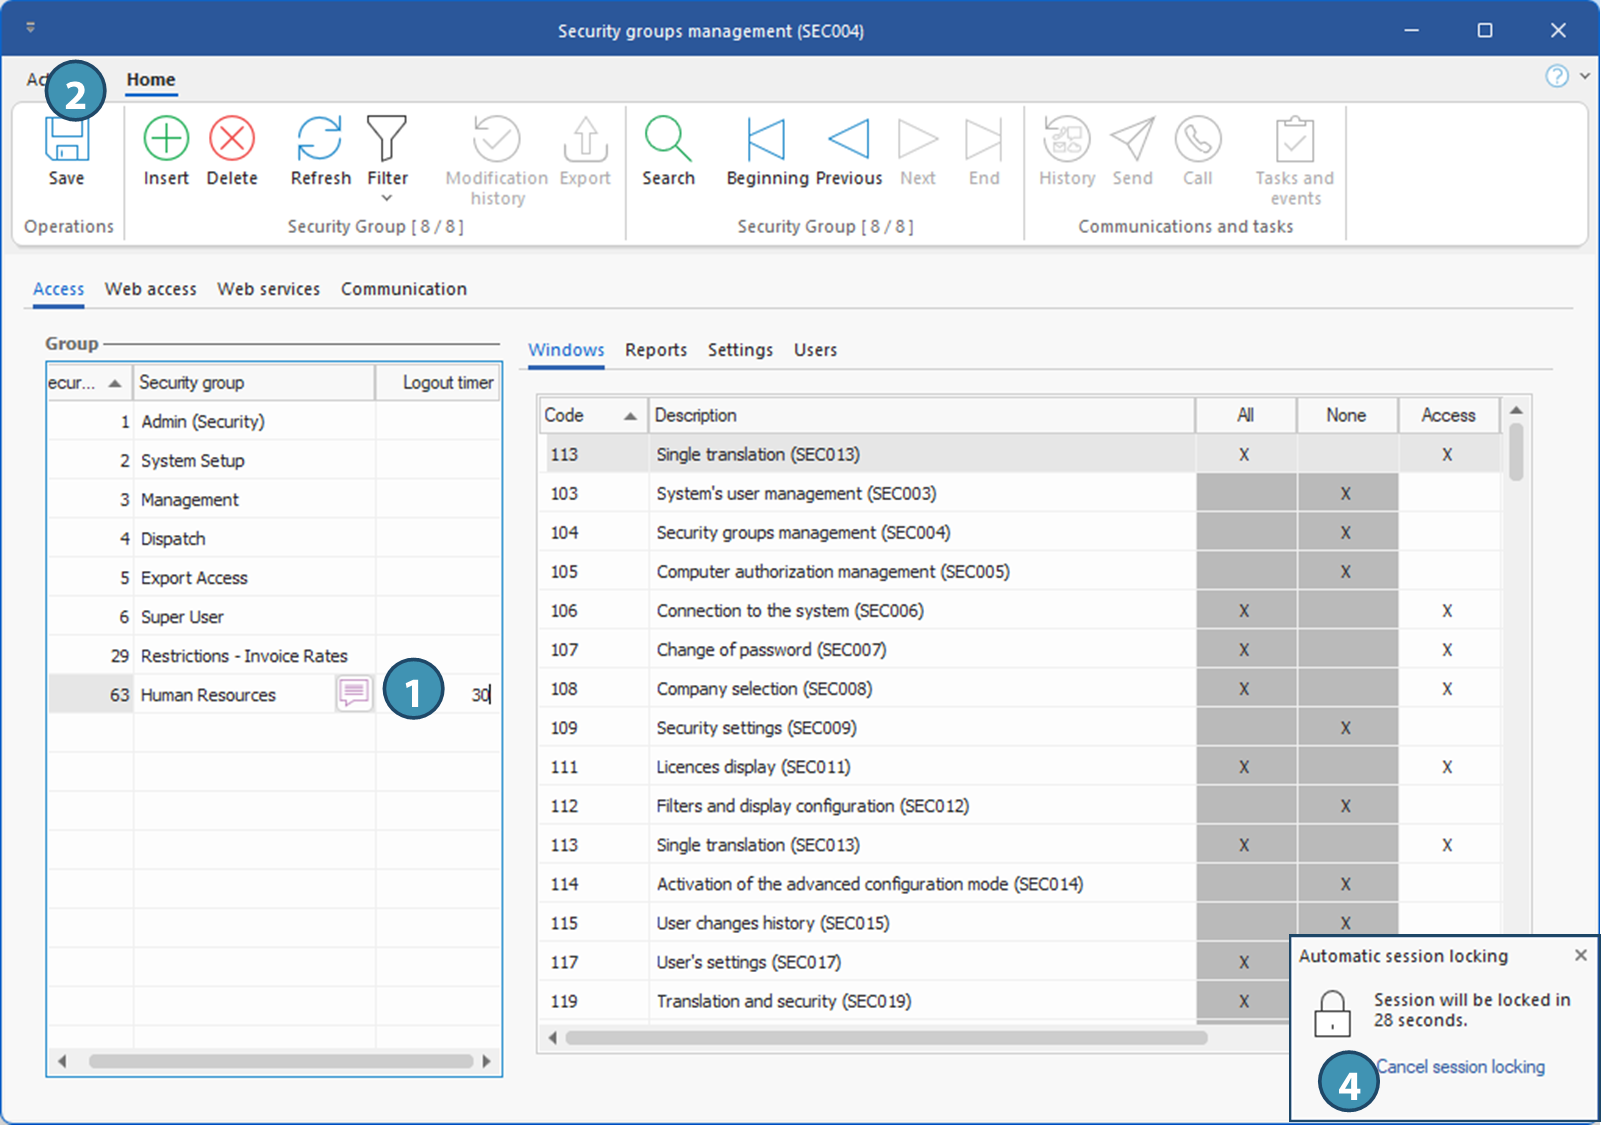
1.For each of the security groups, click in the Logout Time column and enter in minutes the inactivity time, between 2 and 120 minutes, after which PRIM Logix will log a user off the group.
2.Save.
3.Close and launch back PRIM Logix to appy the change.
4.A message will be displayed at the bottom of the screen to notify the user that the application is locked. Click on Cancel session locking to stay connected.
ⅰ After logging out, the login window appears, allowing the user to reconnect. On reconnection, all windows that were open will be reopened, and the user will be able to continue working where he left off.
|
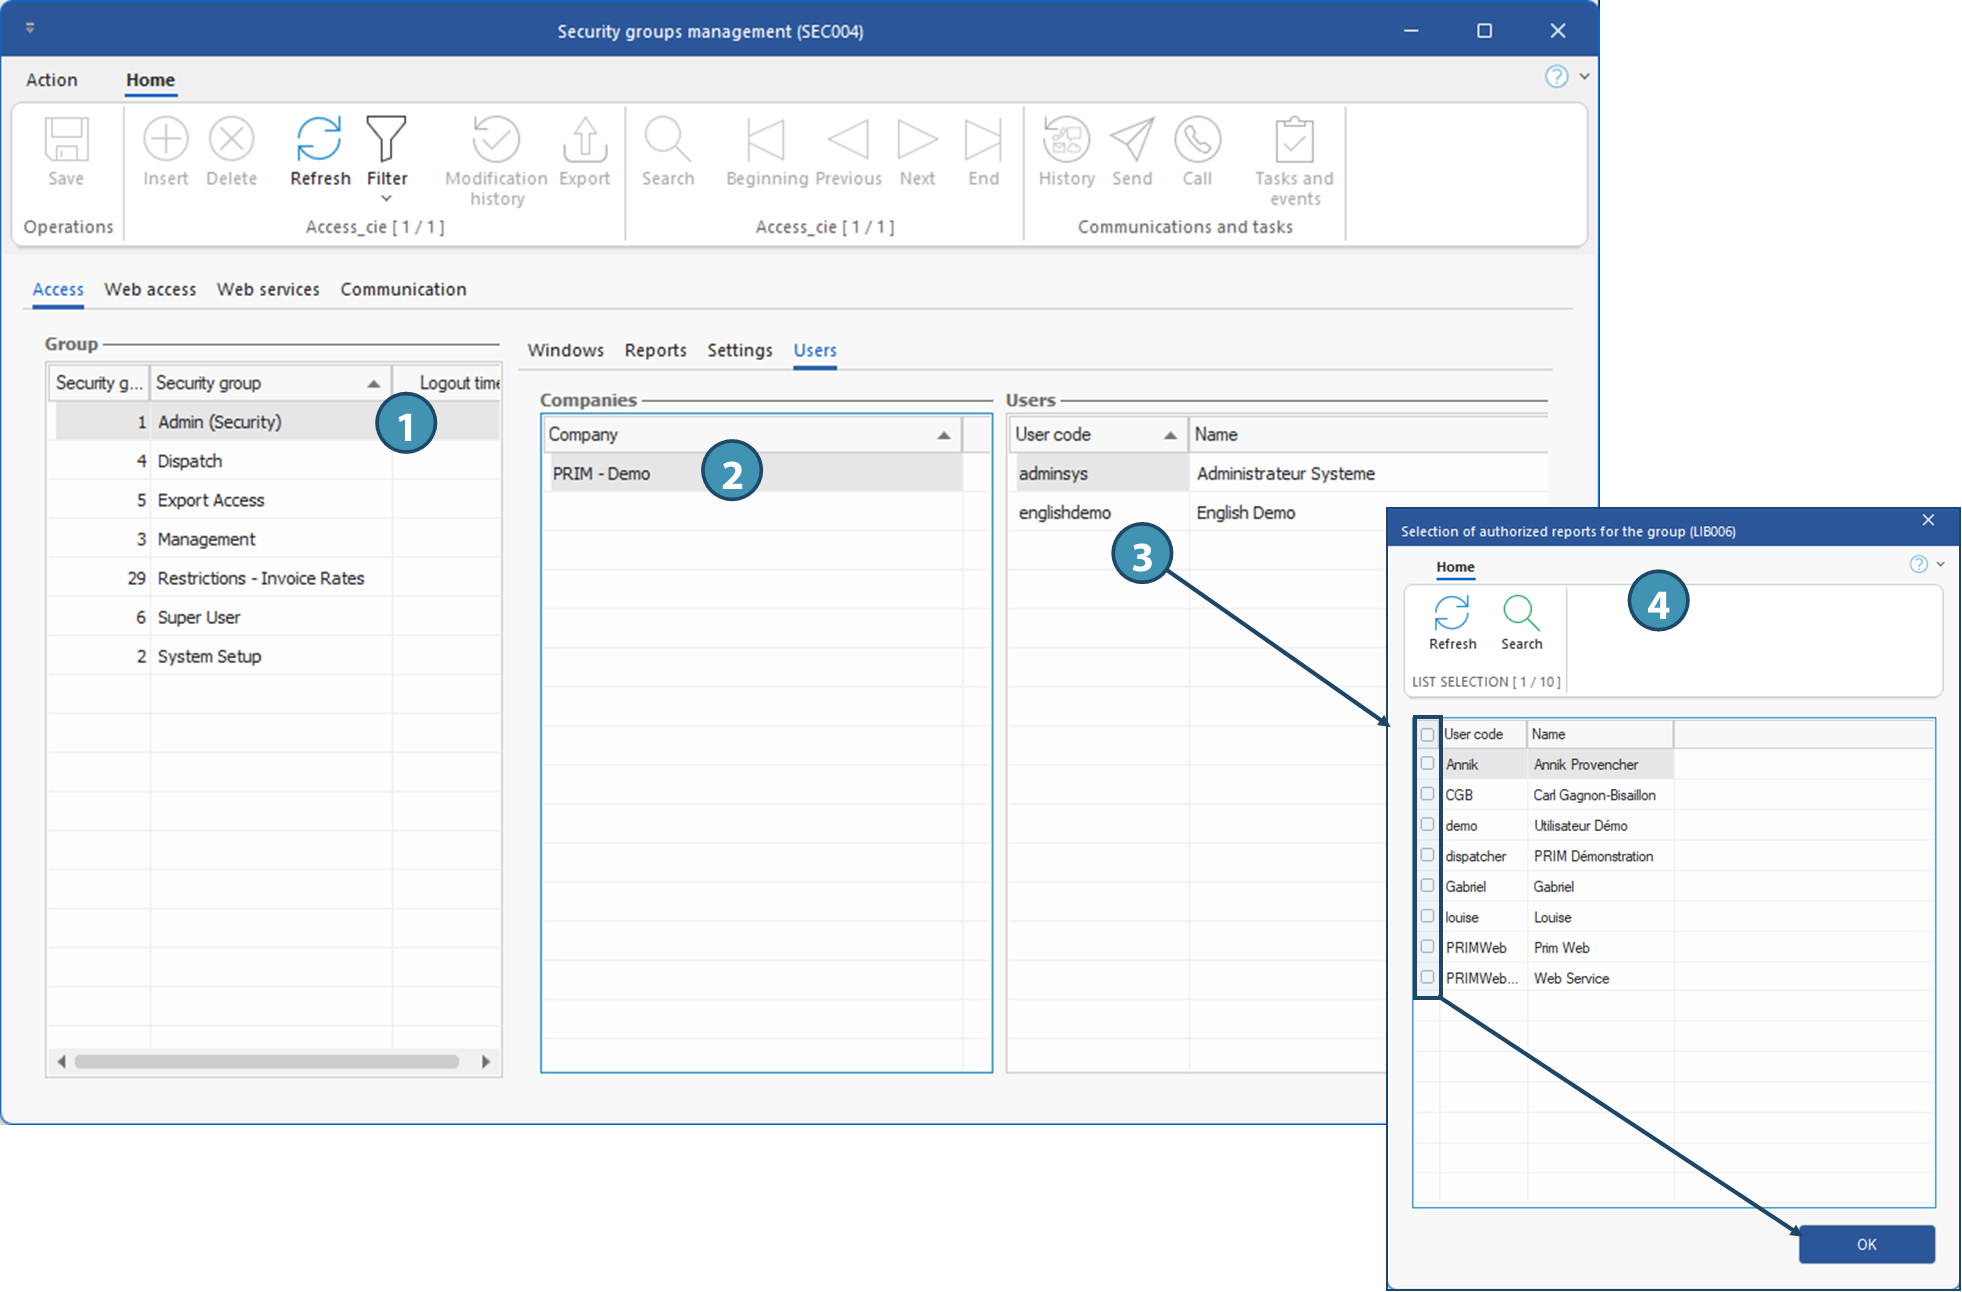
You can add a user to a security group from the corresponding tab:
1.Select the security group to which you wish to add a user.
2.In the Companies section, select the company for which you wish to add the user to the security group.
3.In the Users section, click on an empty line to display the list of system users.
ⅰ Users who are already part of the security group will not appear in the list.
4.Tick one or more users to be added and click OK.
Users have been added to the security group! Repeat the operation as required for any other company/database to which these users need access.
ⅰIt is also possible to go the other way round and add a security group to a user in the user management window.
|
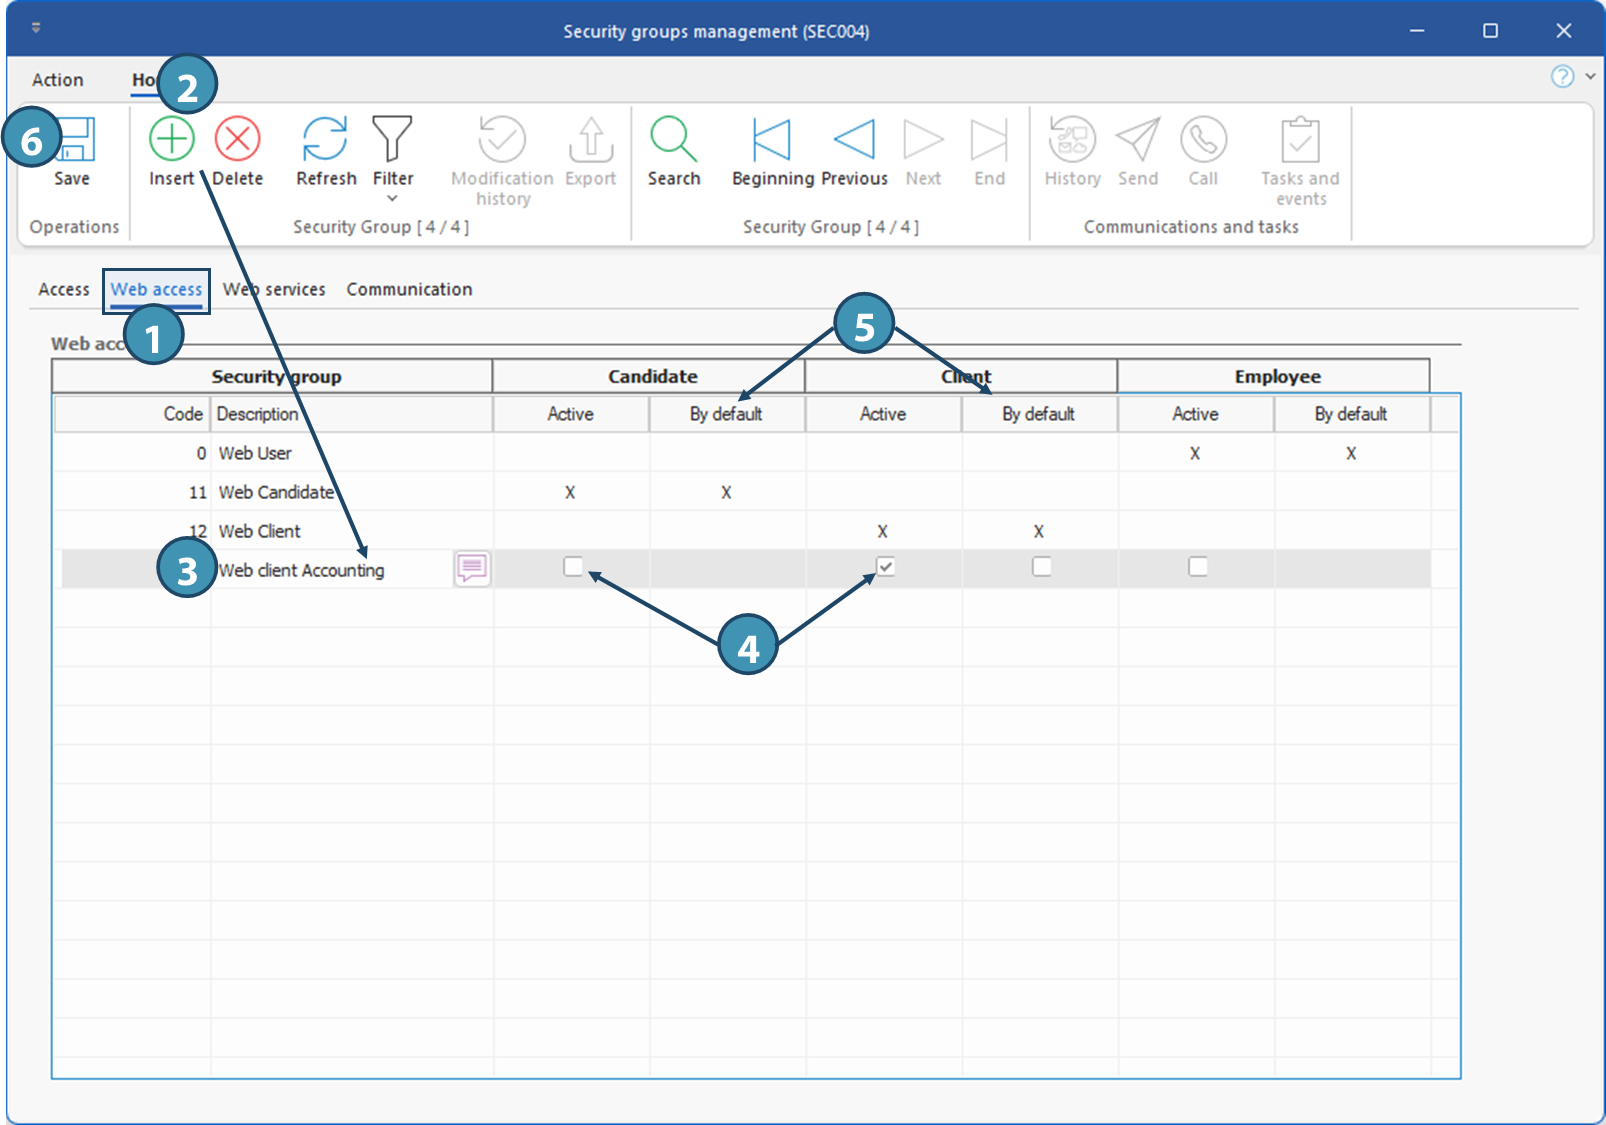
The Web Access tab lets you create security groups for access to the web portal. If security groups already exist to allow candidates and clients to access the Web portal, the agency may wish to grant different permissions to some users within these groups: for example, restricting access to invoices to some specific users, or not allowing all candidates to view long-term positions offered by the agency, or to assign themselves directly to temporary positions. To allow these different levels of access, the agency can create additional security groups, and then modulate authorizations according to the security groups in the backoffice.
To add a Web security group :
1.Go to the Web Access tab
2.Click on (Insert) or on an empty line to add a new element.
3.Enter a meaningful name for your new group.
4.Select the access category by checking the Active box in the corresponding column, Candidate or Client.
5.Indicate whether this is the default Web security group when access is created for this user type. Only one group can be defined by default for each access category.
6.Save
The new Web security group has been created and can now be used in the Web portal backoffice to modulate access to some pages, fields or operations!
|