|
Navigation: Training plan > Section 3 - Candidate > The Candidate Window Tab - Settings |
Scroll Prev Top Next More |
Tab - Settings
The Settings tab allows you to customize some information set up by default for the candidate.
ⅰ For customized rates configuration, the following sub-tabs will be seen in detail in the "Accounting" section.
If you have access to this section and to the Salary sub-tab, you can add the candidate's banking information for direct deposit of payroll.

 Sub-tab - Absence management
The Absence management sub-tab llows you to manage hours in the candidates' time banks.
Hour banks with an associated payroll and billing code are automatically added to candidates' files. However, depending on your configuration, they may differ from those shown below. ⅰ The addition or modification of the number of hours in banks is done manually. For example, the number of hours allocated by the agency for the "Sickness" bank could differ according to the candidate. ! When your candidates complete their timesheets on the Web platform, they must manually record the hours worked if they report a partial absence.
To access it, in the Candidate window, go to Settings tab and Absence management sub-tab (1).
Add or modify the number of hours in banksⅰ PRIM does not allow the deletion of data entered by the user in the "Bank Hours" column. Enter 0:00 in the box to prevent an error message from being displayed.
In the Management of time banks section (A), enter or modify the number of hours allocated for this candidate for each of the banks. Click on
View absence history
In Absence history section (B), you will find history of all the candidate's declared absences, including any absence not associated with a code. The records in red indicate absences reasons that were refused.
|
 (Save).
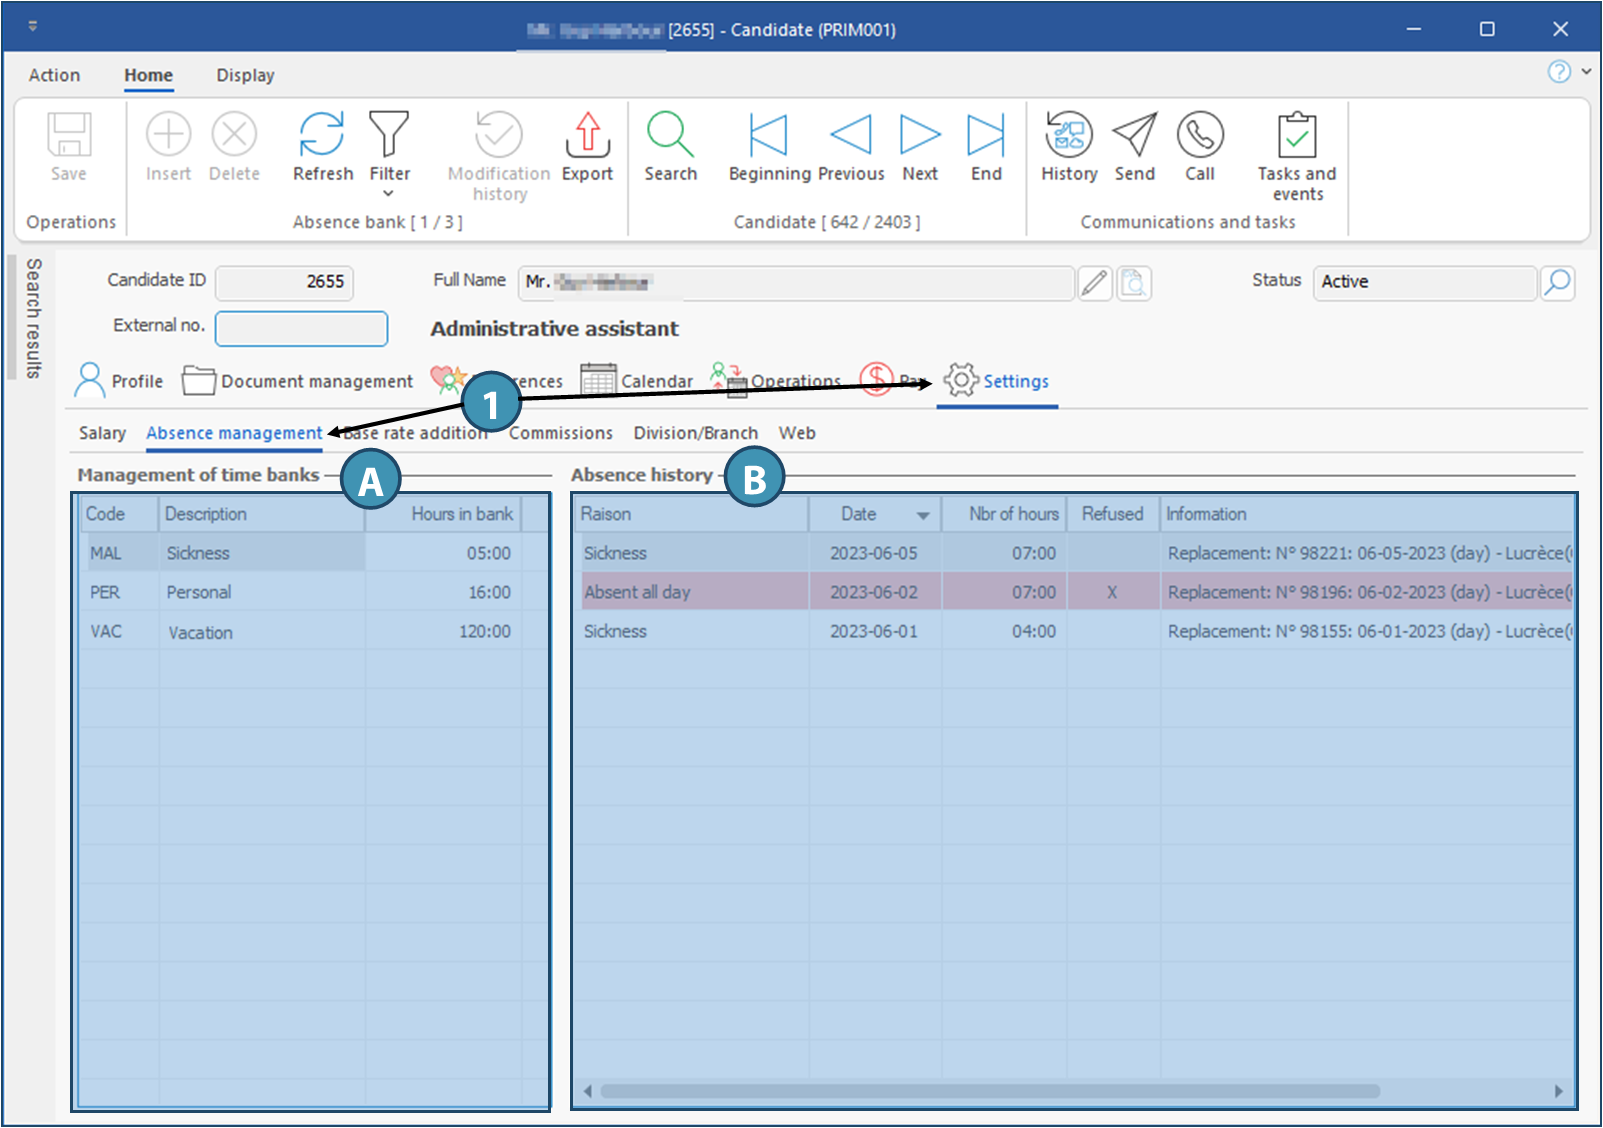
Sub-tab - Web
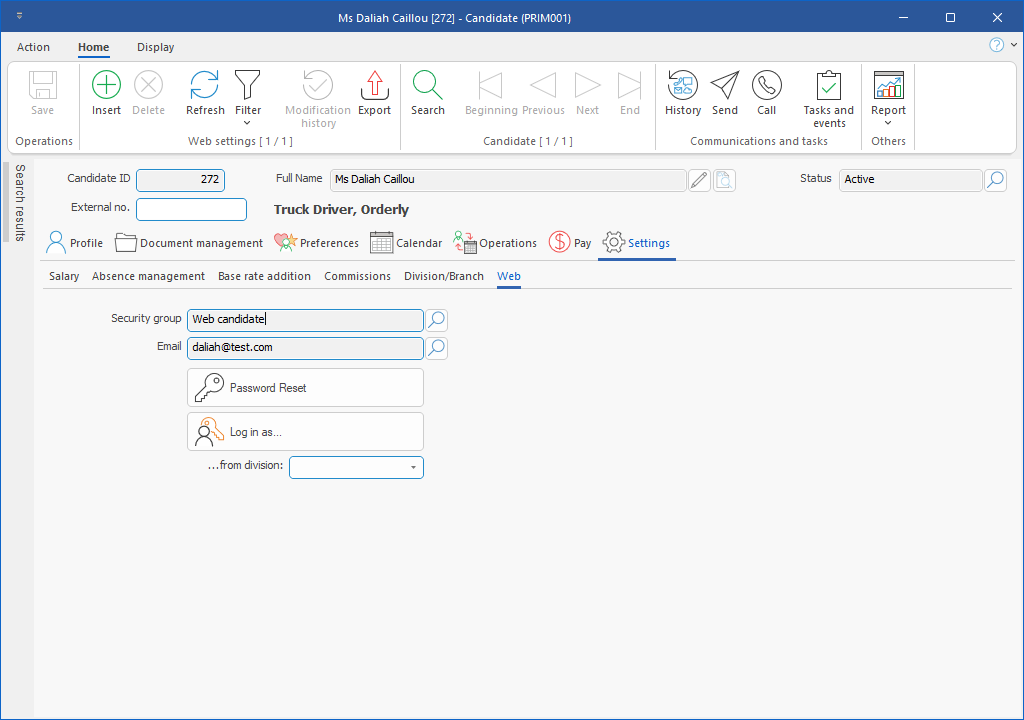
The Web sub-tab allows you to create Web access for a candidate, to reset his/her password or to connect to the personal space of the candidate on the Web portal. ⅰIf a candidate is already registered in your agency but don't have an account on the Web portal, you can create it in this tab by selecting an email. Don't forget to send instructions to your candidate using the appropriate message template.
Description of fields1.Security group: Corresponds to the Web access security group, as defined in the security groups. The Web access security groups determine what a candidate can and cannot see on the web portal, according to the security settings set up in the back office. For a candidate, the default group is Web candidate. ⅰYou can create and configure additional Web access groups in order to allow various security levels on the Web portal for your candidates. 2.Email: This field shows the email that should be used to connect to Web portal. To create the candidate's access to Web portal, click on ⅰEmail addresses available will be the ones already added in candidate's file. The email addresses should be added under Profile > Contact > Contact Information. 3.Password Reset: When you click on this button, an email is sent to the candidate with a link for password reset. . 4.Log in as: Allows to your agency's employees to connect to the candidate's account on Web portal without the password. ⅰThis feature willl help you to guide users in case they encounter any issue or if they have questions.
|

Sub-tab - Division/Branch
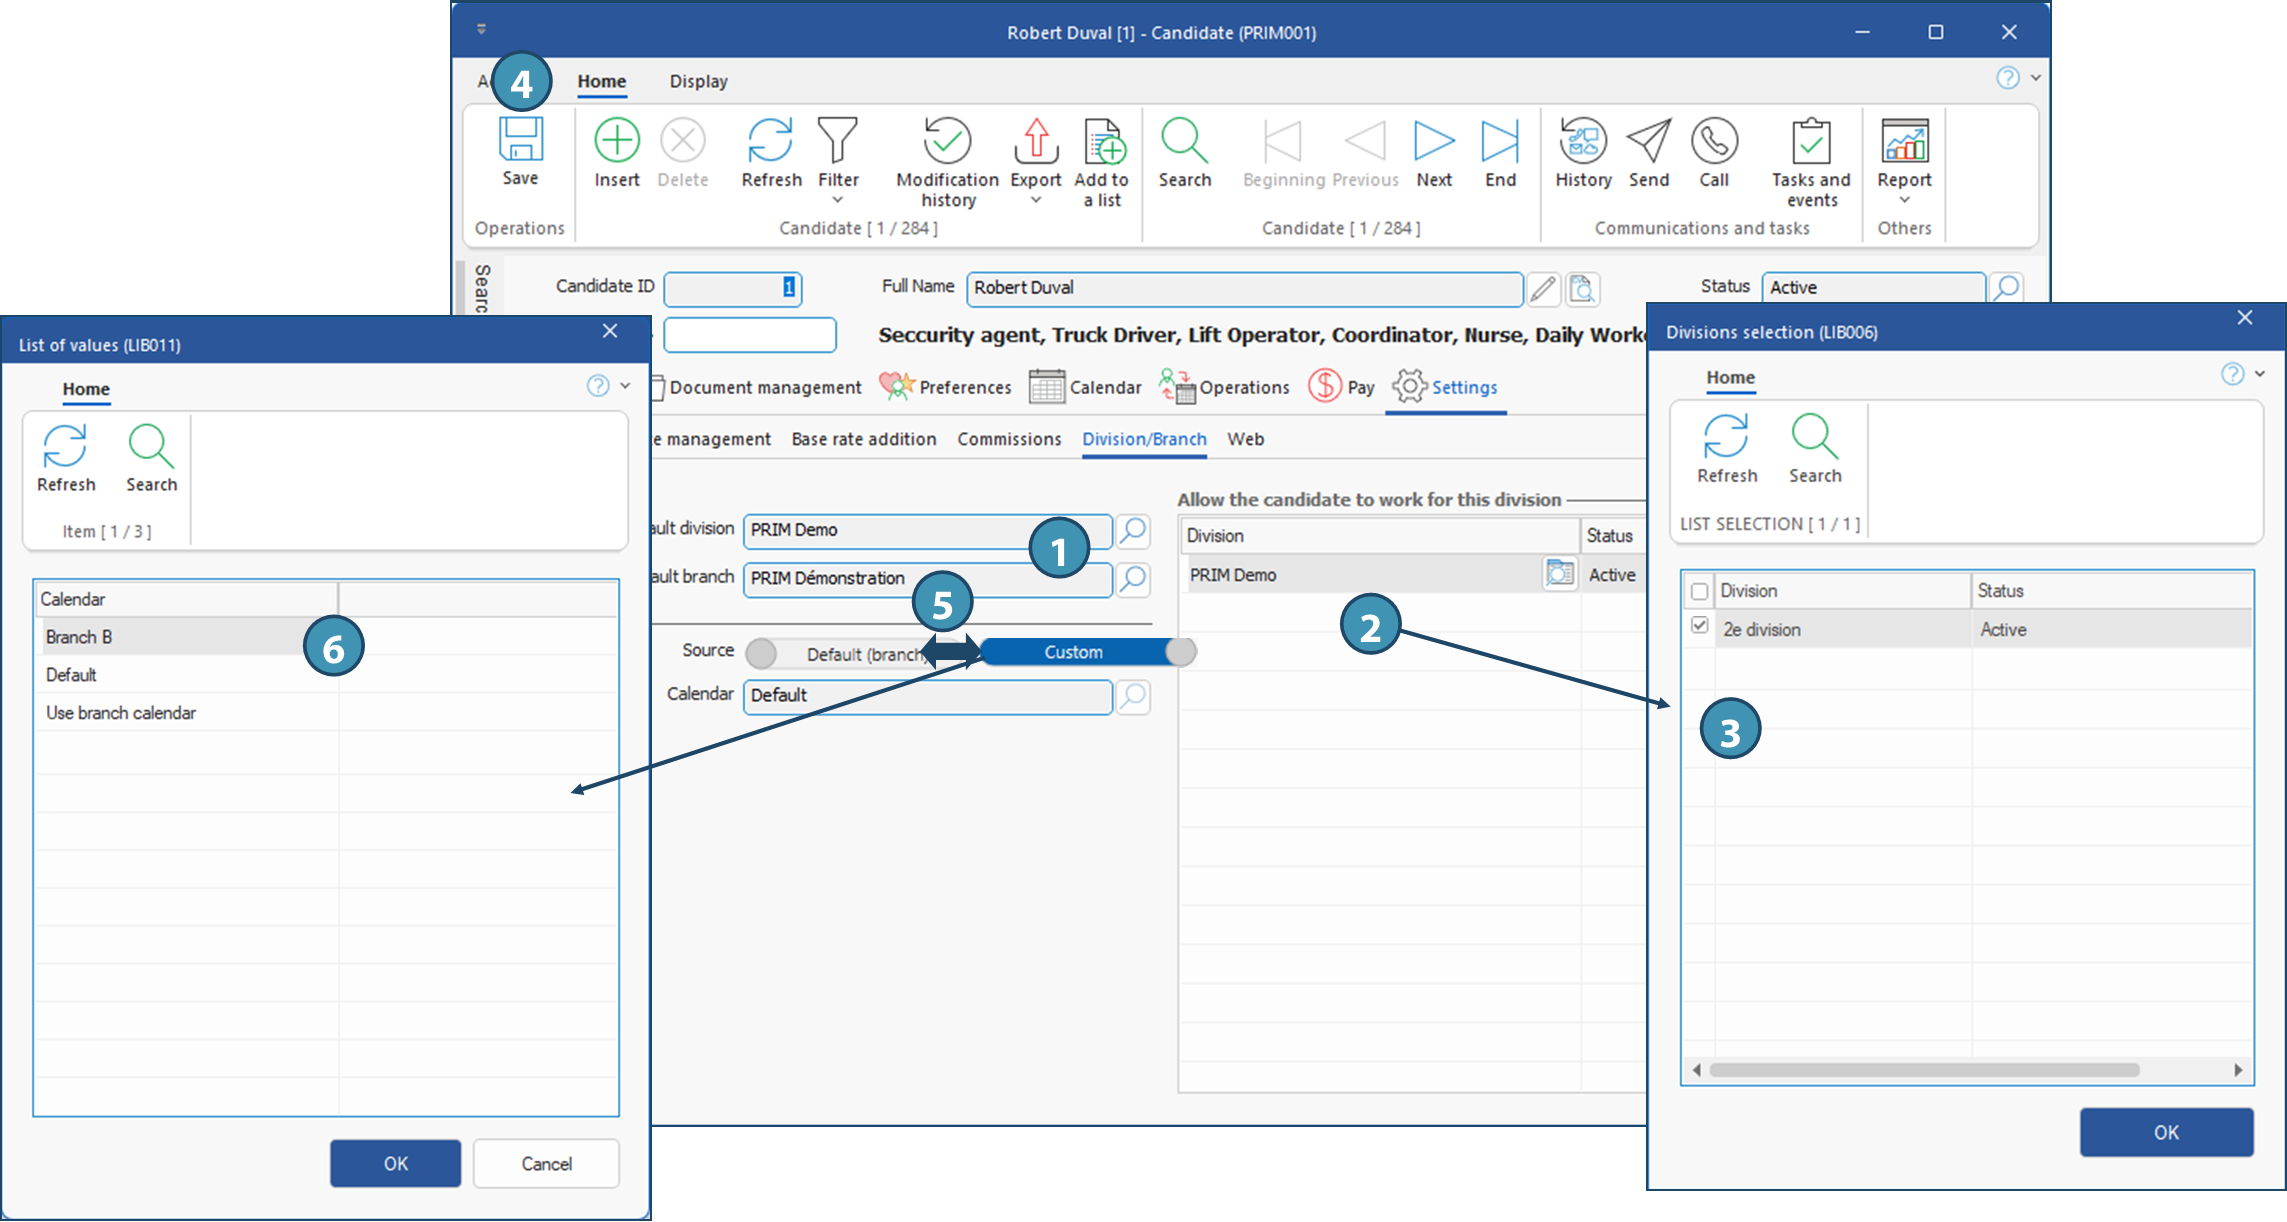
The sub-tab Division/Branch allow management of the association between the candidate, the division and the branch.
ⅰ The association between the candidate, the division and the branch is optional. However, a new candidate created by automatic parsing of the resume in PRIM will automatically be associated to the branch and division of the employee who parsed the resume. Add a default division and branch1.In the left section of the window, click on ⅰIn order to be displayed in the list, the divisions must first be added in the section "Allow the candidate to work for this division". Note that if a candidate is not allowed to work for a division, he/she will not appear in the potential candidates list generated by the planner for a shift.
Add a division the candidate is allowed to work for
2.In section "Allow the candidate to work for this division", click on an empty line to add a record. 3.In the window that is displayed, tick one or more division and click on OK. ⅰDivisions already added will not be displayed in the list. To remove a division, just select the line of the record and click on 4.Click on
Select a holiday calendarⅰThe default holiday schedule will automatically be the one associated with the candidate's default branch. However, in some specific situations, a different holiday calendar may be required: if the candidate's province or region of residence is different from that of the branch, for example. In this case, the system allows you to select a different calendar for the candidate. 5. Move the Provenance field switch to the right. 6.From the list that appears, select the holiday calendar to which the candidate is to be assigned, click OK and save.
|

Created with Help+Manual 8 and styled with Premium Pack Version 4 © by EC Software