Create and manage the pay

Contents
In this section, you will have the procedures and the information regarding the management of the payroll.
![]() PRIM does not manage the entire payroll, however it prepares the raw data for export to your payroll management software, which is responsible for calculating deductions at source.
PRIM does not manage the entire payroll, however it prepares the raw data for export to your payroll management software, which is responsible for calculating deductions at source.
![]() Make sure that all requests confirmation steps have been completed so that requests are available for selection under the "Applications to Pay" tab.
Make sure that all requests confirmation steps have been completed so that requests are available for selection under the "Applications to Pay" tab.
![]() If your company's division configuration allows it, you can produce several payroll runs for an applicant in the same period. ("Division" window - "Settings" Tab / Sub-tab "General")
If your company's division configuration allows it, you can produce several payroll runs for an applicant in the same period. ("Division" window - "Settings" Tab / Sub-tab "General")
![]() The addition of more than one pay in a period is possible from the payroll management window or from the candidate's file.
The addition of more than one pay in a period is possible from the payroll management window or from the candidate's file.
 Create a pay - "Payroll management" window
Open a ''Payroll management'' window.
1.Move under the ''Payroll history'' tab to check the pays with the status ''In progress'' to ensure not to add new items in an existing pay, if you prefer PRIM to produce a new pay for your candidate. 2.Apply a filter in the list to display only the pays with the status ''In progress''. 3.If needed, select the pays to complete and manually change the status for ''Completed'' to avoid additions in this pay. 4.Move back to the ''Requests to pay''. 5.Select a payroll period. If necessary, apply a filter to display only the desired elements. For example, requests to be paid to a specific candidate. 6.Check one or more items to add in a pay and click on 7.The selected items will be found under the ''Payroll history'' in a pay with the status ''In progress''. 8.Under the "Payroll history", apply a sort on the column ''Pay no.'' if you want to display the new pays at the top of the list. 9.If there is no more items to add, you can complete the pay. 10.Select a record and click on the icon 11.In the list, choose ''Completed''. If necessary, repeat these operations to add a new pay.
12.Click on the icon
|

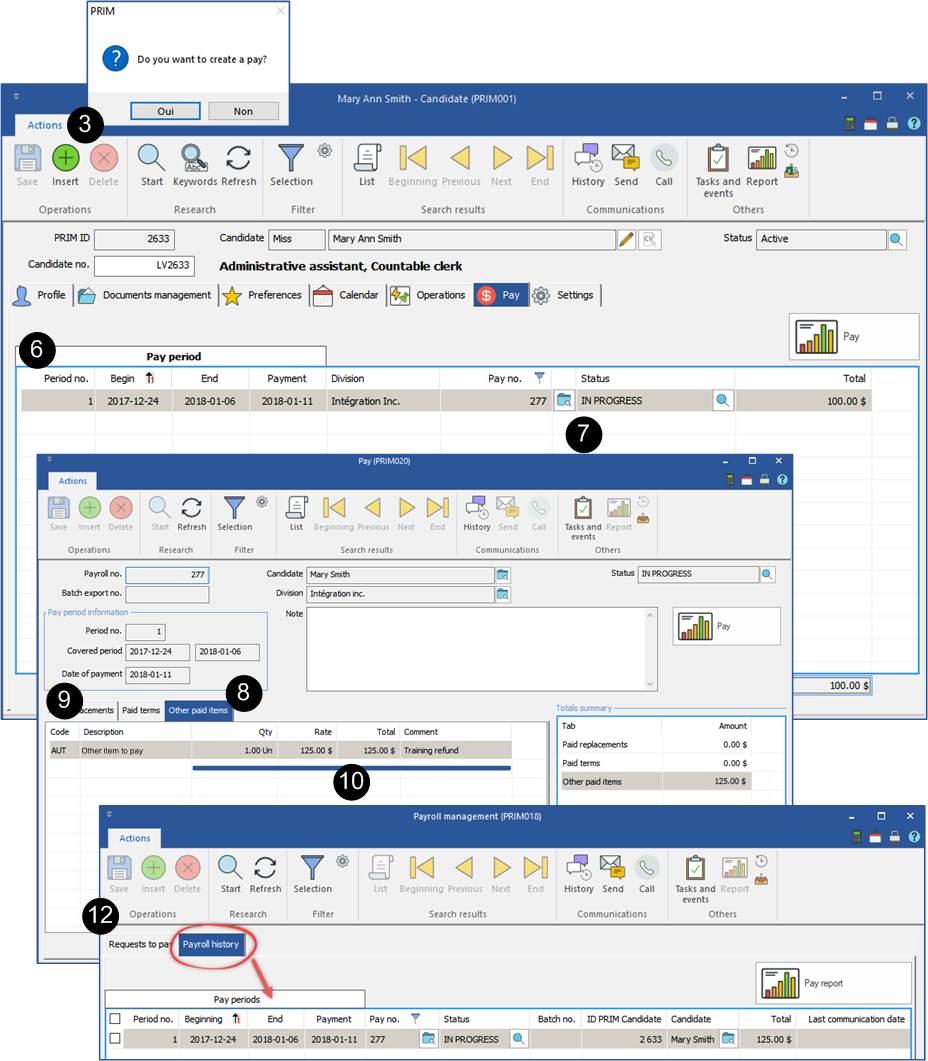
Create a pay - "Candidate" window
For example, the refund of the expenses engaged by a candidate for a special training.
1.Open the candidate's file. 2.Move under the "Pay" tab.
3.Click on 4.Choose a division in the window of selection. 5.Select a pay period in the next window of selection. 6.The pay is added in the list with the status "In progress". 7.Click on the icon 8.Move under the "Other paid items" tab. 9.Click on 10.Change the quantity and the rate and enter the item details in the column "Comment". 11.Click on 12.The pay will be found under the "Payroll history" tab of the "Payroll management" window with the status "In progress".
|
Add items in a pay
To add a new item in an existing pay, it must have the status “In progress”.
1.Open an ''Pay'' window. 2.Move under the ''Other paid items'' tab. 3.Click in the main zone or on the icon 4.The ''Selection of value'' window is displayed. 5.In the list, select the item to add and click on 6.Fill the information in the columns “Qty” or “Rate”. 7.In the example below, we added traveling expenses. 8.Click on
|

Make a modification on a pay
To modify an item in an existing pay, it must have the status “In progress”.
1.Open an ''Pay'' window. 2.Move under the ''Other paid items'' tab. 3.In the list, select the record. 4.Modify the information in the columns “Qty” or “Rate”. 5.In the example below, we modified the traveling expenses. 6.Click on
|

Print, view or send a pay by email
You can print, view or send by email a pay no mather what the status is.
1.Open a ''Payroll management'' window. 2.Move under the ''Pay history'' tab. 3.Check one or more pays. 4.Click on 5.If you choose the option ''Send'', an email will be sent with the attached pay to the selected candidate.
|
