Create a job offer

Contents
The creation of a term is done from the "Job offer" window.
![]() PRIM offers 2 locations to open this window and add a job offer:
PRIM offers 2 locations to open this window and add a job offer:
•"Quick actions" menu of the "Client" window
•"Job offer" window in the "Request" section of the PRIM ribbon
A client needs a new permanent employee in his company, he entrusts you with the management of recruitment.
![]() The recruitment management for the job offer "Client via Web" is made by the client via the Web platform.
The recruitment management for the job offer "Client via Web" is made by the client via the Web platform.
![]() You can create the job offer for your client in PRIM, it will be easily accessible for your client via the Web platform.
You can create the job offer for your client in PRIM, it will be easily accessible for your client via the Web platform.
On the "PRIM” ribbon, click ![]() (Job offer) to open the window.
(Job offer) to open the window.
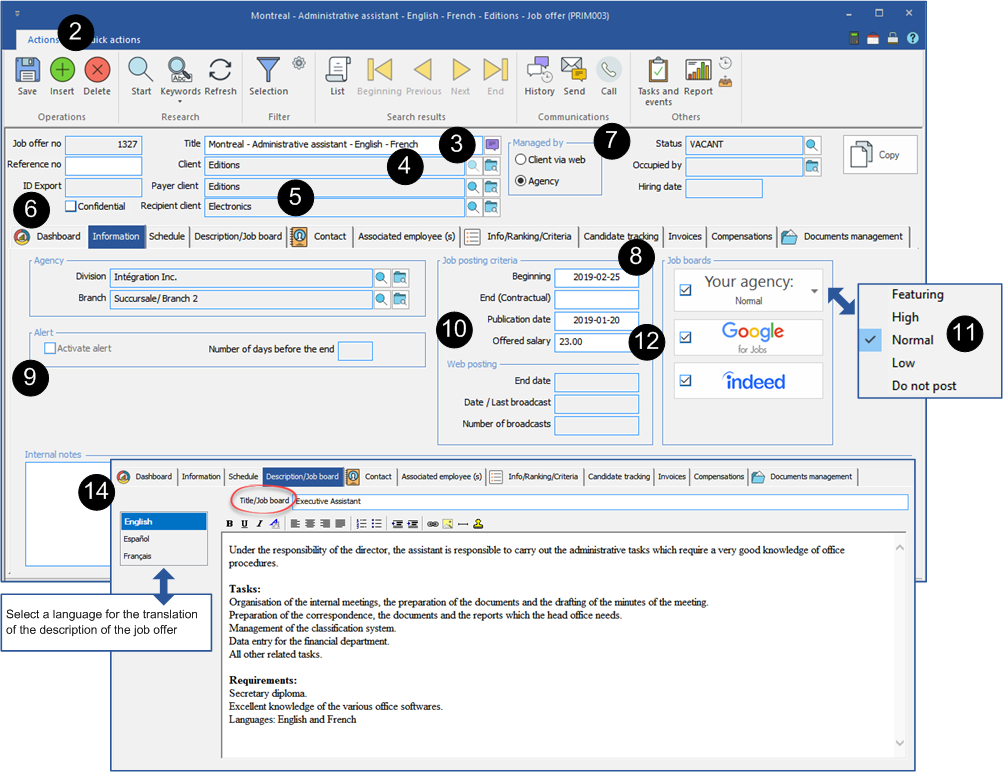
1.At the opening of the window, you are under the "Information " tab.
2.Click on ![]() (Insert) to be in input mode.
(Insert) to be in input mode.
3.Enter a title, a name for the job offer.
4.Click on ![]() (List of values) to the right of the field "Client" to select a client.
(List of values) to the right of the field "Client" to select a client.
![]() If there is no default division saved in the client's folder, you will have to select it in the creation process, otherwise it will be added automatically.
If there is no default division saved in the client's folder, you will have to select it in the creation process, otherwise it will be added automatically.
5.If a recipient client or a payer client is registered in the client's file, it will automatically be displayed in the window.
6.Check the box "Confidential", if the client wants to keep the posting of the job offer confidential and to not display his name on the job offer sheet.
7.In the section "Managed by", choose the placement process. You will not be able to modify this section after saving.
8.Change the beginning date, if it is different from the current date and enter the end date, if it is known. The end date is optional and might represents a contract.
9.Check the box “Activate alert” If you want PRIM to generate a task to inform you of the end of the job offer. You can change the number displayed by default if it is not suitable for you. The check box will not be accessible if you have not entered an end date.
10.In this field PRIM adds the creation date of the job offer, it is editable.
11.Select the display priority of the job offer on the Web platform.
12.If the offered salary is entered in the field, it will be displayed on the job offer sheet. If not, the mention "To be discussed" will be displayed.
13.Under the "Schedule" tab, enter the schedule for each day. If needed, click on ![]() (Insert) or on an empty line to add one or more weeks.
(Insert) or on an empty line to add one or more weeks.
![]() For example, a rotating schedule which alternate, one week of day working and one week of night working.
For example, a rotating schedule which alternate, one week of day working and one week of night working.
14.Under the "Description/Job board" tab, enter a job description and translate the text if necessary. If applicable, add a title in the "Title/Job board" box.
15.Under the ''Contact'' tab, you will find the contacts listed as main contact for a job offer in the client's file. You can add one or remove one.
16.Under the "Associated employee(s)" tab, select an employee associated to the job offer, if applicable.
17.Under the "Info/Ranking/Criteria" tab, select the criteria corresponding to the job offer.
18.Under the "Document management" tab, add the documents, if applicable.
19.Click on ![]() (Save) to finish.
(Save) to finish.