|
Navigation: Training plan > Section 2 - Client > The Client Window Tab - Settings |
Scroll Prev Top Next More |
Tab - Settings
The Settings tab allows you to customize information about the client and also to accelerate the data entry when creating requests.
 The following sub-tabs will be seen in detail in the "Accounting" module.
 The sub-tab Personalization will be seen in detail in the super user section.
 Sub-tab - Billing
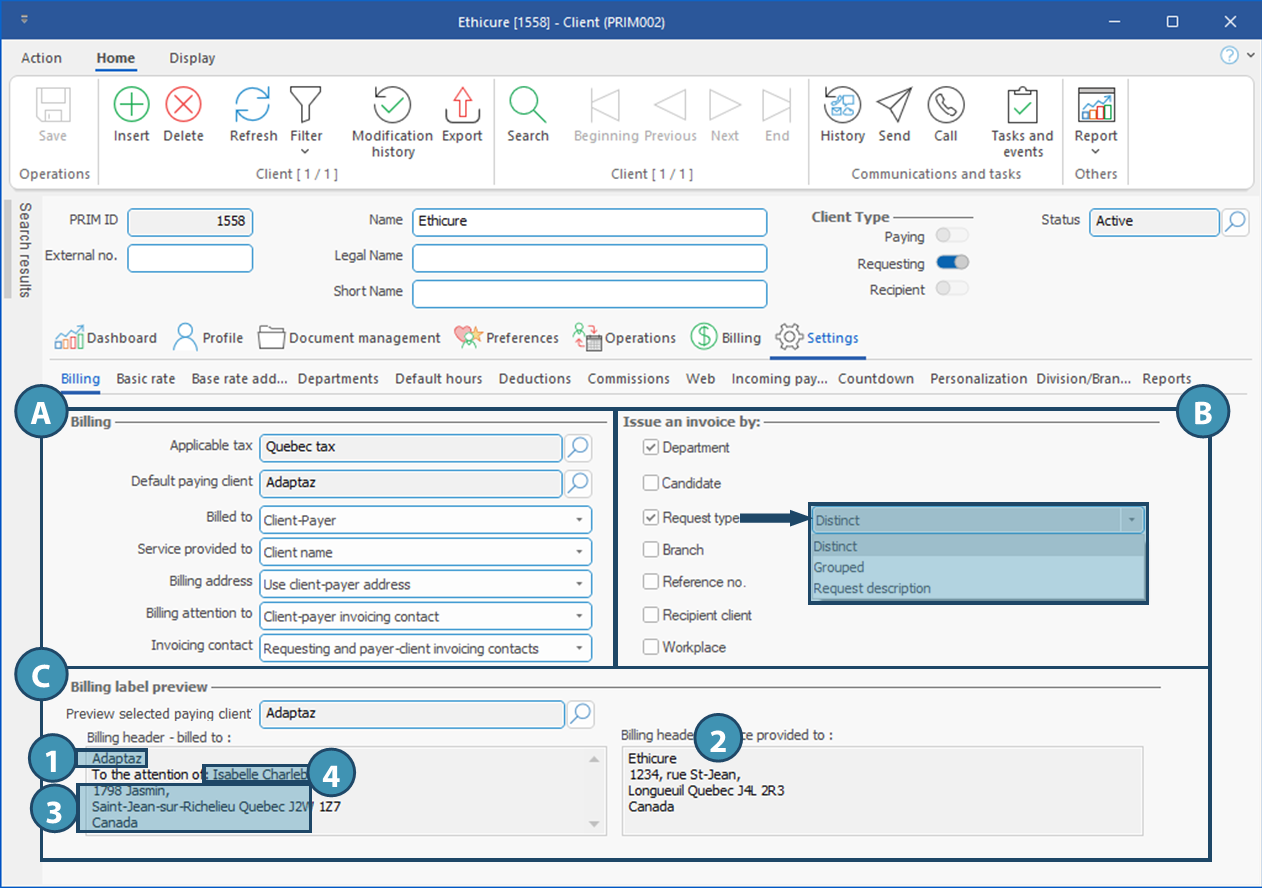
The Billing where to enter the configuration related to billing for a specific client. If this tab is configured correctly, a lot of time will be saved during the various operations, especially during the creation of requests as well as during invoicing. It can be divided into 3 sections: A.Billing: This section comprises all items related to invoicing that needs to be set up, i.e. the payer client, taxes, to whom the invoice is sent and many additional items. B.Issue an invoice by: Comprises the various units that can be used for the breakdown of billing. C.Preview of the billing label
We will see below what the fields in these sections refer to.
Fields in the billing section (A)
Issue and invoice by:
This section allows you to define the billing template for the client, according to the selected criteria.
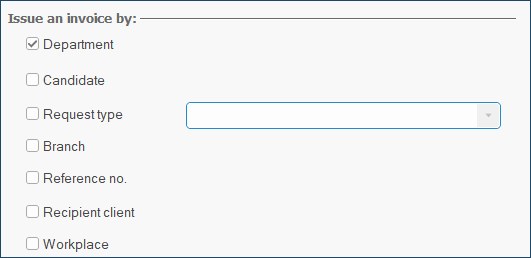
When a user adds a ready-to-process request to an invoice, PRIM will check whether the request can be added on an invoice already having the status "in progress" for the same client, according to "Issue an invoice by:" section. (See example #1).
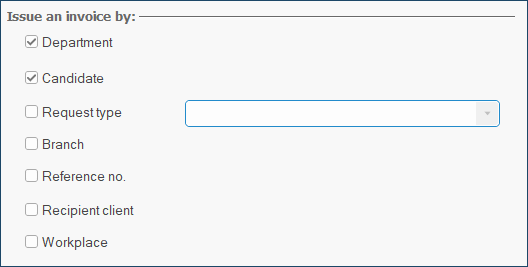
More than one box can be checked, thus adding to the billing constraints. (See example # 2).
Example #1: If the checkbox Department is ticked, PRIM will create a separate invoice for each department of this client. .
Request #1 - Béatrice Dubé worked at "Ethicure" in department "2nd floor". Request #2 - Mario Ouellette worked at "Ethicure" in department "2nd floor". Request #3 - Thomas Cloutier worked at "Ethicure" in department "Basement".
In this scenario, when the 3 requests will be processed for invoicing, requests #1 and #2 will be on the same invoice, since they are for the same department. Request #3 will be on a separate invoice.
Example #2: If the checkboxes for Department and Candidate are ticked, PRIM will create a separate invoice by department AND candidate for this client. .
Request #1 - Béatrice Dubé worked at "Ethicure" in department "2nd floor". Request #2 - Béatrice Dubé worked at "Ethicure" in department "Basement". Request #3 - Thomas Cloutier worked at "Ethicure" in department "Basement".»
In this scenario, when the 3 requests will be processed for invoicing, each request will be on a separate invoice, since none is for the same department AND candidate..
|
 Sub-tab - Departments
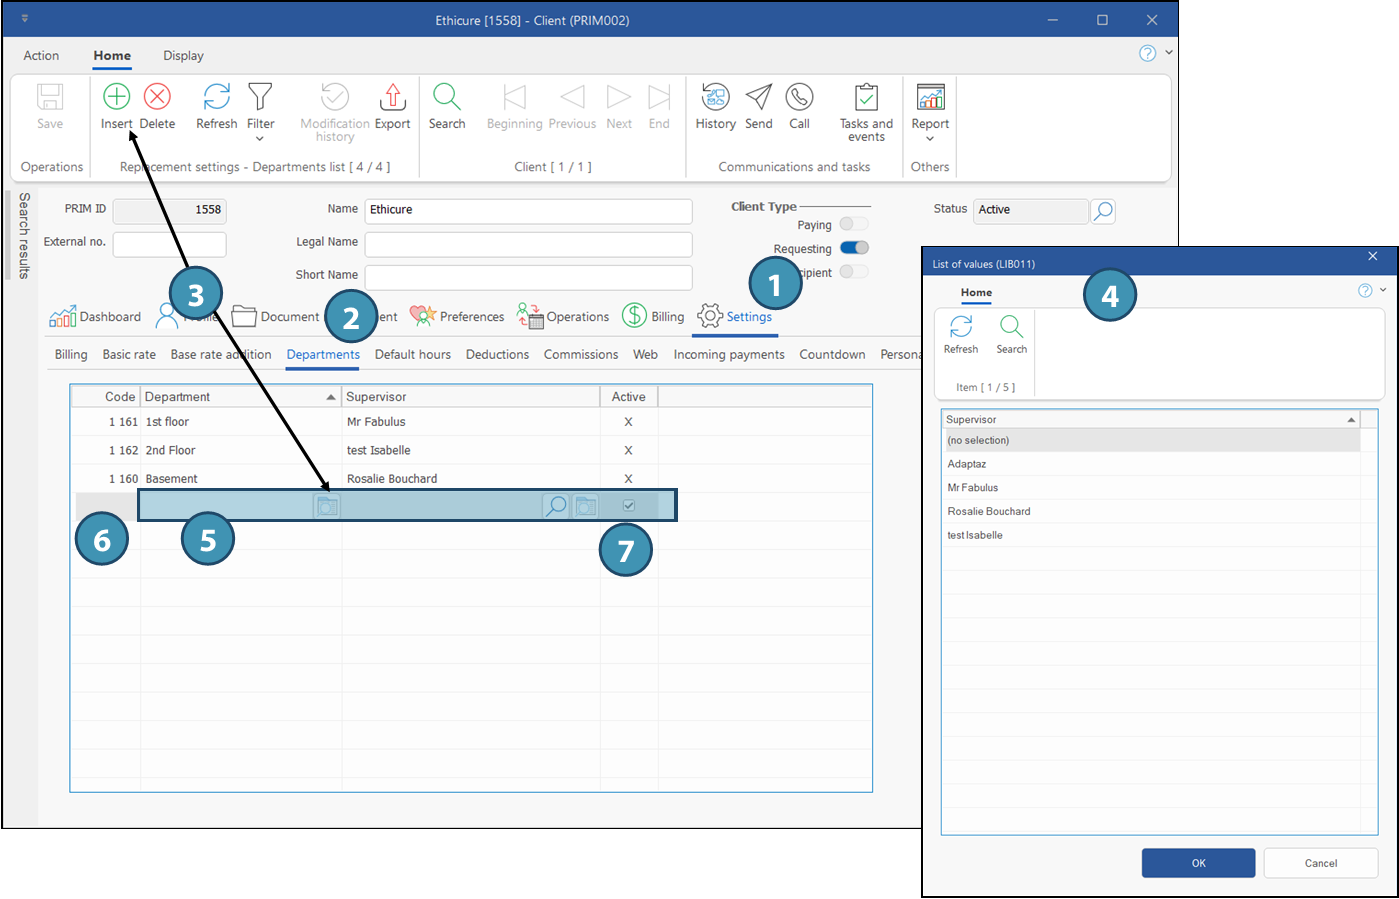
The Departments sub-tab allows you to create departments in the client file. The departments will then be available when creating rrequests and for invoicing.
1.Click on Settings. 2.Select Departments sub-tab. 3.Click on a blank line or on 4.A List of values window is displayed, allowing you to select the supervisor (optional) among client's relations, if applicable. 5.Indicate the name of the department.
|
 Sub-tab - Default hours
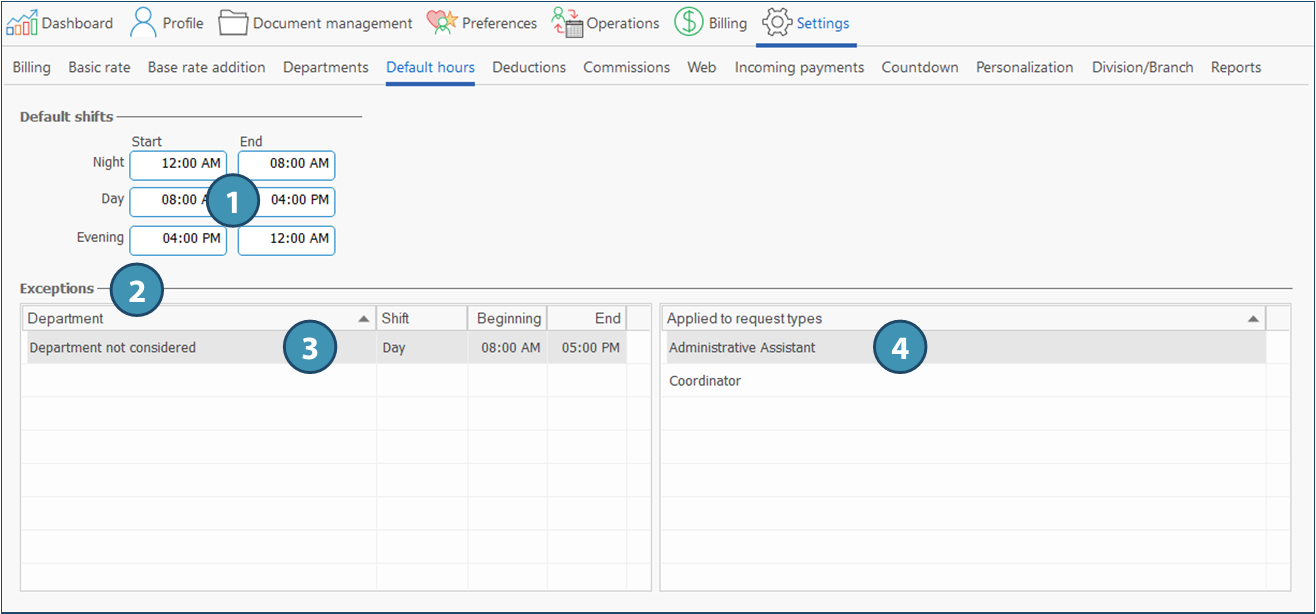
This tab allows you to define the default hours that will be displayed for a shift when creating requests for this client, in order to accelerate data entry. It is possible to customize these hours for each client in the corresponding fields under Default shifts (1).
Furthermore, it is possible to set up exceptions in the Exceptions section. (2).
It is possible to set up 4 exception types to the default hours. •For one department and for one request type. •For one department and for many request types •For all departments and for one request type •For all departments and for many request types
For instance, in the example below, we created an exception for the day shift that appies to all departments (3), for request types Administrative assistant and Coordinator (4)
|
 Sub-tab - Deductions
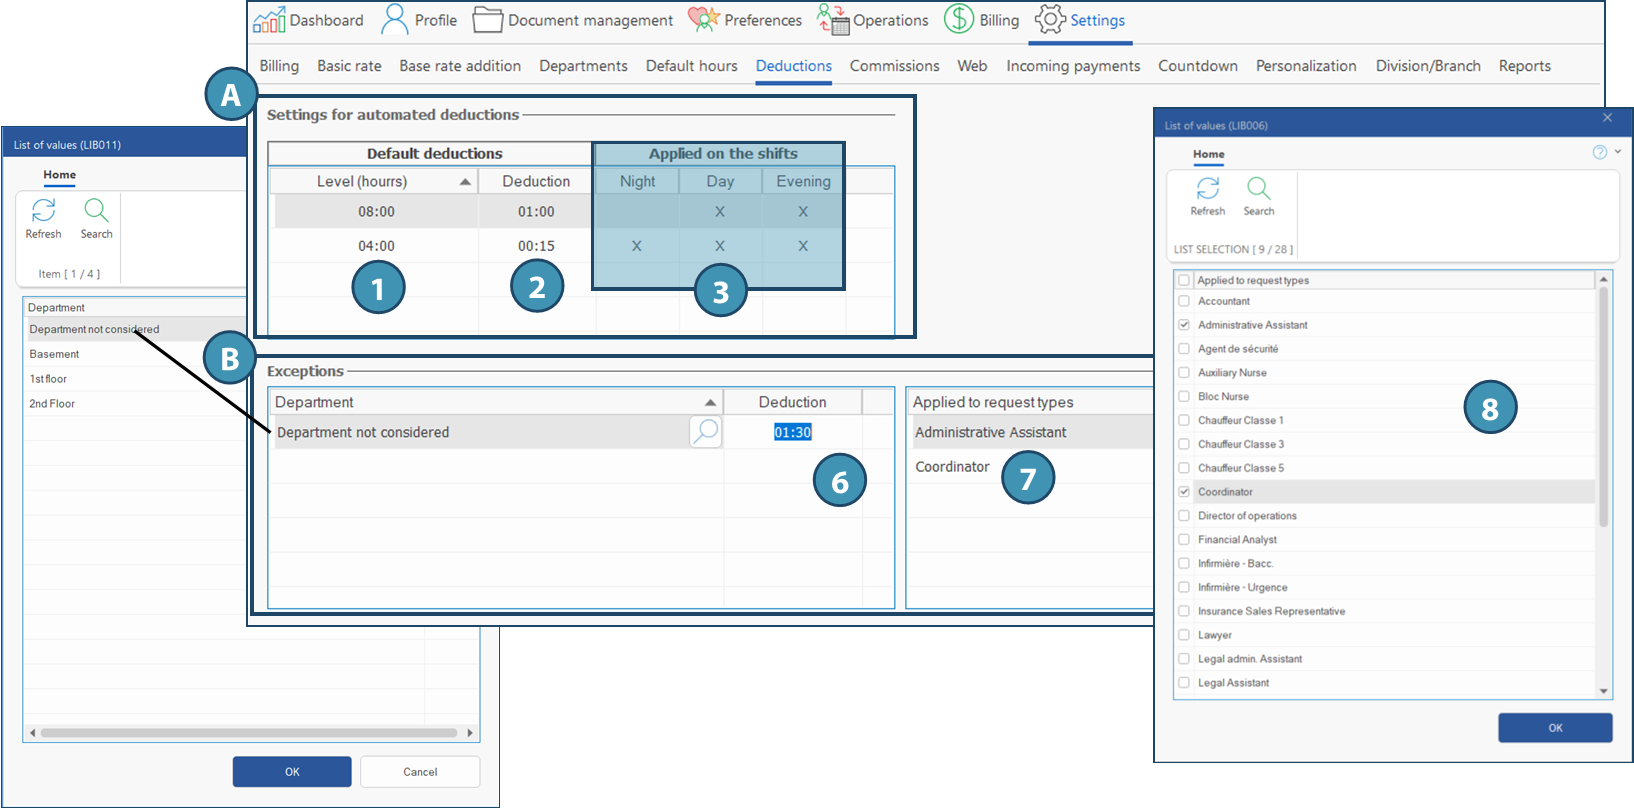
This sub-tab allows you to set up default deductions for the client depending on the shift and total number of hours. Furthermore, for each deduction created the section Settings for automated deductions (A), it is possible to add exceptions depending on the department or request type (B)
To create a basic deduction: 1.On an empty line of the section Settings for automated deductions (A), in the column Level (hours), specify the total number of hours for the deduction to apply .
2.Specify the deduction (in hours and minutes) that should be applied in the column Deduction 3.Specify the shift(s) for which the deduction applies by ticking the appropriate checkboxes. ExceptionsIt is possible to set up 4 exception types to the default deductions •For one department and for one request type. •For one department and for many request types •For all departments and for one request type •For all departments and for many request types
To create an exception: 4.In the section la section Settings for automated deductions (A), select the line for which the exception applies. The selected line will be highlighted. 5.In Exceptions (B) section, click on a blank line in the column Department. A List of values is displayed with the list of active departments. select one or more departments and click on OK.
6.Indicate the deduction (in hours and minutes) in the column Deduction. 7.If the deduction applies only to some functions (request type), click on a blank line in the column Applied to request types. 8.A list of values is displayed with all the active request types for the client. Check all that applies and click on OK. 9.Save.
In the example below, a 1 hour deduction is applied automatically to any day or evening shift. However, an exception has been added to this deduction for the request types Administrative assistant and Coordinator, for which a deduction of 1.5 hours is applied.
|
 Web sub-tab
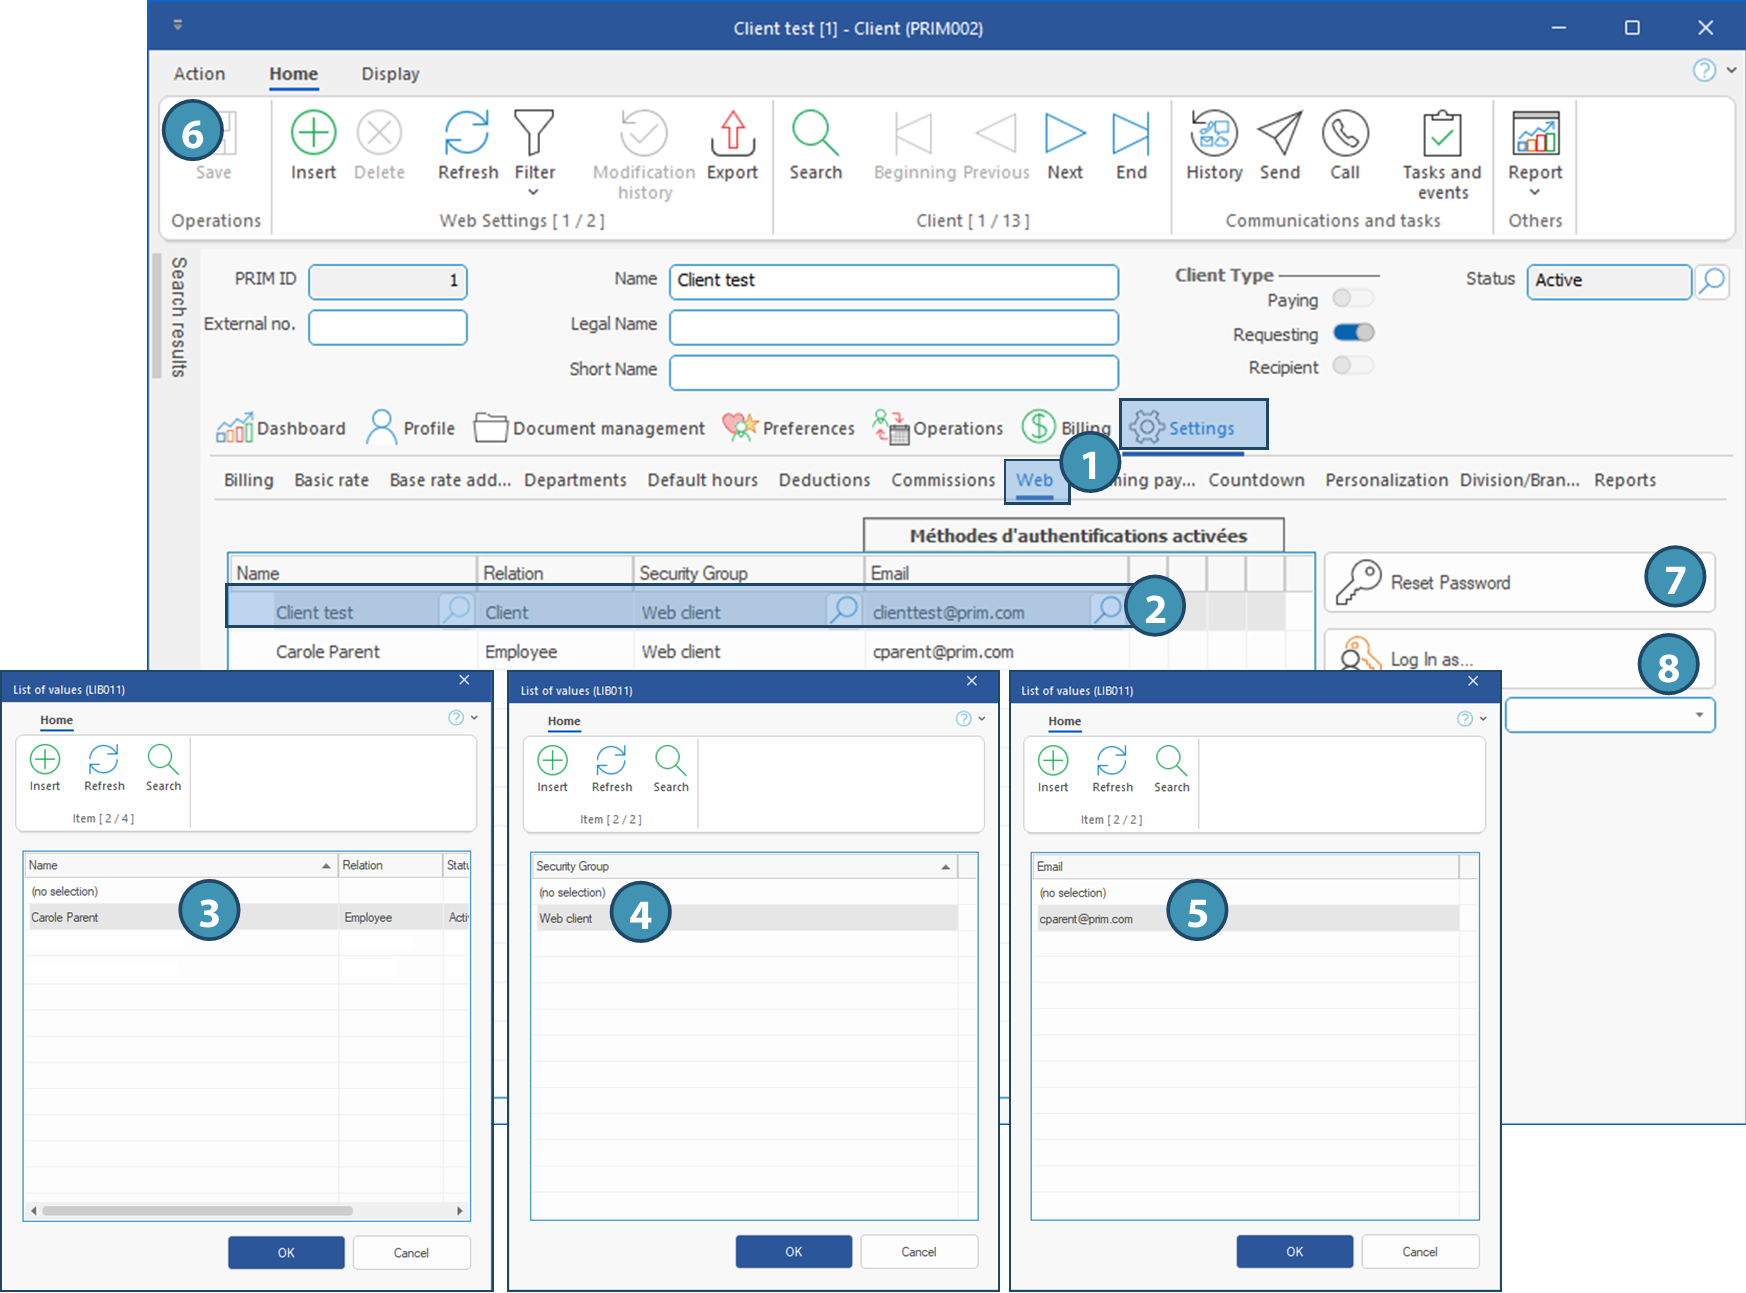
This sub-tab allows you to create client access to the Web portal and reset their password if needed.
1.Click on Settings tab and Web sub-tab. 2.The client itself will be in the list by default. To create a client access with one of the main client emails, click on the magnifier in the Email column and choose the email to be used.
To create additional accounts: 3.Click on a blank line: the List of values window is displayed with all the relations included in the client's file. Choose the employee for whom you want to create an account and click on OK. 4.A second List of values window is displayed, allowing you to select the Web security group. Click on OK. 5.A third List of values window is displayed . Choose the employee's email and click on OK. 6.Click on 7.To reset a password, select the account for which a reset is needed and click on Reset Password. The user will receive an email with a link to click on in order to reset the password. 8.At any time, you can connect to the client Web portal with one of the created account by selecting the line and clicking on the button Log in as...
|
 Sub-tab - Incoming payments
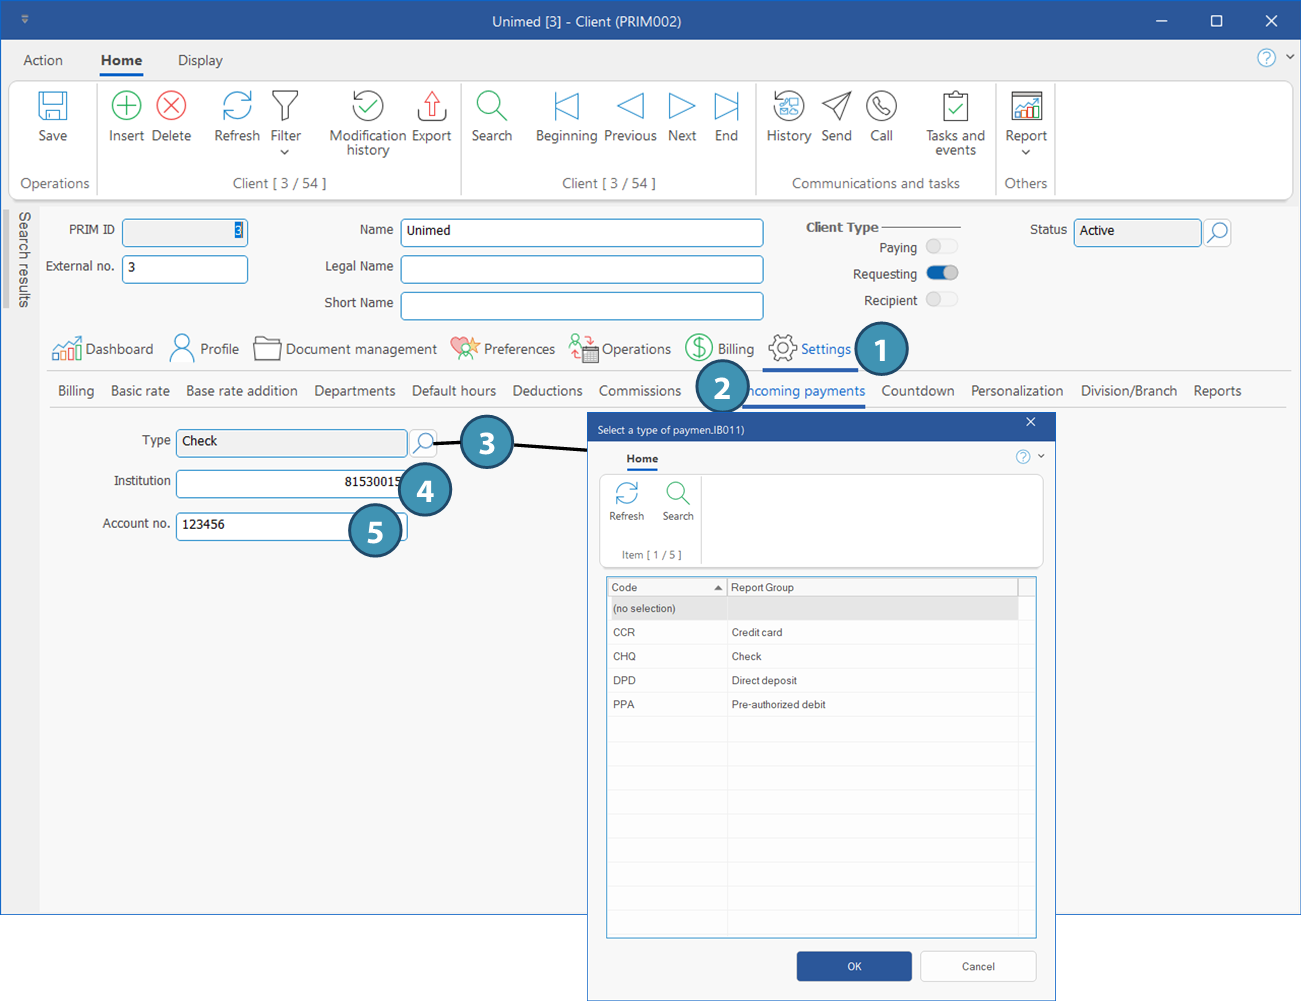
The sub-tab Incoming payments allows you to set up the payment type used by the client.
1.Click on Settings. 2.Select the sub-tab Incoming payments. 3.Click on 4.Enter your client's financial institution number (without the leading zeros, if applicable) and the transit number, without space. 5.Enter the account number. 6.Click on
|
 Sub-tab - Countdown
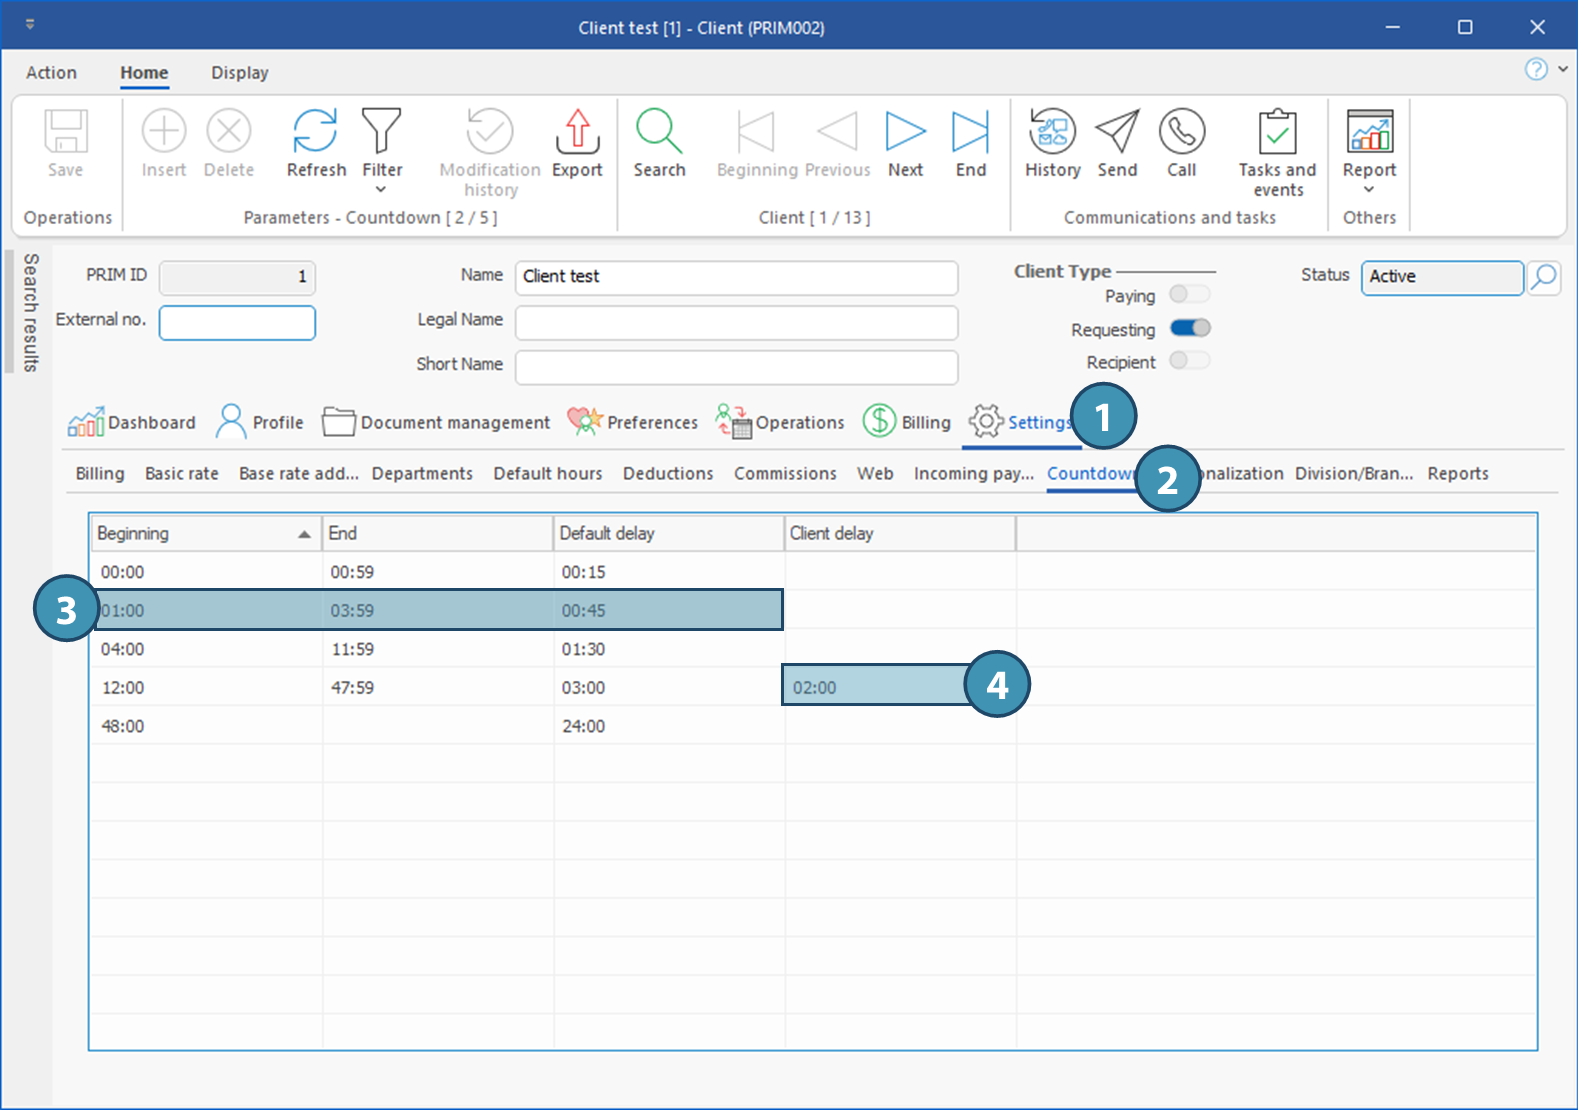
The sub-tab Countdown allows you to set up time limits to fill the replacements.
To access it : 1.Click on Settings. 2.Select the sub-tab Countdown.
For example, in the highlighted line (3), all the requests where the start time is between "now + 1 hour" and " now + 3 hours, 59 minutes", the agency has 45 minutes to confirm to the client the name of the candidate that is assigned to the replacement.
|
 Sub-tab - Division/Branch
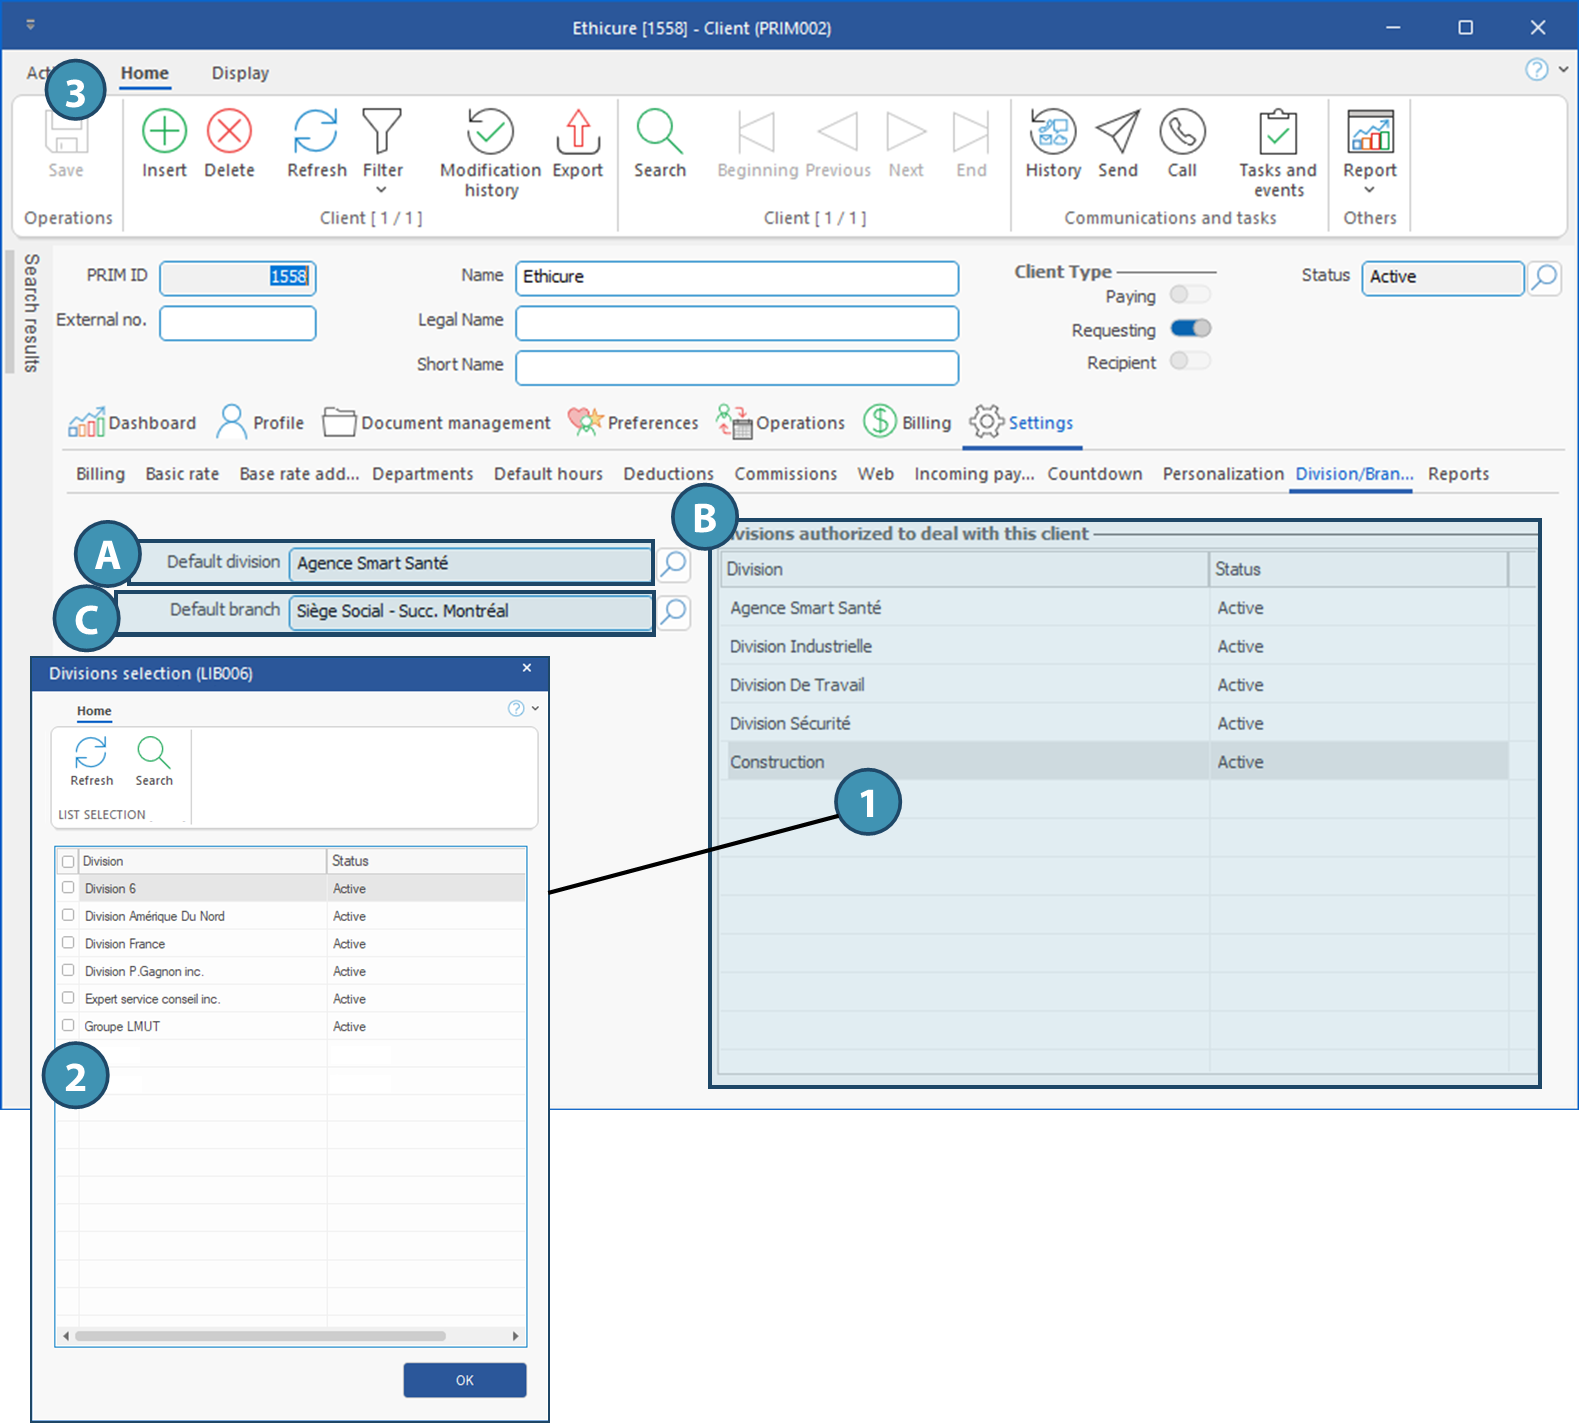
The sub-tab Division/Branch allows you to manage the links between the client, the division and the branch..
A. Default division: Division that will be selected by default when creating a request for the client. It will still be possible to change it if needed with one of the divisions authorized to deal with the client. Click on
B.Division authorized to deal with this client: All the divisions of the agency that are authorized to deal with the client must be specified in this section. C.Default branch: Branch that will be selected by default when creating requests for this client. Click on
To add a division: 1.In the list of divisions authorized to deal with the client (B), click on a blank line. 2.The list of divisions is displayed. Tick all the divisions to be added and click on OK. 3.Click on
|
Created with Help+Manual 8 and styled with Premium Pack Version 4 © by EC Software
 (Insert) to add a new item to the list.

 This feature willl help you to guide users in case they encounter any issue or if they have questions. .
 (Select a type of payment) to disply the choices list, then select the payment method.

 (Delete).