|
Navigation: Training plan > Section 5 - Events and tasks Events and tasks management |
Scroll Prev Top Next More |
 The types of events and tasks associated with these events are configured according to your company's specific needs. The completion choices or events illustrated in the examples below may be different.
 Complete tasks and archive the event
The completion of tasks is possible from the "Events and tasks management" window or from the "To do tasks" window, the completion procedure is identical in both windows.
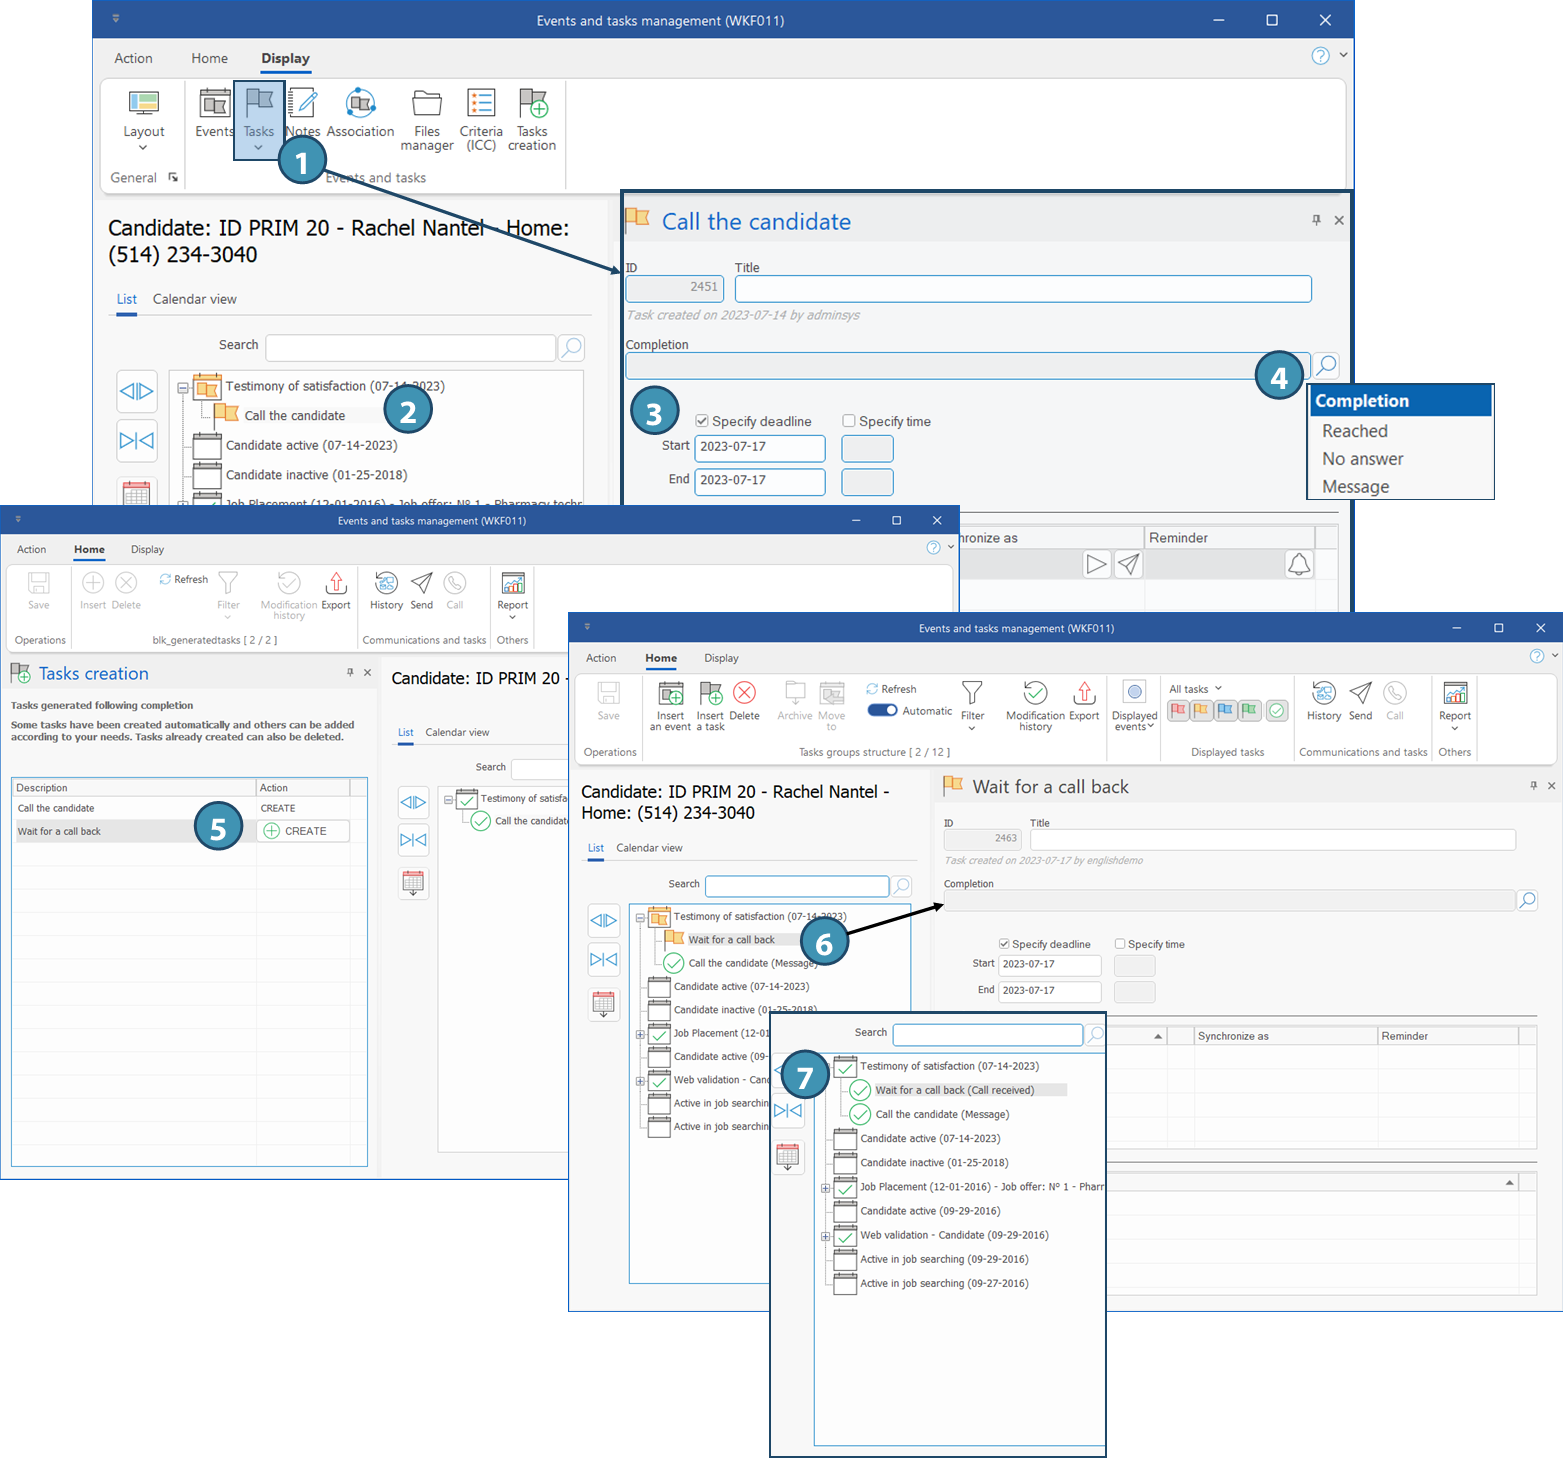
The example below illustrates the completion of tasks related to the "Testimony of Satisfaction" event for a candidate.
1.From the candidate's file, launch the Events and tasks management window. Make sure the Tasks pane is displayed, otherwise launch it from the Display ribbon. Assure. 2.Select the task "Call the candidate" under the event "Testimony of satisfaction". 3.Depending on your configuration, the due date of the task could be automatically added and it will be possible to modify it. Otherwise, check the "Specify deadline" box to activate the text fields and enter a date. 4.Click on the icon
Dans l'exemple ci-dessous, nous avons choisi l'option « Message » 5.In the case where various tasks can be added, a new Events and tasks management window will open with the task creation pane to allow the creation of a new task related to the event. In the displayed window, select the proper tasks - here "Wait for a call back". Click on
6.The new task has been added to the list. Repeat the previous steps when ready to complete the new task. 7.If the selected completion option is the last task to complete the event, the event will be marked as completed and the icon
|


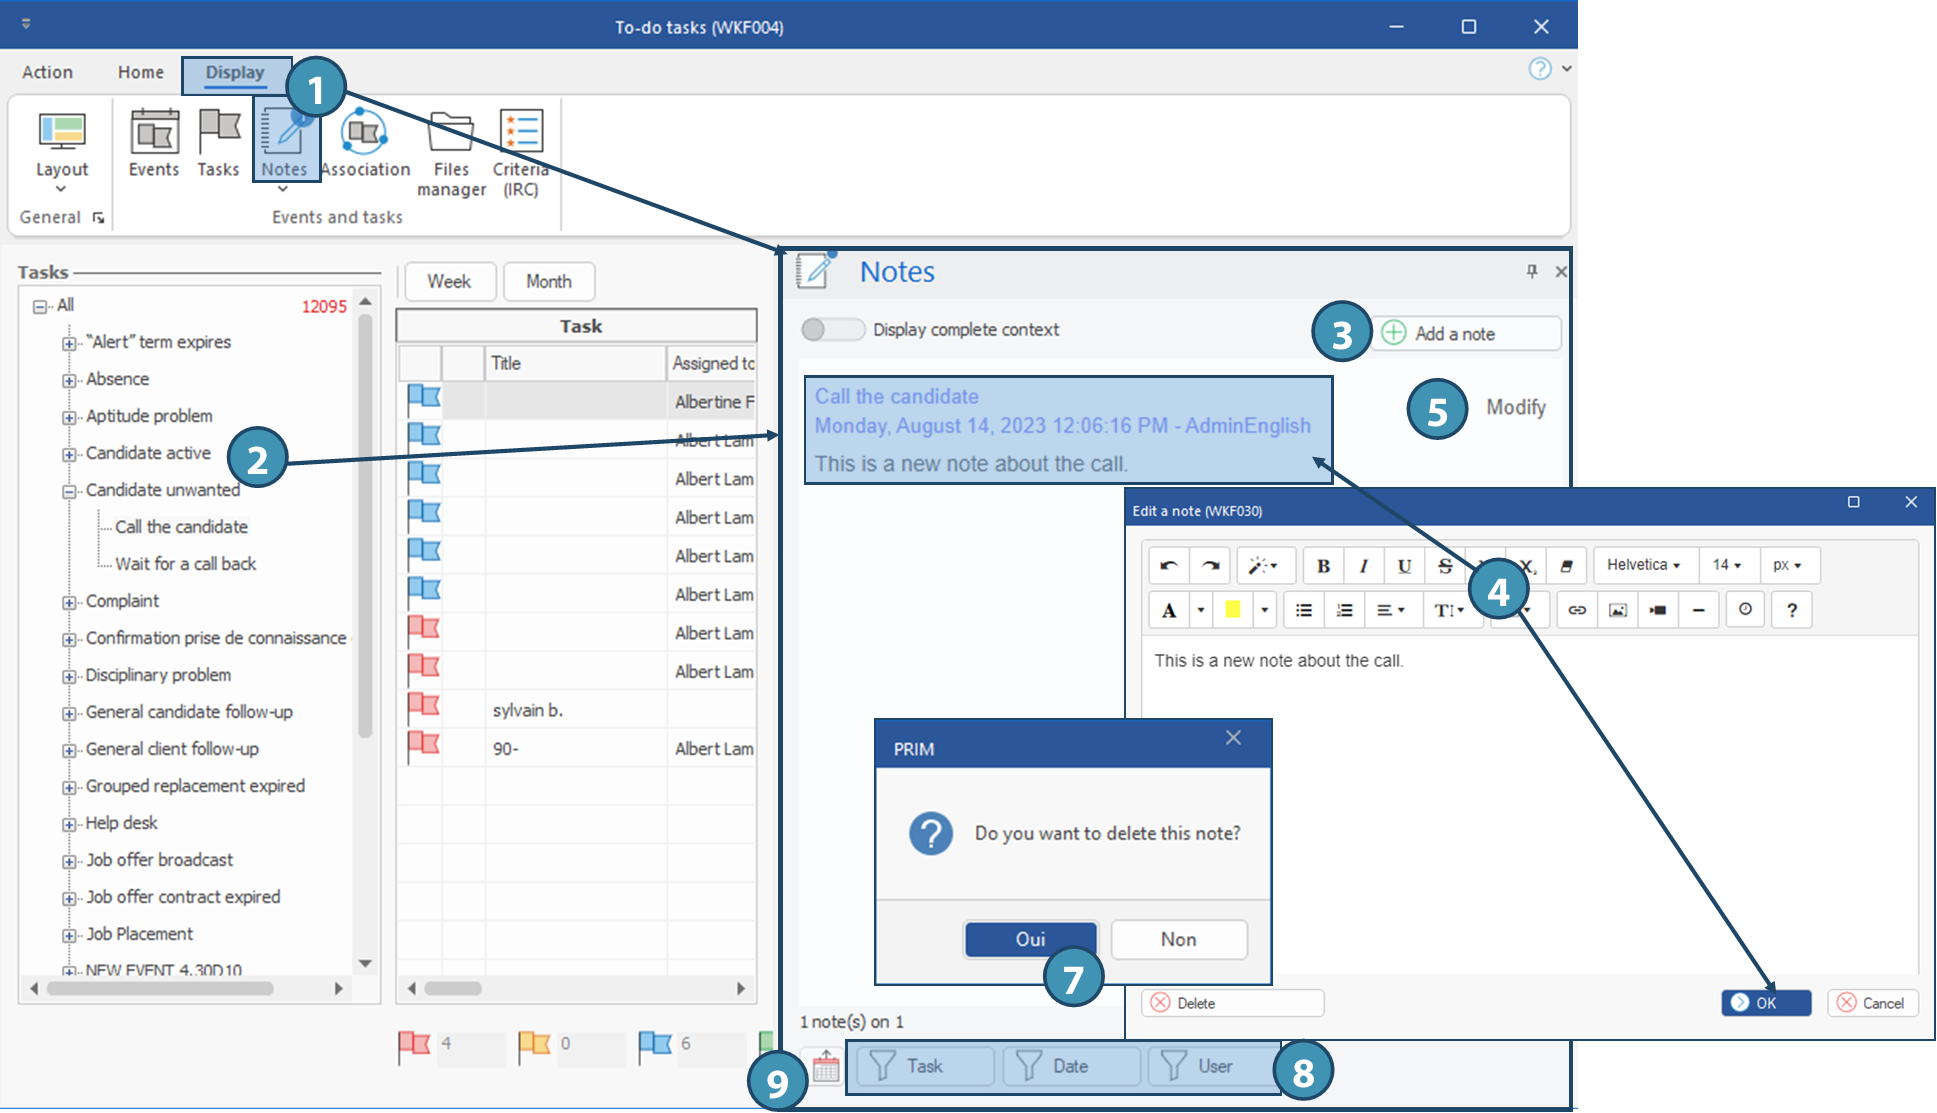
Add, edit or view a note related to an event or task
For clarification, a note can be added to a newly created or existing task or event.
Add a note
1.From the "To do tasks" or Events and tasks management window, make sure the Notes pane is displayed. Otherwise, launch it from the Display ribbon 2.Select a task or event and move to the "Notes" tab. 3.Click on the button 4.Write and use editing options to format the text if needed. Once you are done, click OK to save the note. Details are visible in the note display area. Modify or delete a note
5.Select the note you want to make a change or delete and click on the "Modify" link on the right of the note to open the note editing window.
6.Change the text of the note. Click "OK" to save your changes. 7.To delete the note, click on
Trier ou filtrer les notes à l'intérieur d'un événement
The notes displayed in the pane will be the ones linked to the selected task or event, unless the Display complete context option is activated. In this case, you can apply filters to view only some notes according to the criteria you have chosen.
8. To filter the notes, click on one of the filter icons (Task, Date, User). Une fenêtre de sélection de filtre s'affiche, vous permettant de sélectionner les éléments à inclure ou exclure de l'affichage. 9. To sort notes by ascending or descending date, just click on the corresponding buttons:
|
 to launch text editor.
 or
or
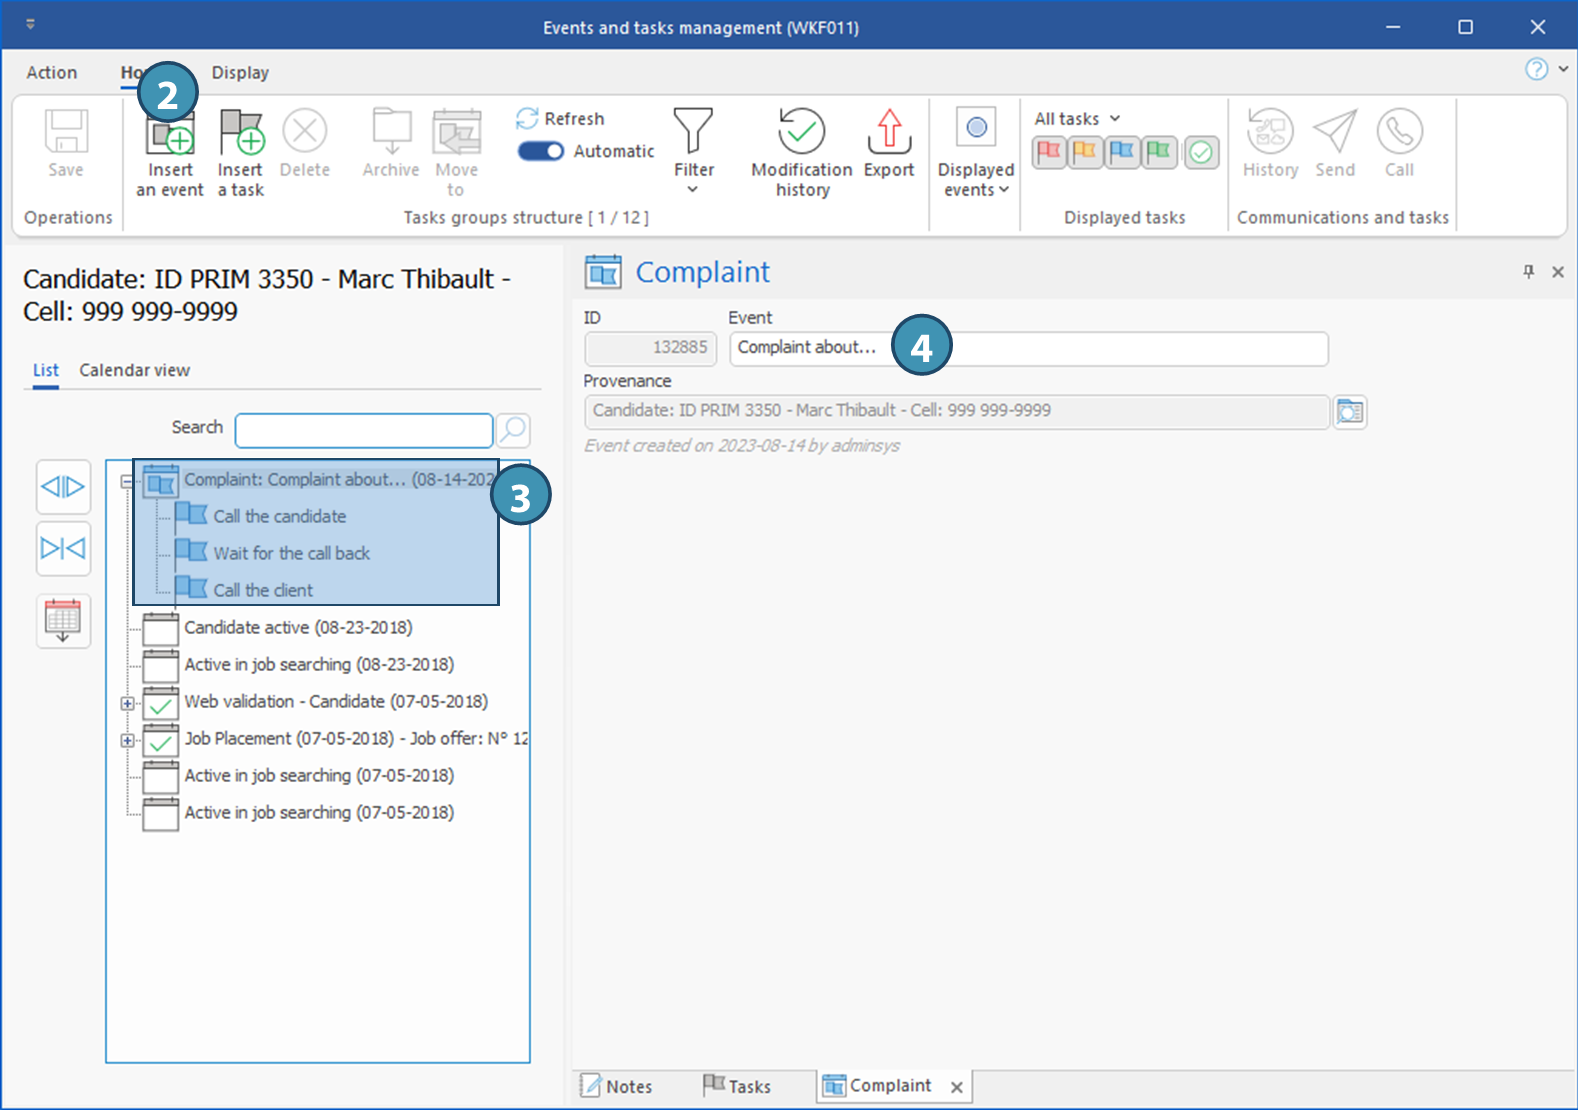
Add an event
The example below illustrates the addition of the "Complaint" event to a candidate's file.
1.Open the candidate's file and the "Event and task management" window. 2.Click on the button Insert an event to display the selection window and choose the event "Complaint". 3.The event and its associated tasks are added to the file. 4.You can add a personalized title to the event, to specify its nature or subject.
|
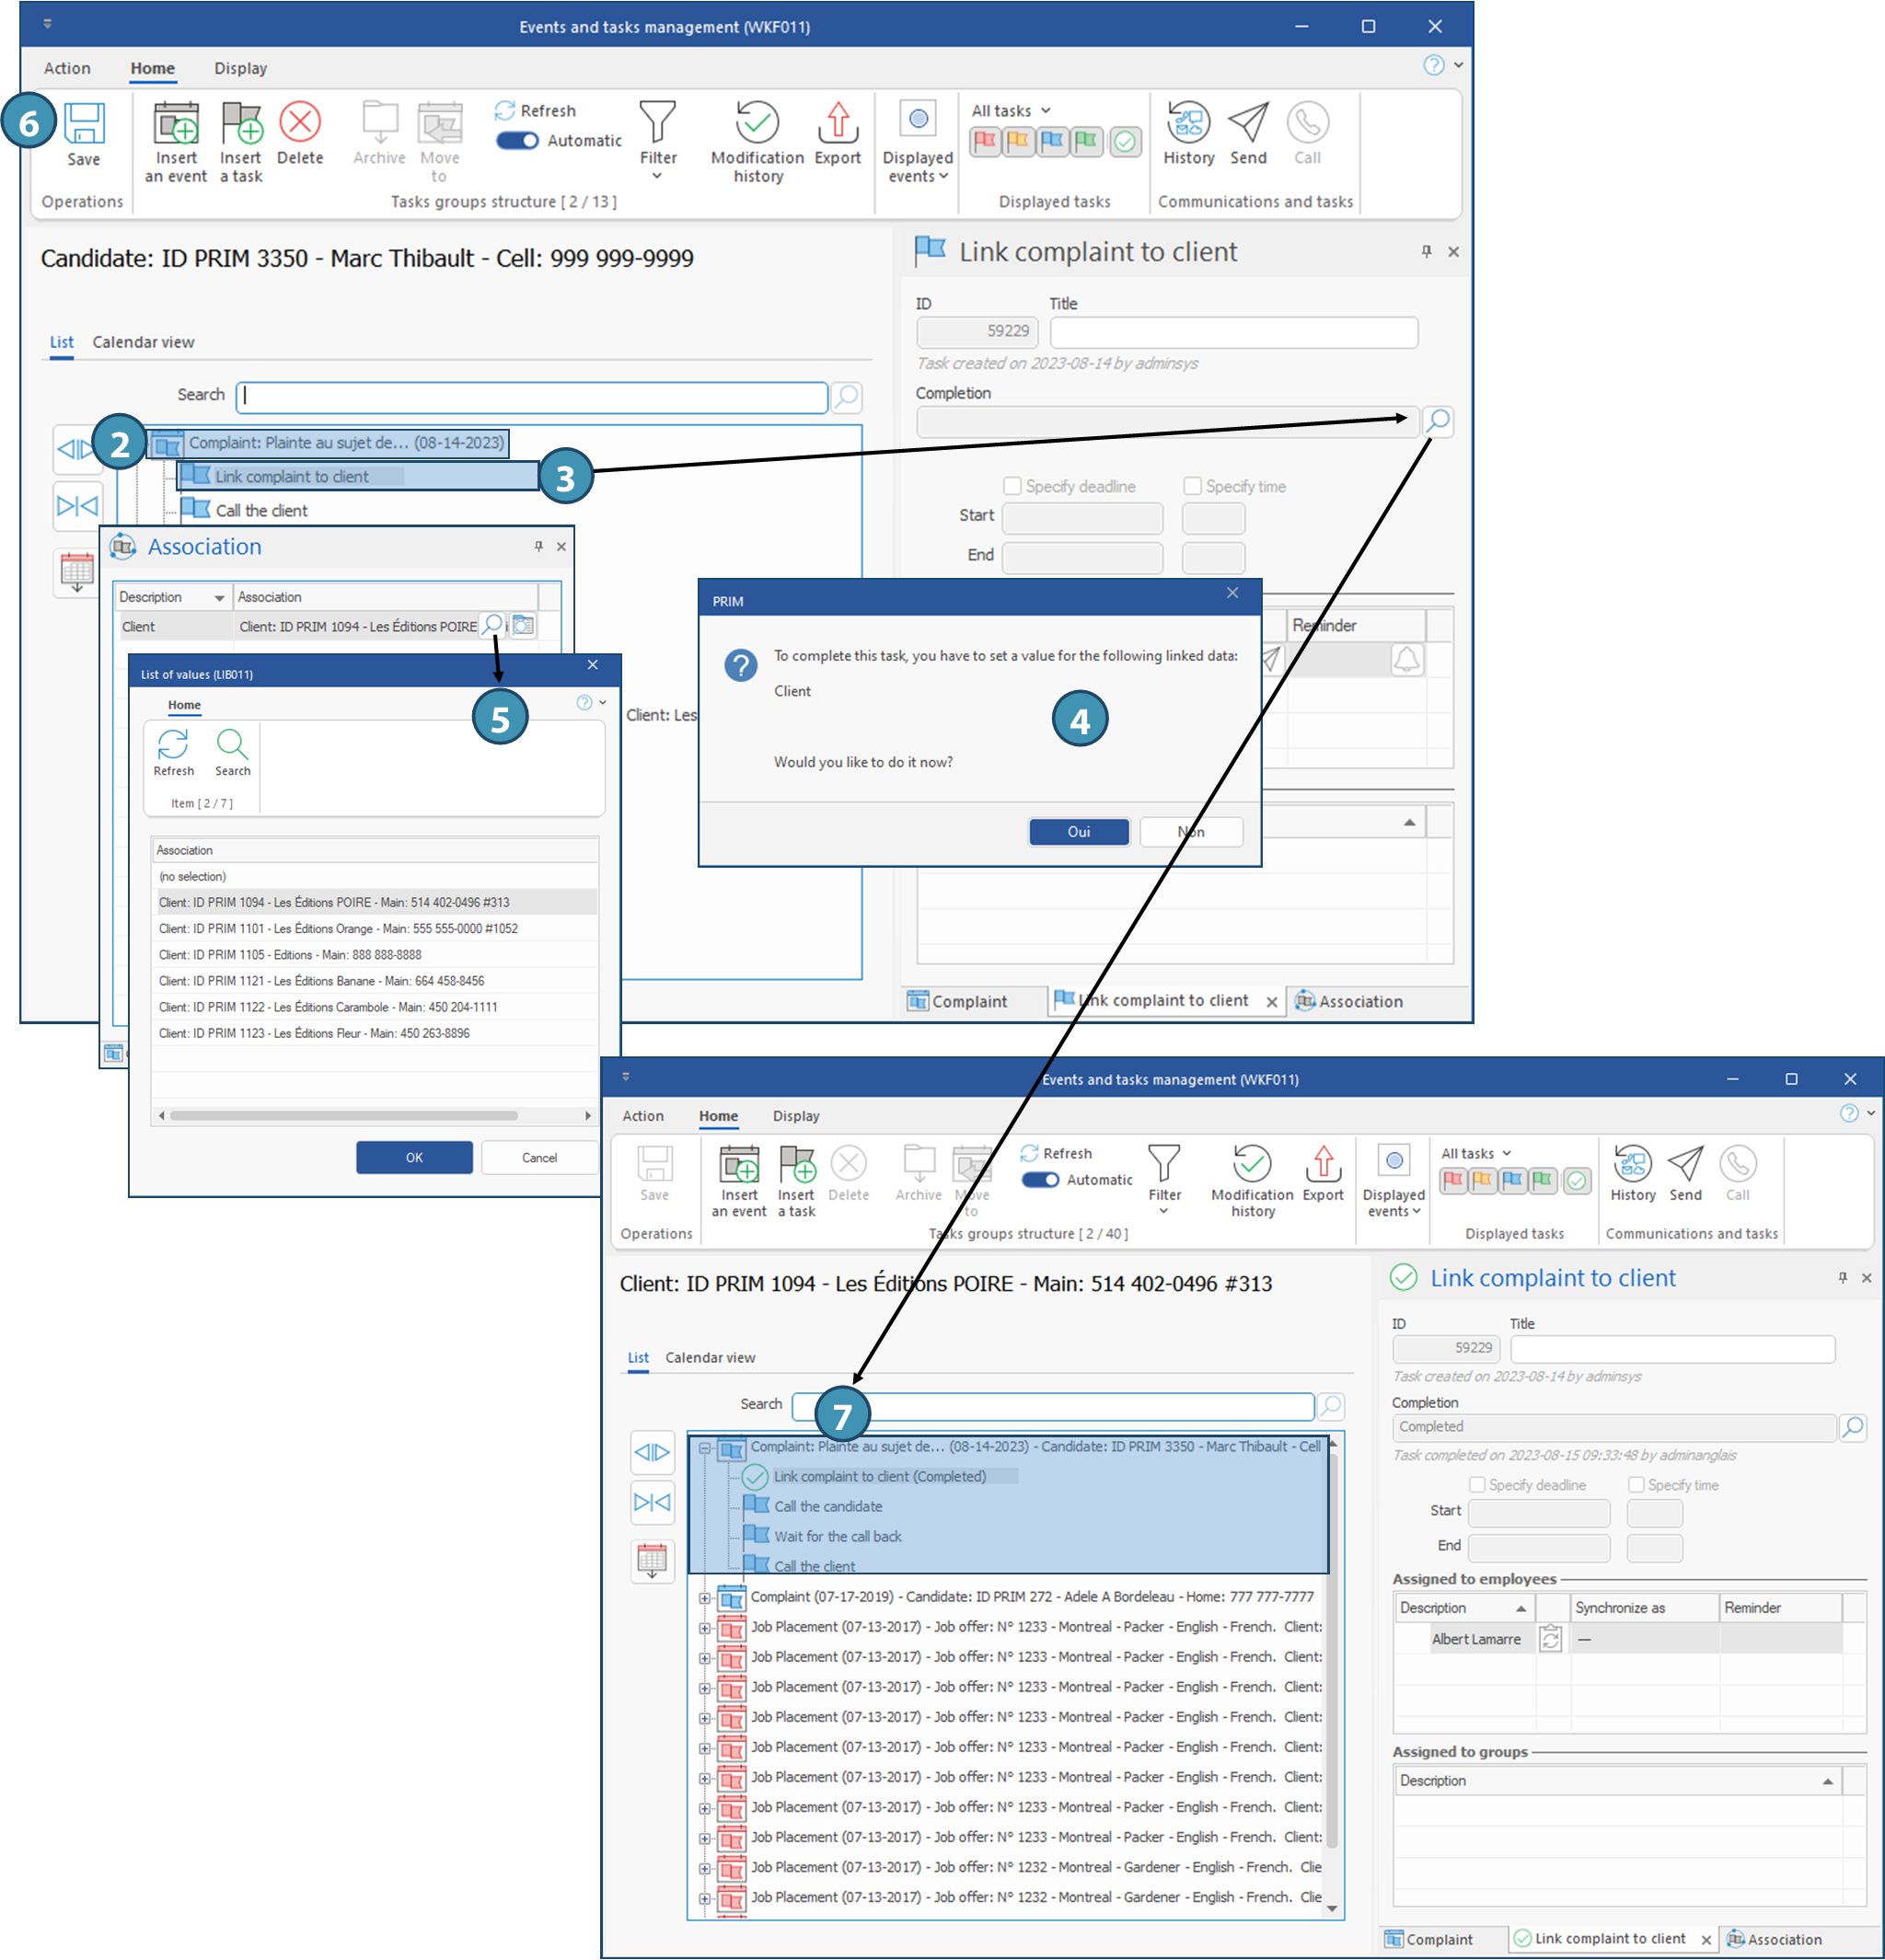
Associate an event
Associating an event between two folders will make it possible to find this event in the two folders concerned in order to facilitate its follow-up.
The example below illustrates an association between a candidate and a client following a complaint made by the client who was not satisfied with a candidate's work.
1.Open the candidate's file and the "Event and task management" window. 2.Select the "Complaint" event, or add it to the file if it is not already added. 3.Select the task "Link complaint to client" and in the tasks pane, click on the icon 4.In the message that appears, click Yes. You are redirected to the "Associations" pane of the window, which will open if it is not already.
5.In that pane, click on the icon 6.Click on 7.Move to the "Tasks" tab and complete the task. The event is added to the client's file and contains the information from the file to which the event is associated. 8.You can complete other tasks and archive the event, if necessary.
|

Add a task
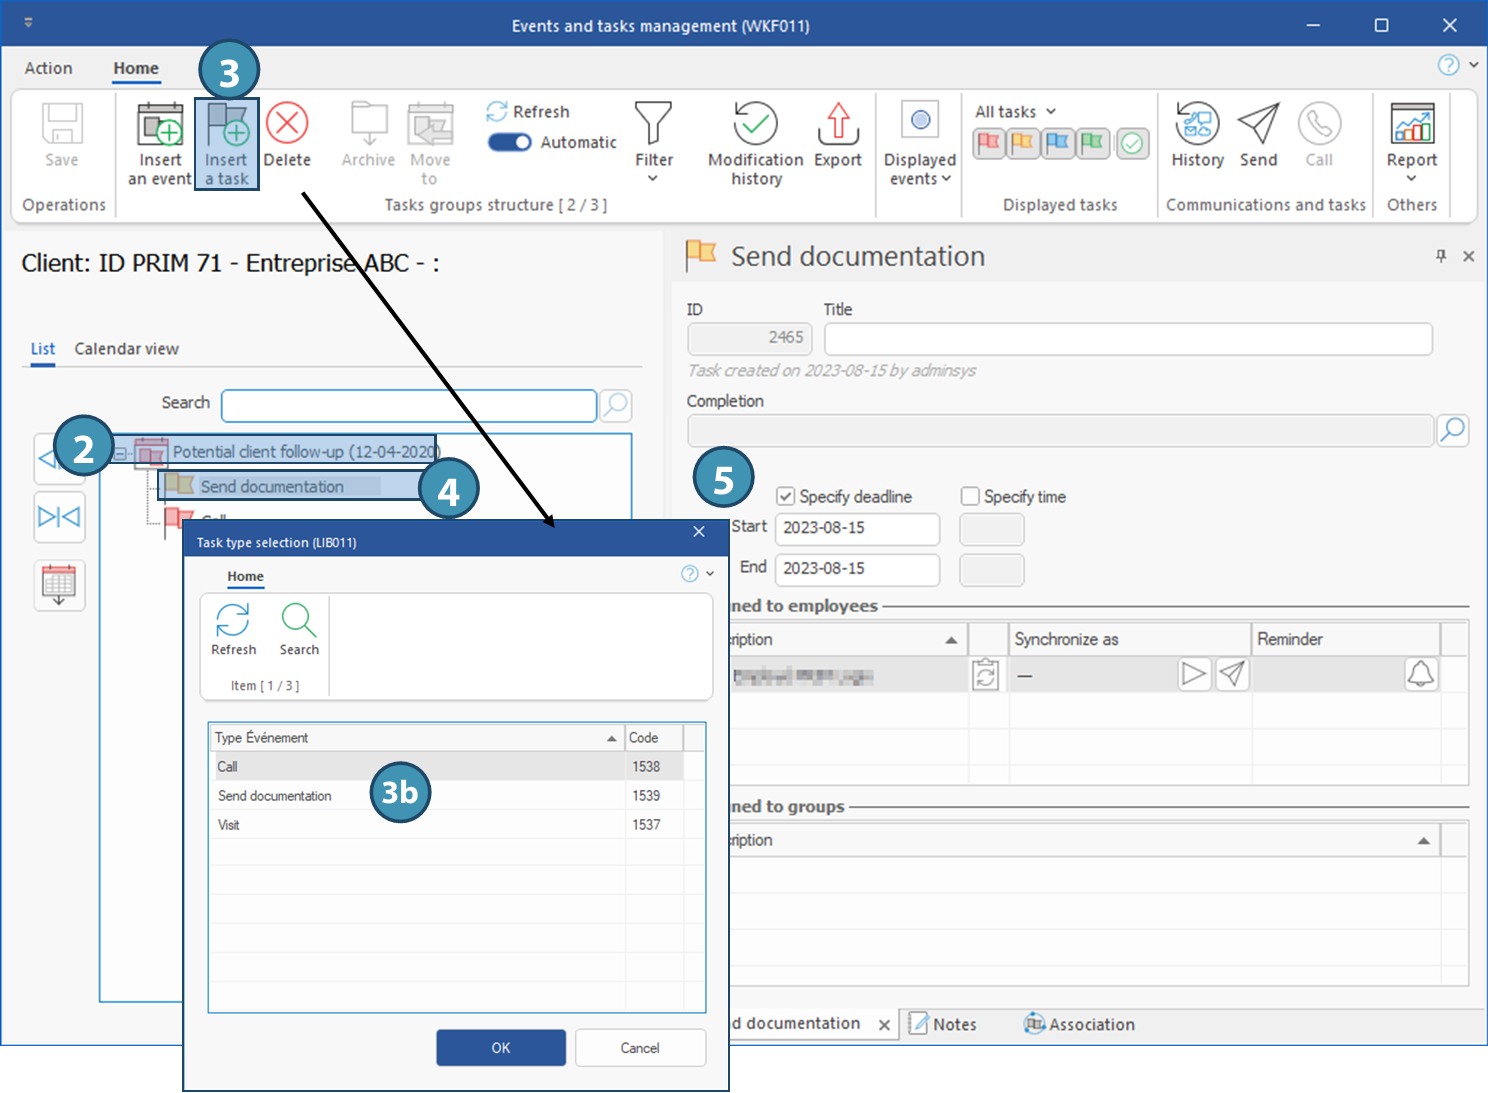
The example below illustrates the addition of the task "Sending documentation" under the event "Potential client follow-up" in a new client's file.
1.Open the client's file and the "Event and task management" window. 2.Select the event "Potential client follow-up". 3.Click on the button Insert a task to open the selection window, choose the task "Send documentation" and click OK.
4.The task is added to the folder. 5.If necessary, specify the due date of the task.
|
Assign a task
PRIM allows you to assign a task to a user or a security group.
The example below illustrates the assignment of the "Send documentation" task to a user from a client's file. Note that the procedure is the same for assigning a task to a security group.
1.Open the client's file and the "Event and task management" window. 2.Select the event "Potential client follow-up" and the task "Send documentation". 3.Click on a blank line in the "Assigned to employees" section to open the selection window. 4.Select an employee from the list provided. 5.Press the icon 6.The task is assigned to the selected user.
|
 (Save).
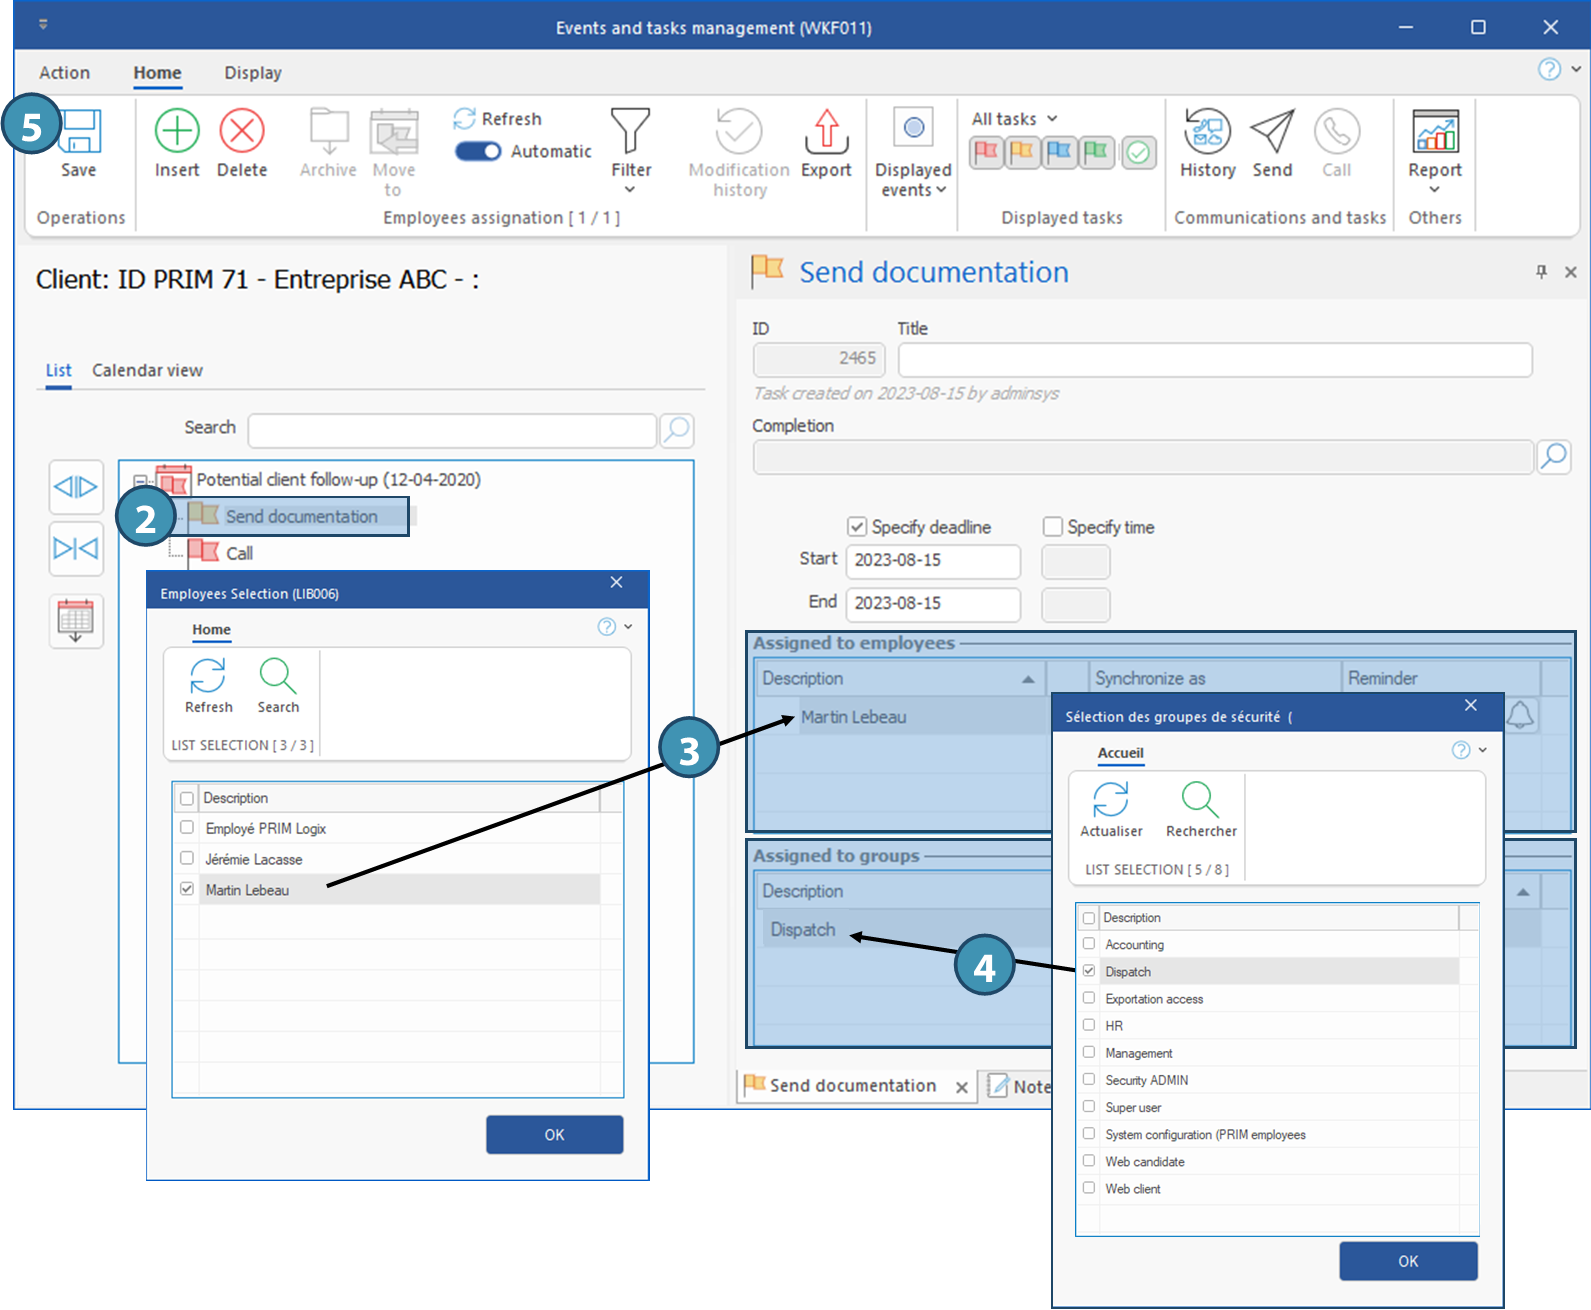
Created with Help+Manual 8 and styled with Premium Pack Version 4 © by EC Software