Why a candidate is not displayed in planner
There are several reasons that can explain why a candidate does not appear in the planner when trying to fill a request. Here are the main items to check:
•A filter applied to a column in the planner is hiding the candidate: some basic filters are applied on the planner, including preferences, client criteria, schedule conflictsand candidate availability. Additional filters could be used in your organization.
•The candidate does not have the criteria to perform the work. i.e. criteria required for the mission.
•The candidate has the selected the option "Decline" in one of its criteria relating to the client or the mission.
•The candidate has selected the option Requirement for a choice associated to subject in his file, and this choice is not requested for the mission or the client.
•The candidate has exclude a combination of criteria in his or her file, and one of the criteria is requested for the mission or the client.
•The current status of the candidate doesn't allow him or her to work.
•The candidate did not activate the job type matching the request in the Type of job sought
•The candidate is not allowed to work for the division in which the request has been created.
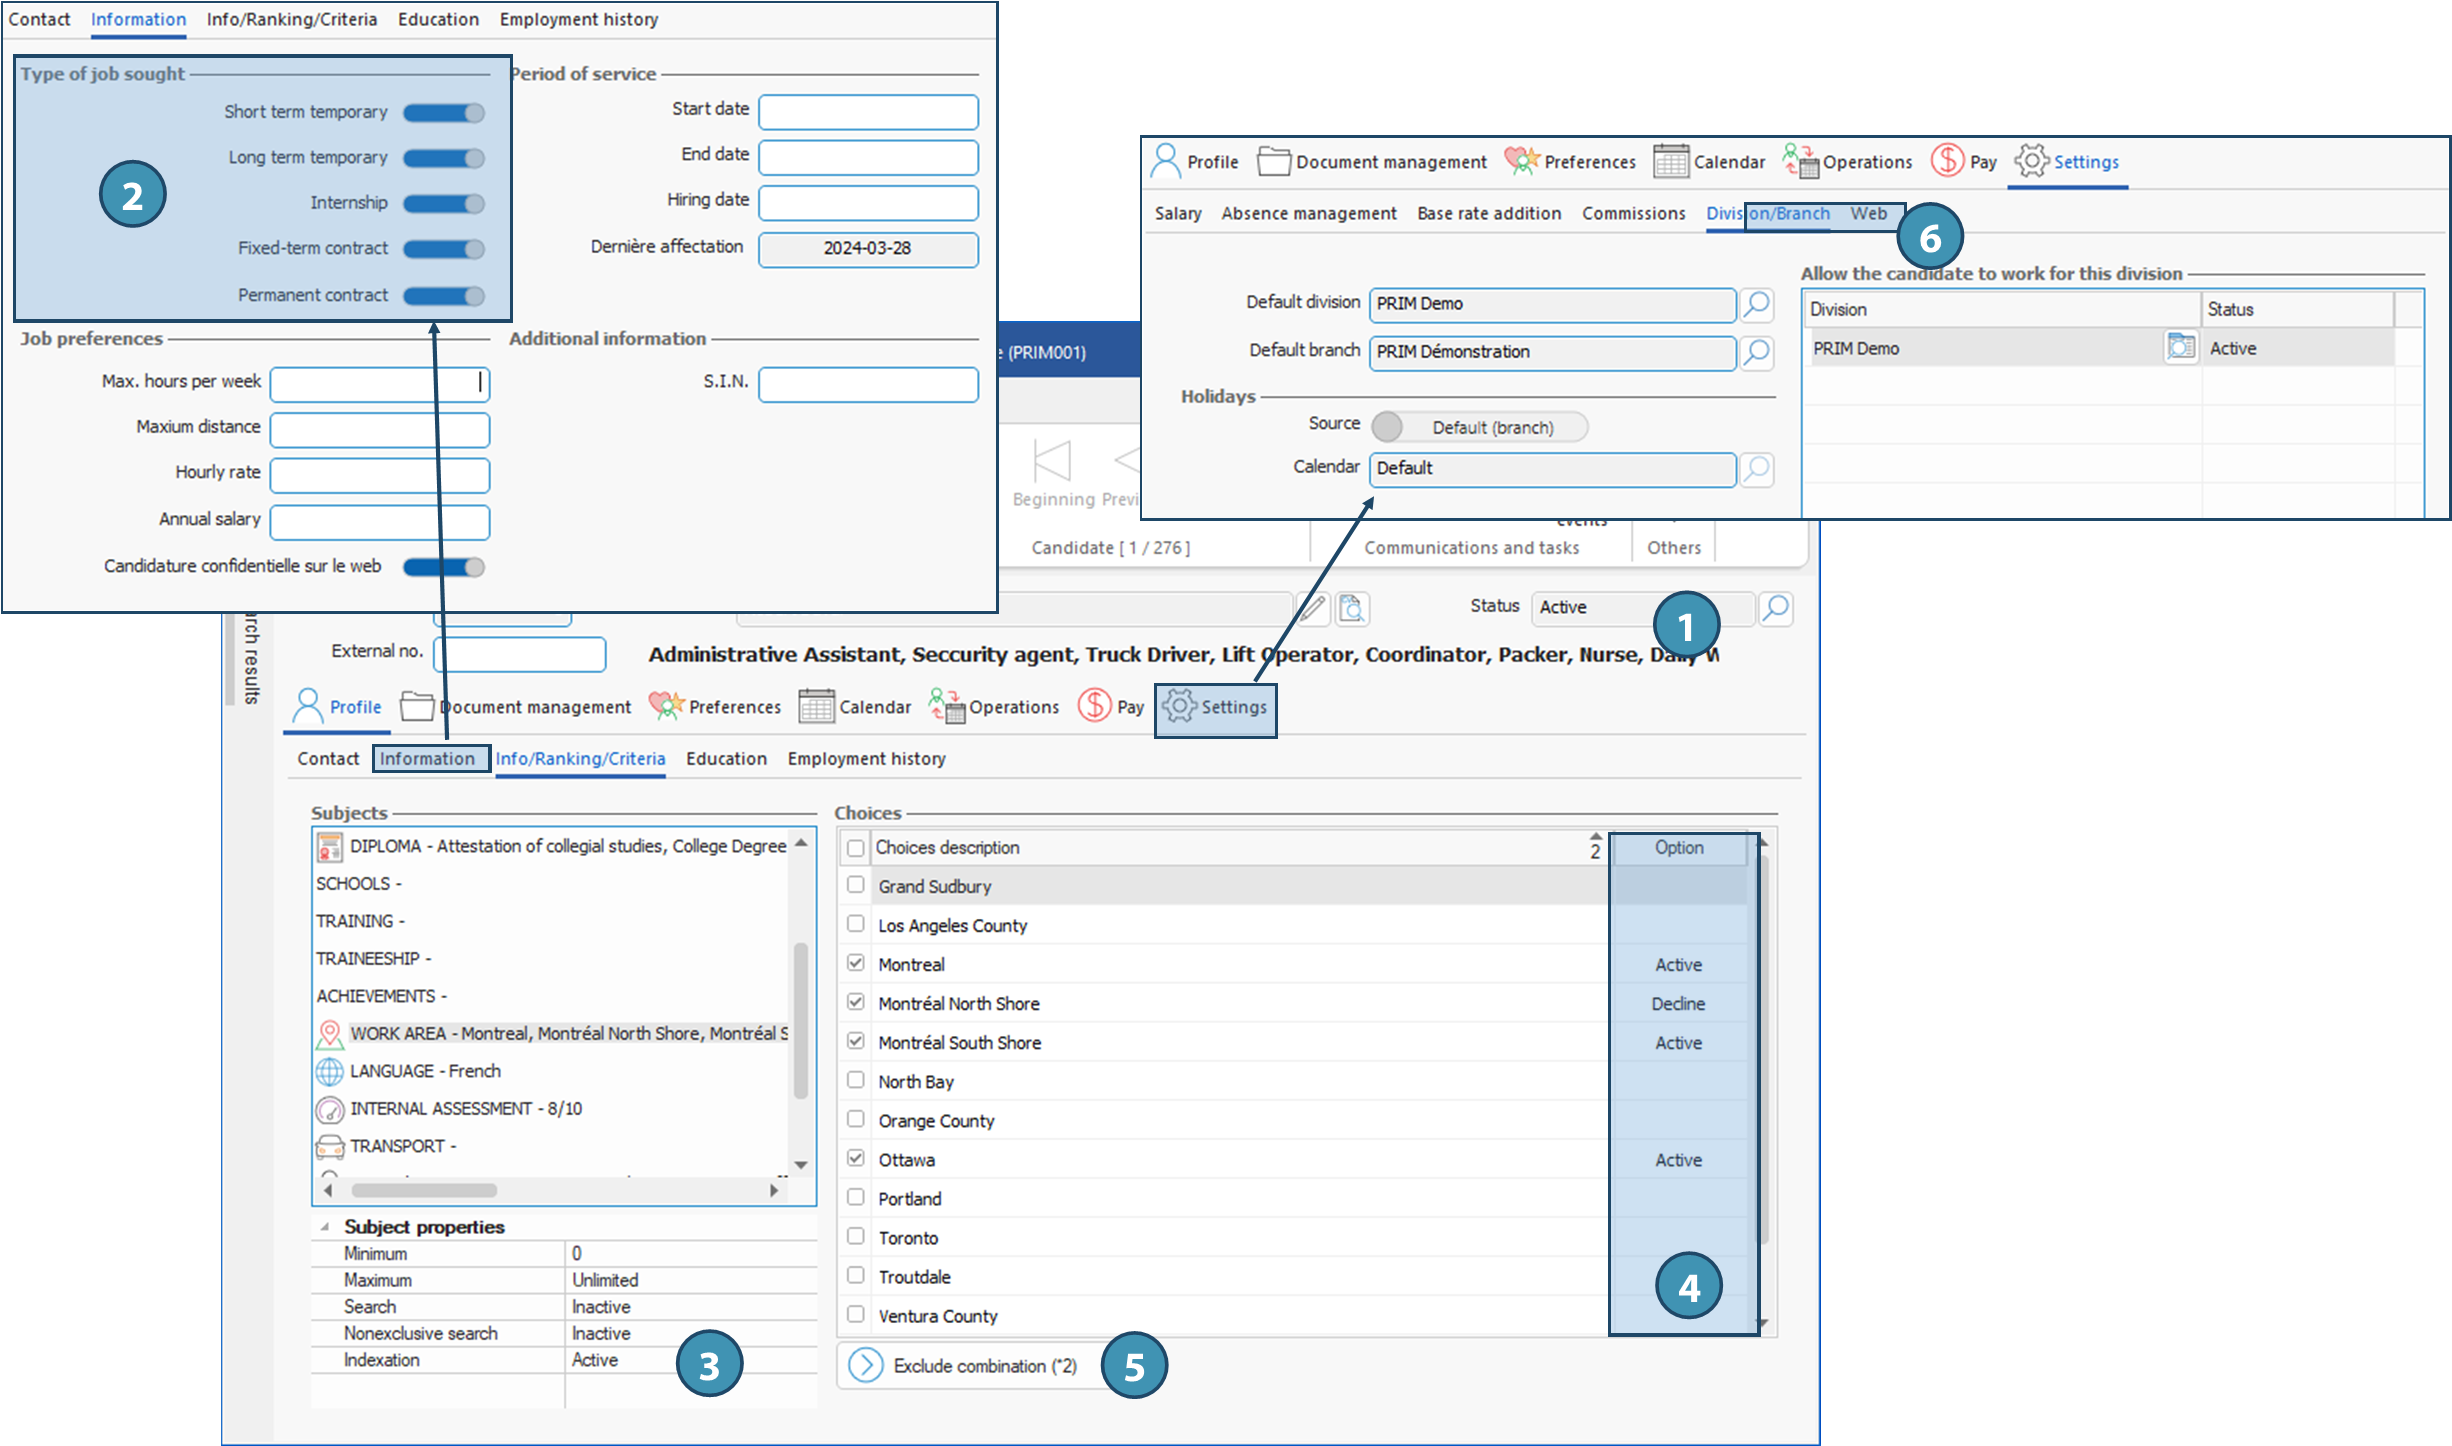
Verifications in the candidate's file
Several verifications can be made in the candidate's file:
1.In candidate's file main section, check the candidate's status.
2.Click on Information tab, then make sure that the job type matching the request is active for the candidate.
3.In Info/Ranking/Criteria tab, verify all the subjects that are activated for indexation, for example the region, function, language or client type.
4.Also check if the options Decline or Requirement are selected for choices ticked in some subjects.
5.Finally, check if some criteria combination are excluded.
6.In tab Settings / sub-tab Division/Branch, make sure the candidate is allowed to work for the division associated to the request.
Find and remove filters applied on planner
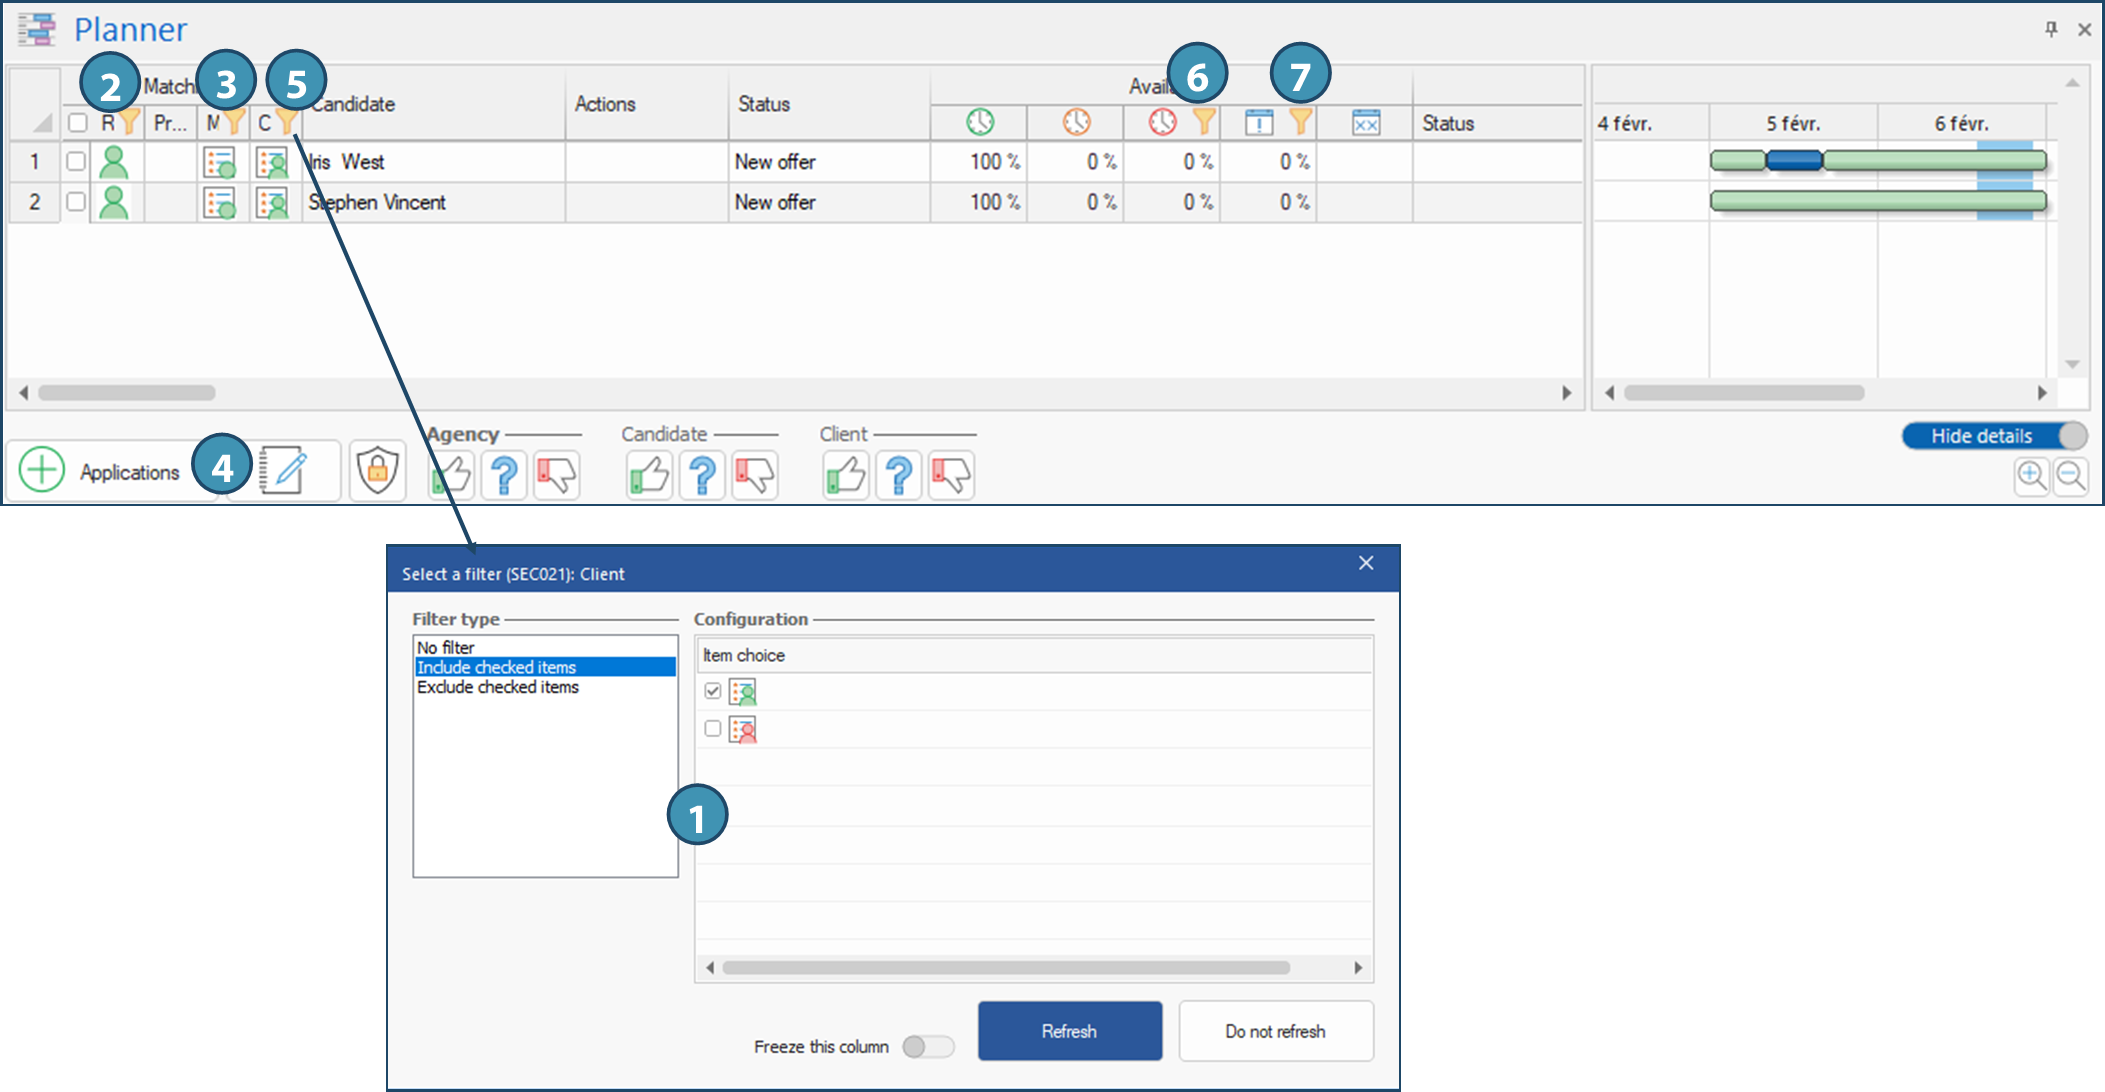
The filters applied on planner allow you to only display candidates that might be a good fit for the request. Some filters have been set up in a recurrent filter with basic configuration, while others might have been added by your organization.
To find the applied filters, look for the icon  on column headers in planner. To remove a filter, just right-click on a the column header and choose the option No filter in displayed window, then click on Refresh (1).
 You can also remove all filters applied on planne in a single click: make sure the focus is on the planner by clicking anywhere in the planner, then click on in "Home" ribbon and on "Clear filters".
The following filters are applied with basic configuration:
•Preferences (2): Candidates that are unwanted at the client or those who don't want to work for this client will not be displayed at first. Once the filter removed, these candidates will be shown with the icond  or
or  in this column.
•Mission's criteria (3): a filter is applied on mission's criteria.
To see what are the criteria for the mission of a punctual shift request, see the Info/Ranking/Criteria tab in this shift. For a mission in a grouped request, select the relevant mission before looking at the Info/Ranking/Criteria pane in the grouped request.
 Although a filter is applied to the mission criteria, removing this filter will not result in displaying candidates who do not meet these criteria, since they are considered mandatory. If a candidate who should meet all the criteria does not appear despite the removal of all the planner's filters, we suggest you check ticked criteria in the candidate's file, the excluded combinations, the required or declined criteria, to compare them with criteria of the mission, and correct the candidate's criteria if necessary. You can also add the candidate manually by clicking on the button "Applications" (4). If the candidate doesn't meet the mission criteria and the filter has been removed, the added candidate will be displayed with the icon
  in mission's criteria column.
•Client's criteria (5): Candidates that do not meet client's criteria according to their profile will not be displayed at first. If you remove the filter, candidates that do not comply will be displayed with the icon  . It is recommended to check wich criteria are not complying by comparing candidate's and client's criteria, and if applicable, correct the candidate's choices before you assign the candidate. However, if a criterion not met can be ignored for the specific request, you will still be able to assign the candidate.
•Candidates not available  (6) : Candidates that are not available for the shift or schedule based on their availability calendar are filtered at first on column . Removing the filter on this column will display the candidates, and you will be able to assign them if needed, after checking that they accept event if they indicated not being available. It will not be necessary to modify the candidate availability to assign.
•Schedule conflicts  (7): Candidates already assigned elsewhere will be filtered in this column. If you remove the filter, you will see in the graph in right end section what is the assignment. Just click on the blue line matching the assignment. In the graph section, the shift(s) of current request are rep is represented by a vertical colum (yellow for day shift, blue for evening, and gray for night).