|
Navigation: Training plan > Section 2 - Client > The Client Window > Tab - Profile Tab - Profile / Sub-tab Contact |
Scroll Prev Top Next More |
Tab - Profile / Sub-tab Contact
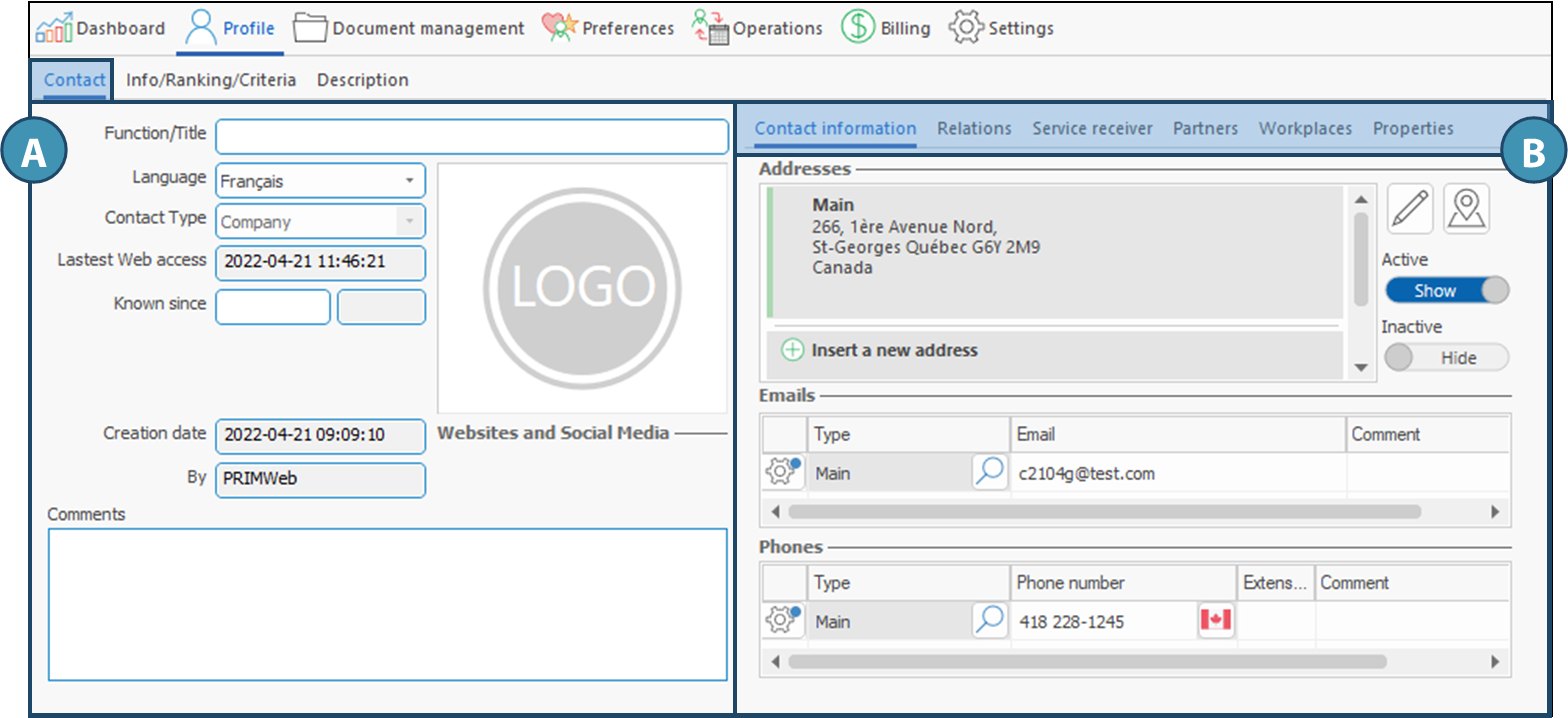
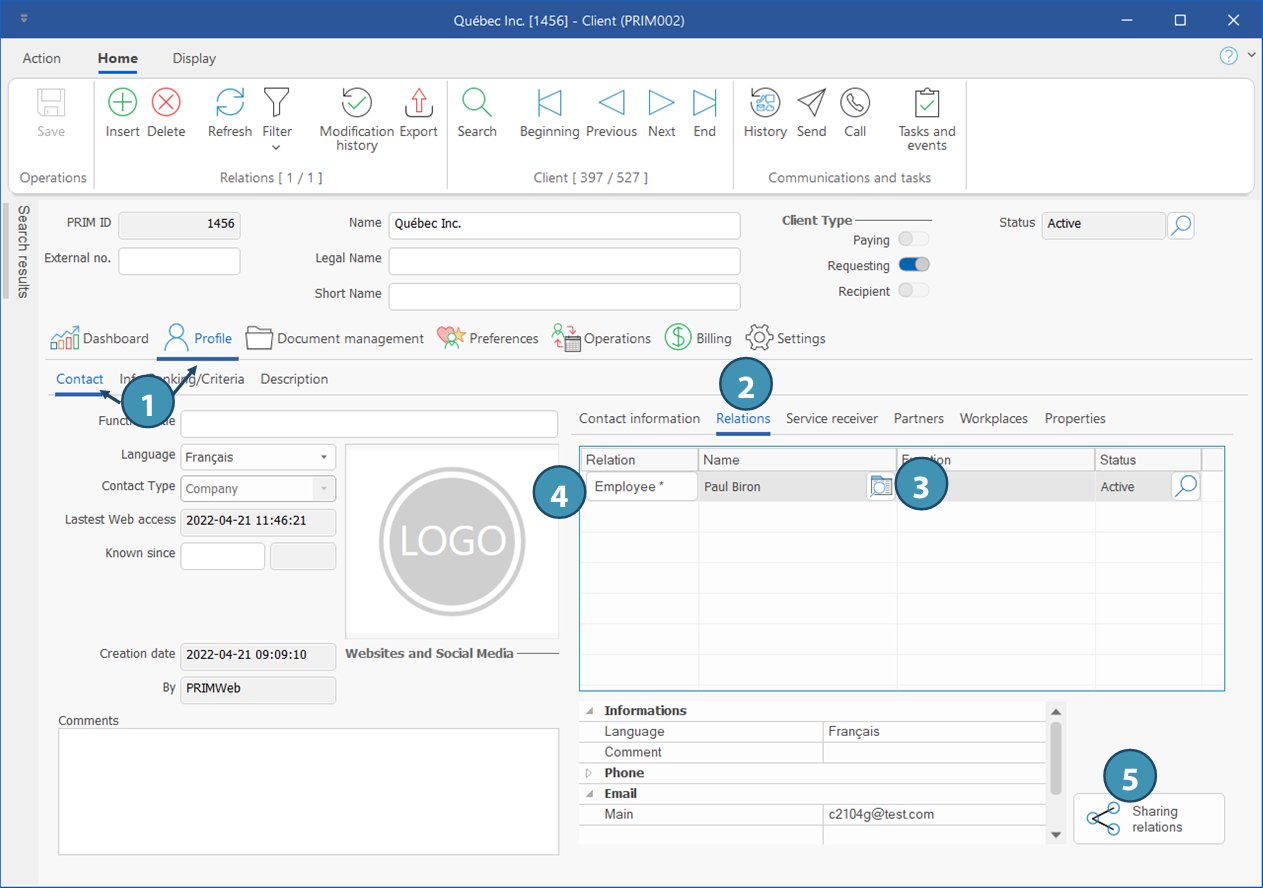
This sub-tab of the Profile tab shows the various contact information for the company and some basic information, such as the creation date, the preferred language for communication, the function of the company.
It does include a main area that will always be the same (A) and various sub-tabs (B)
Description of the fields in the main area (A)
Function/Title: You can use this field to enter the business type or business line.
Language: Used to indicate the preferred language to communicate with the client. Note that the preferred language of contacts added as relations or partners could be different.
Contact type: The type of client (Company or Individual) is specified here.
Latest Web access: Last date of access to the Web portal by the client.
Known since: You can enter the date of the first contact with the client.
Creation date / By: This information is auto-populated after first save at creation of the file.
Logo: Allows you to add a logo for the company.
Web and Social media: Links to the Web site and social media pages
Comments: You can enter a short comment of general interest about the client.
 Sub-tab Contact Information
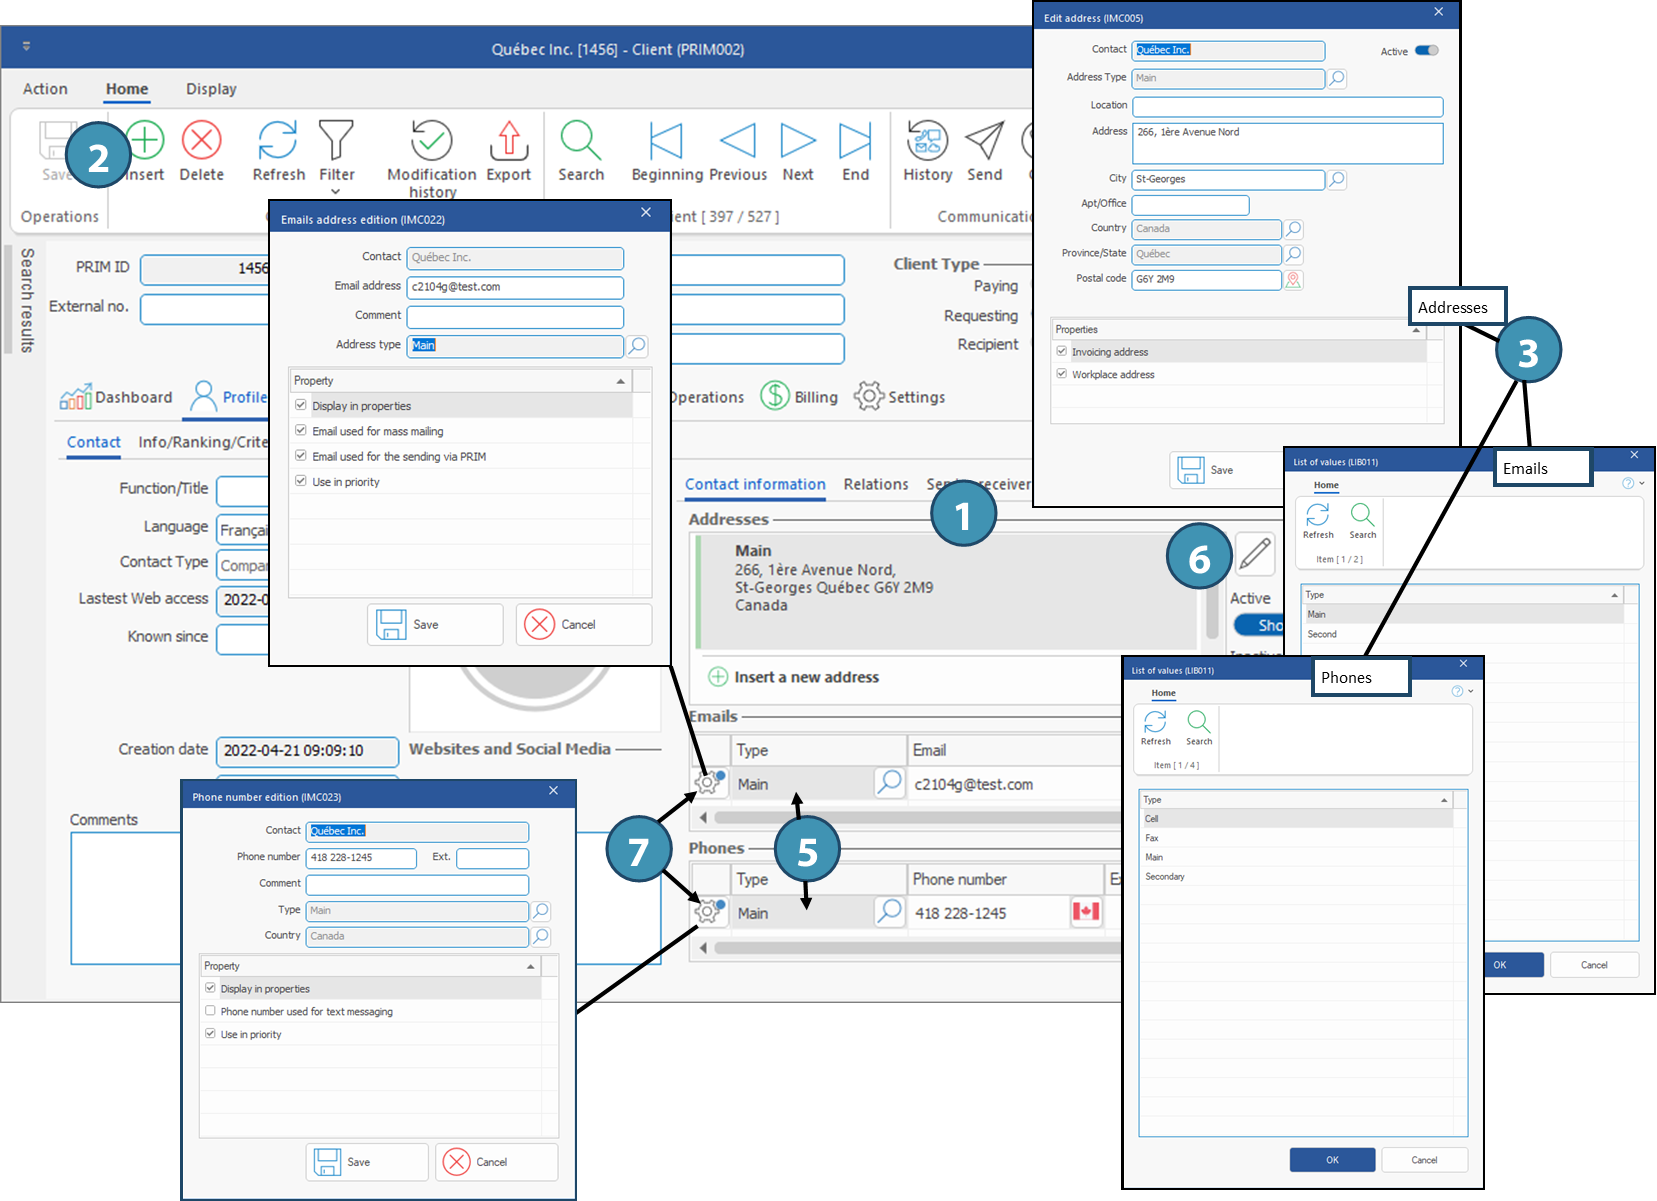
This sub-tab allows you to add the main contact information for the client : street address (A), email addresses (B), phone numbers (C).
To add a contact information: 1.Select the concerned section: the section will display a thin blue frame. ln the example below, the section Addresses is selected. 2.Click on
3.A List of values window is displayed, allowing you to specify if this is a "main" or "secondary" contact information, as well as other settings depending on the contact information type. Select all the values that apply and fill in the the required fields. 4.Click on OK (email, phone) or Save (address). 5.For emails or phone numbers, specify the email address or phone and extension on the line that has been added, as well as any relevant comment.
To modify a contact information or specify it's properties: 6.Addresses: Select the address and click on 7.Phone or email: Click on
|
 Sub-tab - Relations
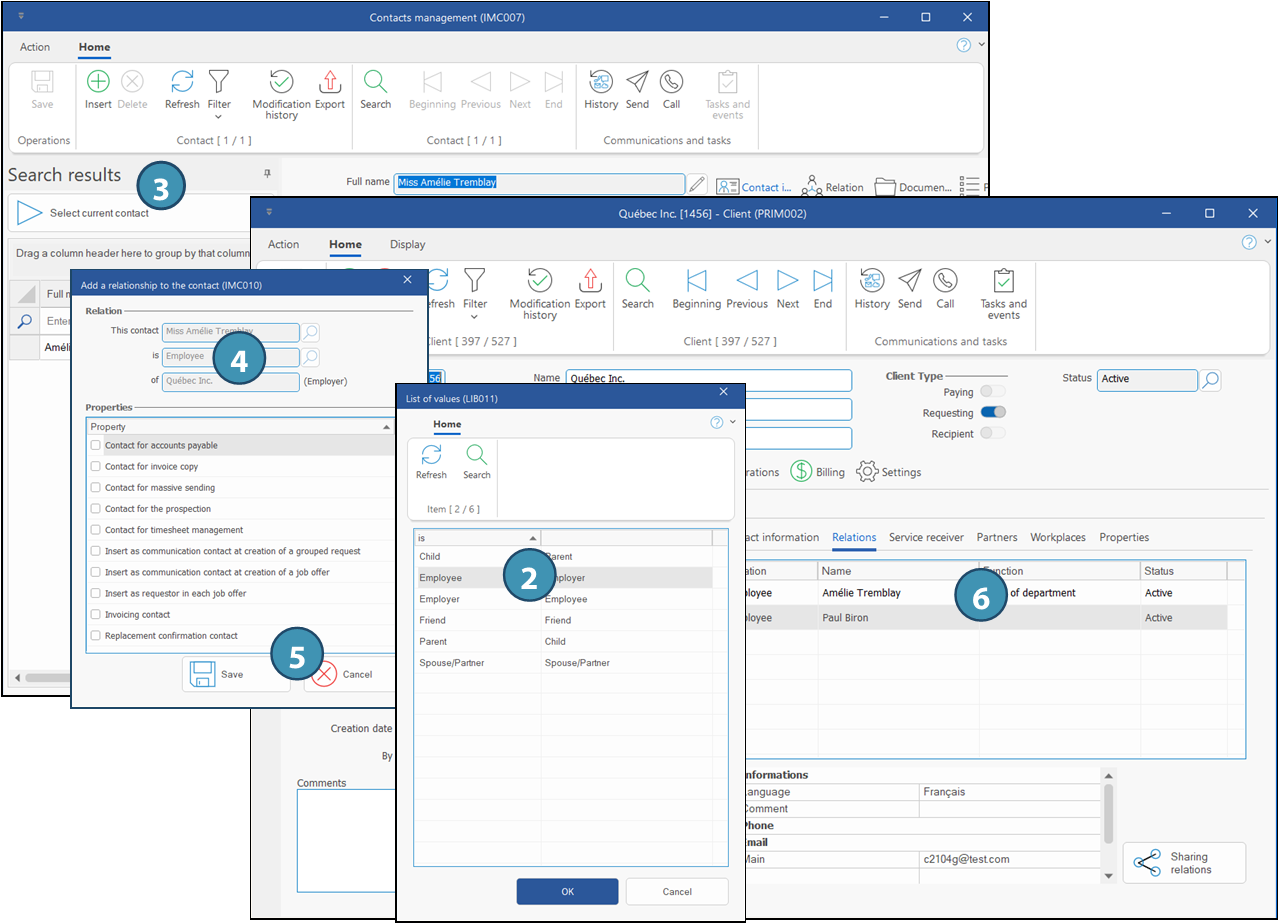
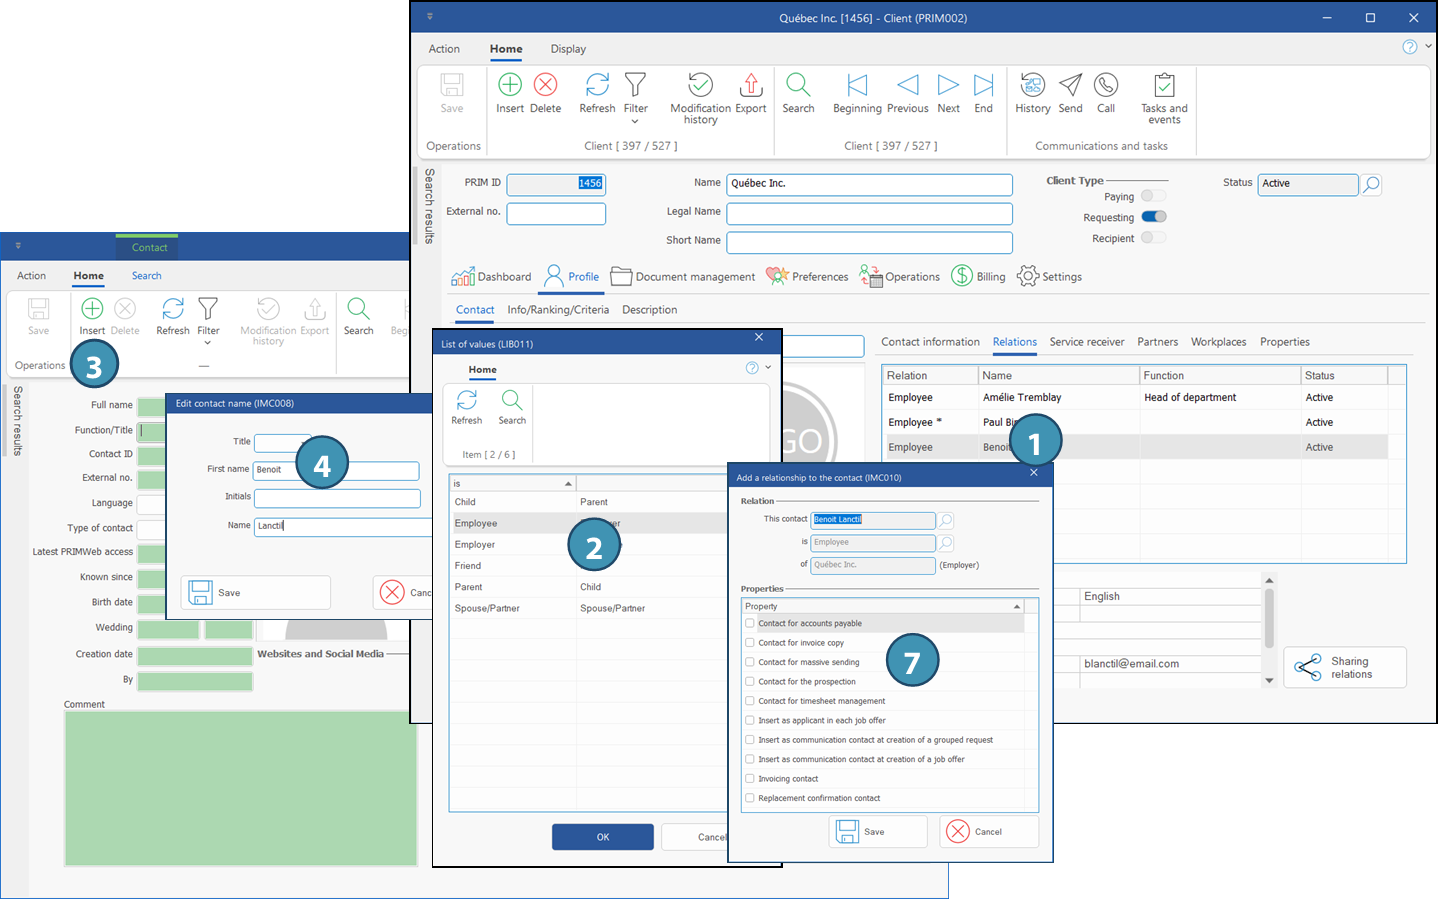
This sub-tab allows you to specify contacts as client relations. The contacts may already exist in PRIM, or could be created starting from this tab.
A relation can be an individual (an employee), or a company (affiliated center). Furthermore, it is possible to assign properties to relations.
|
 Service receiver
A service receiver must be a "Client" type of contact already existing in PRIM. The client might be either a company or individual.
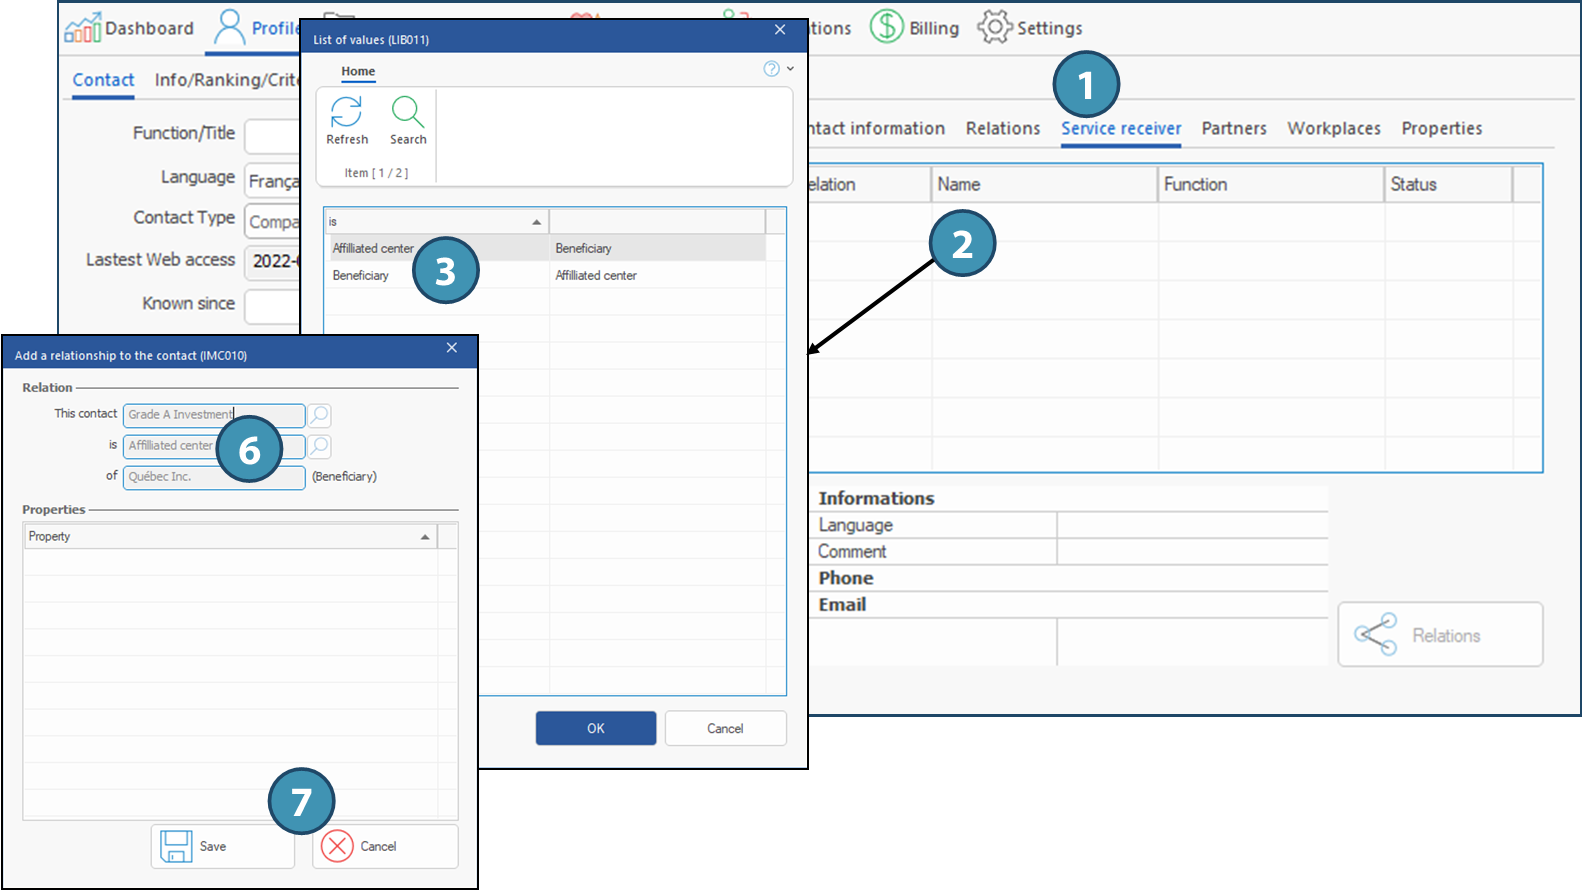
In the example below, we will add a service receiver that is a company.
1.Click on the sub-tab Service receiver. 2.In the section, double-click on an empty line. The List of values window is displayed. 3.Select the line displaying Affiliated center in the first/left column and click OK. 4.A new Client window is displayed in search mode. Search the contact by entering the name in the Full name field and click on 5.In the search results pane, making sure the proper client is selected, click on the button Select client. 6.The window Add a relationship to the contact is displayed. 7.Click on Save to add the service receiver. The service receiver have been added to the client's file.
|
 Partners
A partner must be a "Client" type of contact already existing in PRIM.
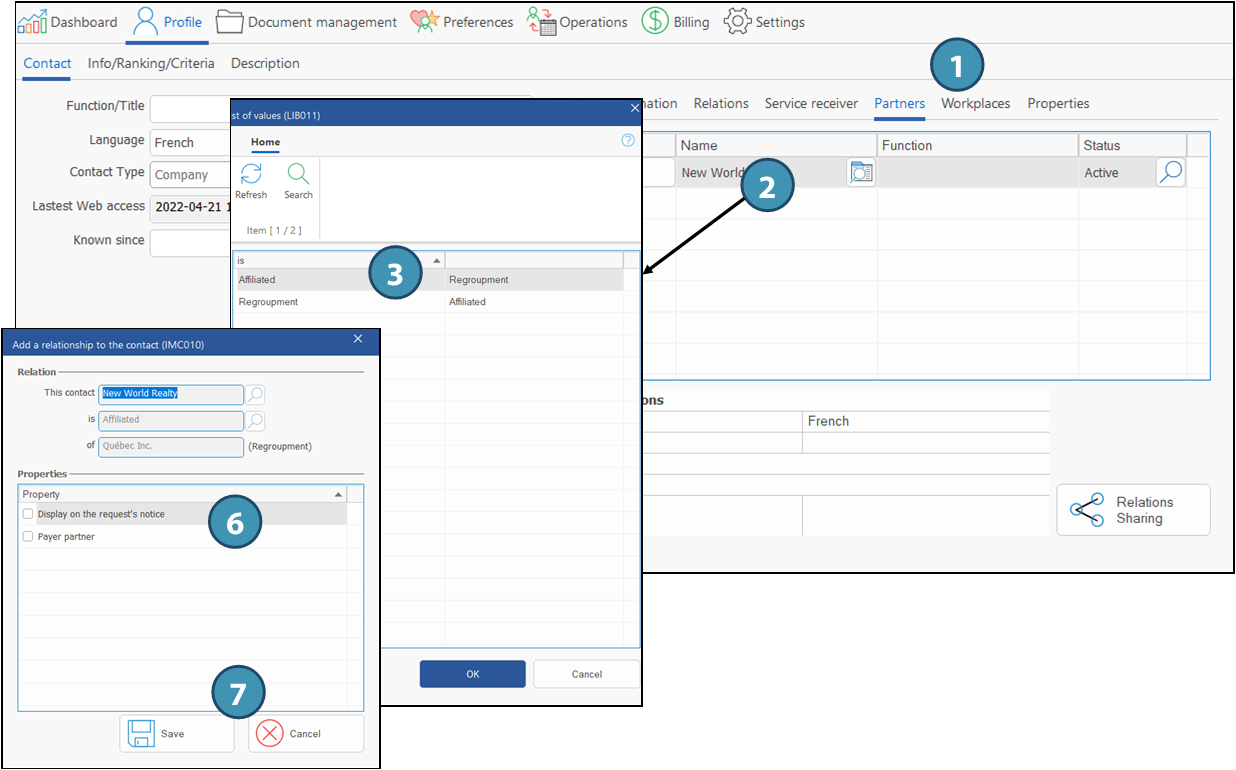
In the example below, we will add a partner that is an affiliated center.
1.Click on the sub-tab Partners. 2.In that section, click on an empty line. The List of values window is displayed. 3.Select the line with Affiliated in the first column and click on OK. 4.A new Client window is displayed in search mode. Search for the contact by entering the name in the Full name field and click on 5.In the search results pane, making sure the proper client is selected, click on the button Select client. 6.The window Add a relationship to the contact is displayed. Tick the properties you want to apply to this contact. 7.Click on Save to add the new partner, or on Cancel to ignore.
|
 Sharing a relation
First, it is important to understand that the words "Relation",« Service receiver » and « Partner » all refer to a type of relation. It is possible to share relations between clients, tous des types de relations. Il est ainsi possible de partager les relations d'un client avec un autre client, provided that this other client is also a relation.
Steps to use:
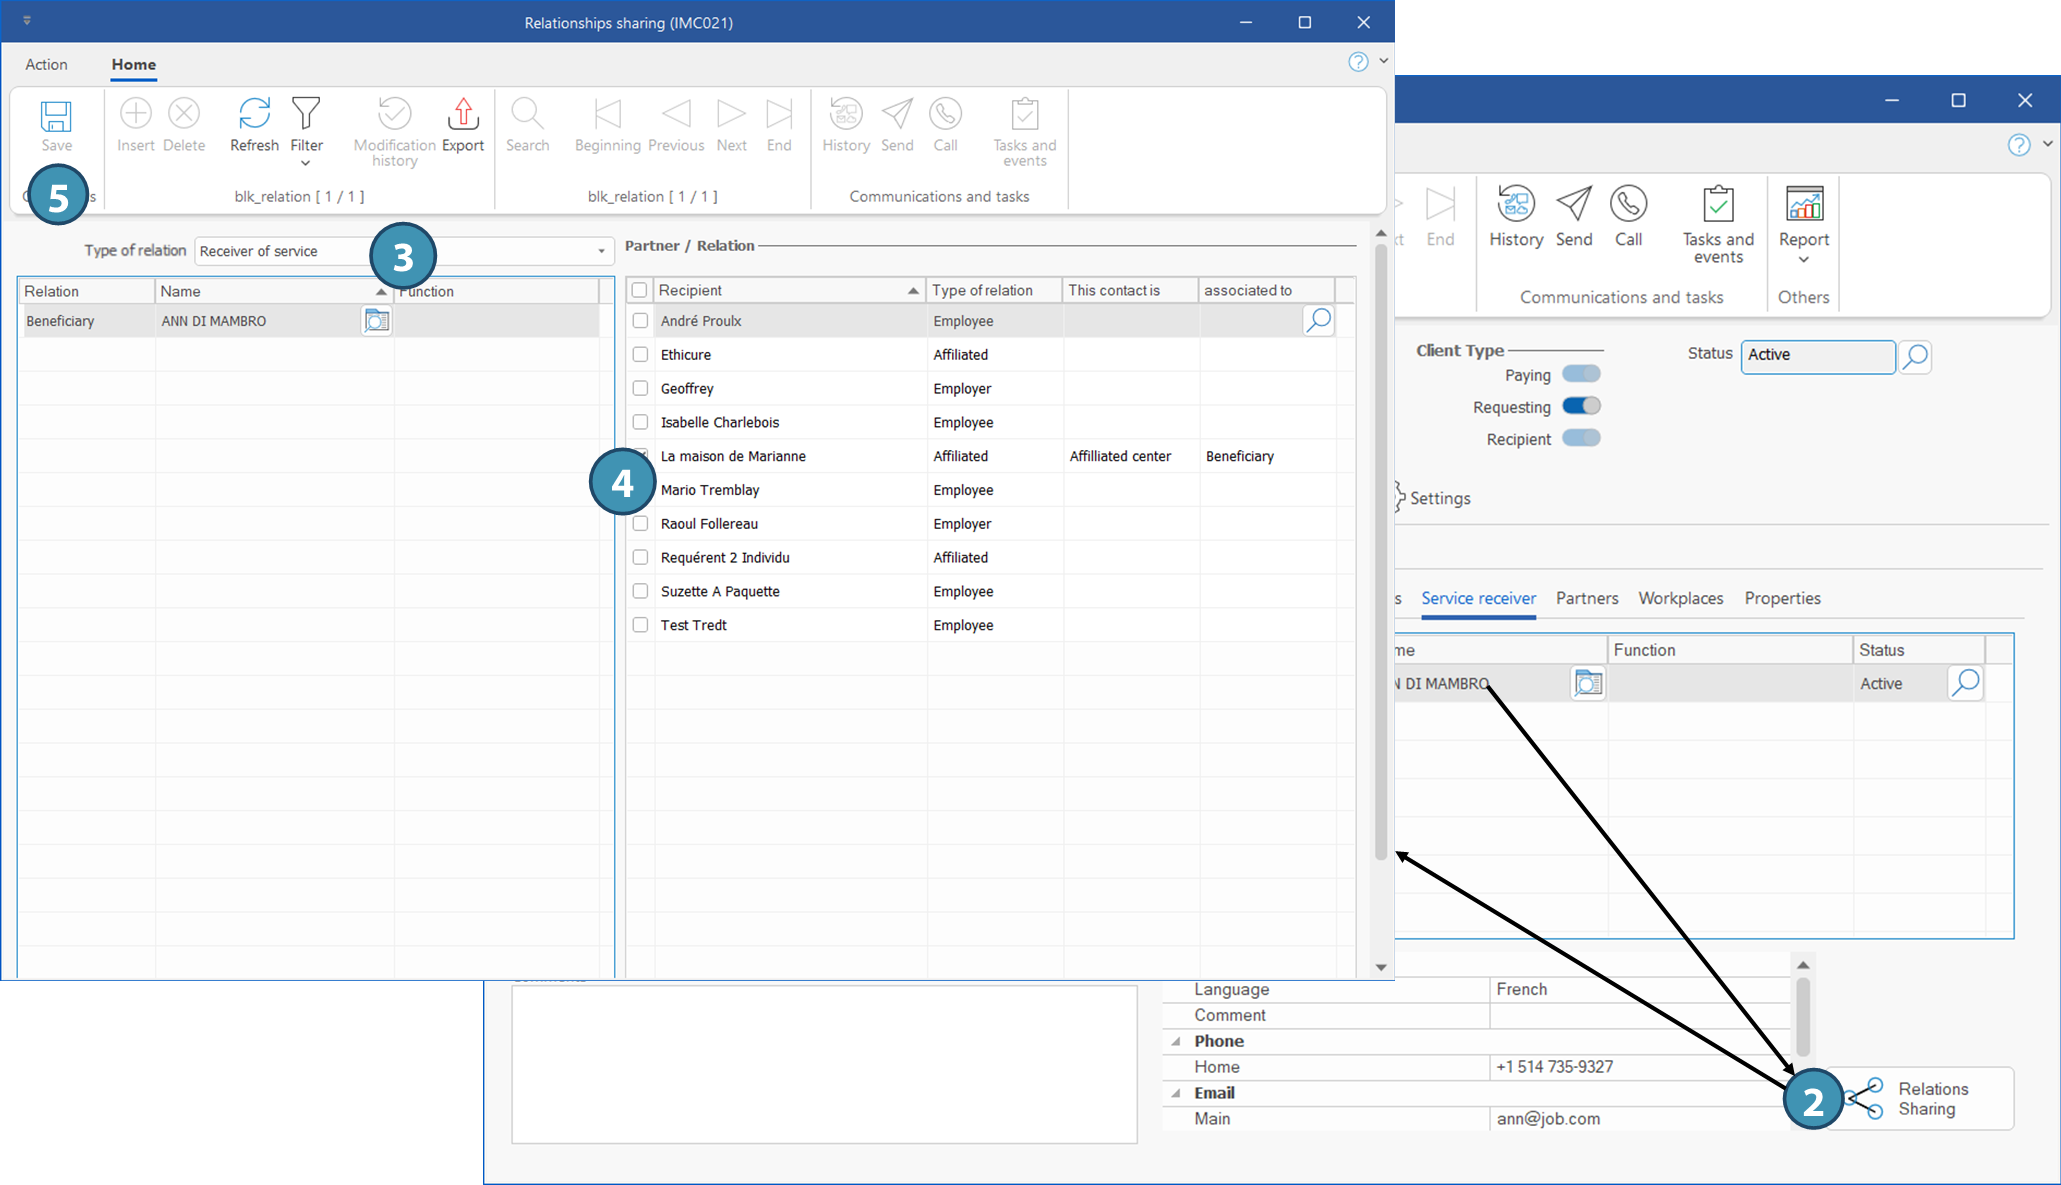
1.Find a client in PRIM with at least 3 relations, in one of the tabs: "Relations", "Service receiver" or "Partners" 2.In the tab where you find the relation you want to share, select the contact and click on the button "Relations Sharing ». 3.Since you clicked from the tab "Service Receivers", the left section shows relations of this type, and on the right, you have the list of other available relations for this client ("Relations" and "Partners »).
4. In the column Recipient, tick at least one contact with whom you want to share the relation. In the example below, we will share the beneficiary with another client with the type "Affiliated". 5.Click on
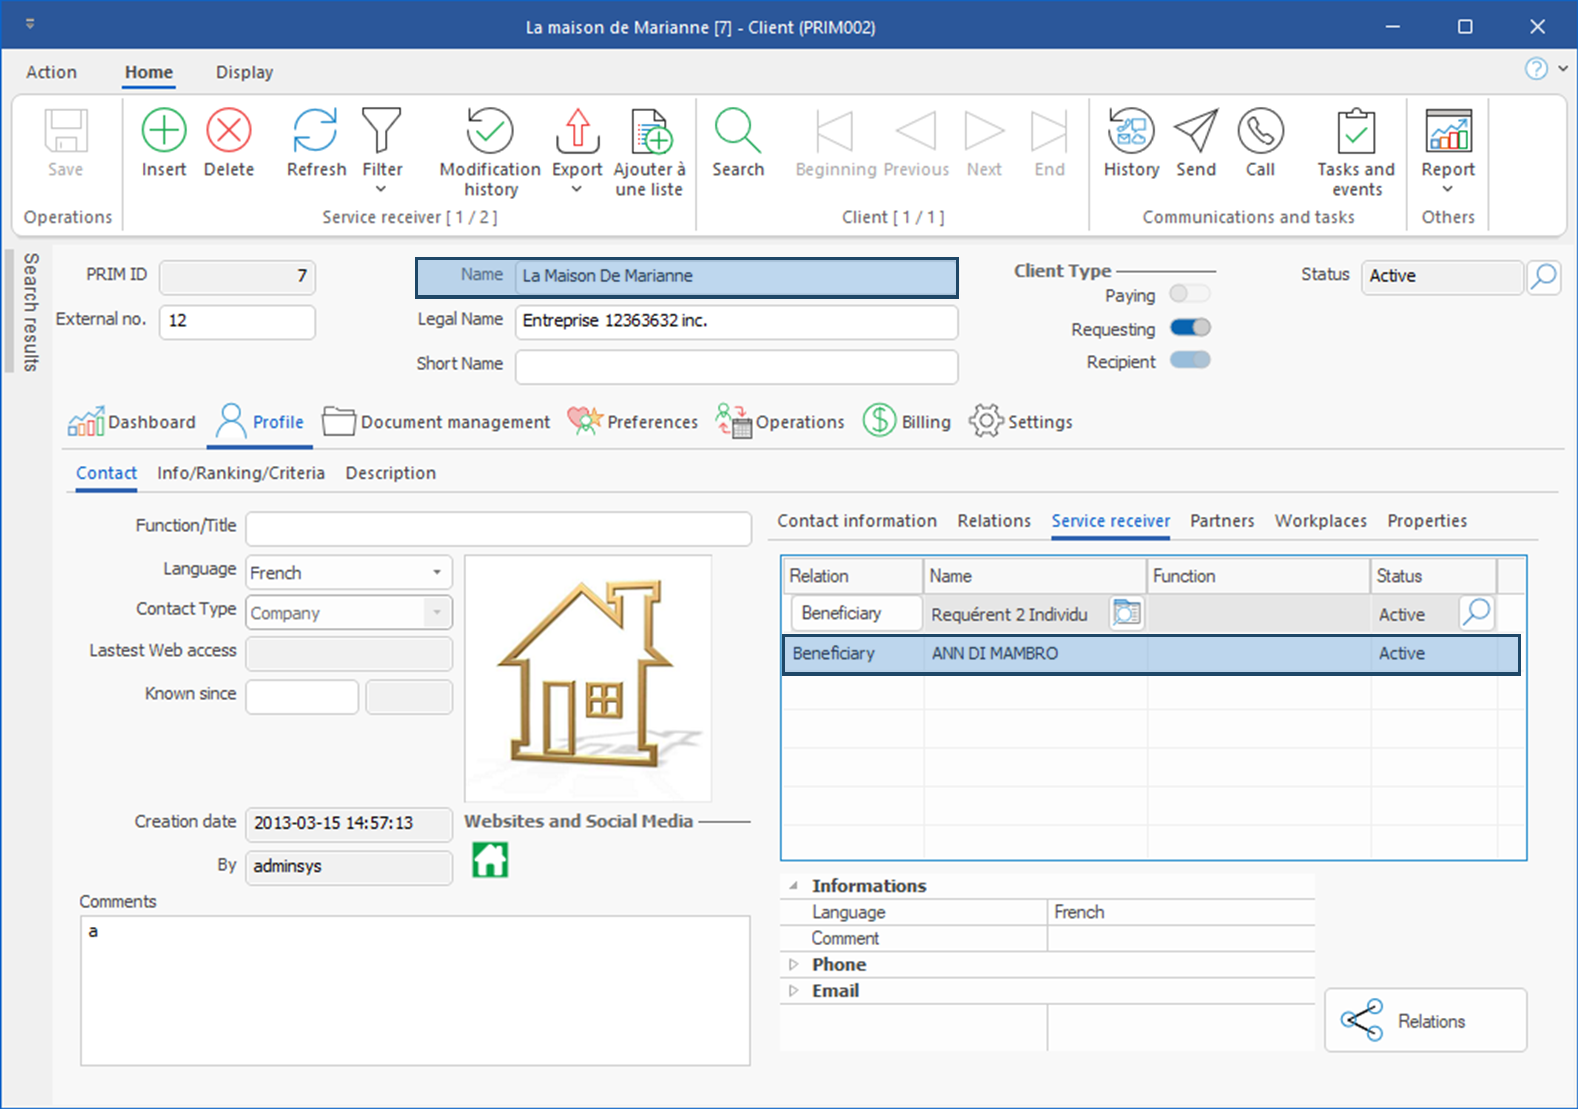
6.Now let's open the client file "La maison de Marianne" to check that the client now has the relation "ANN DI MAMBRO" as a service receiver. 7.
|
 Workplaces
By default, the main address or a secondary address added in Contact information tab can be defind as the workplace for a client: however, only one address can have this property in this tab. If a client has several workplaces, it is possible tot set up additional workplace addresses in this tab.
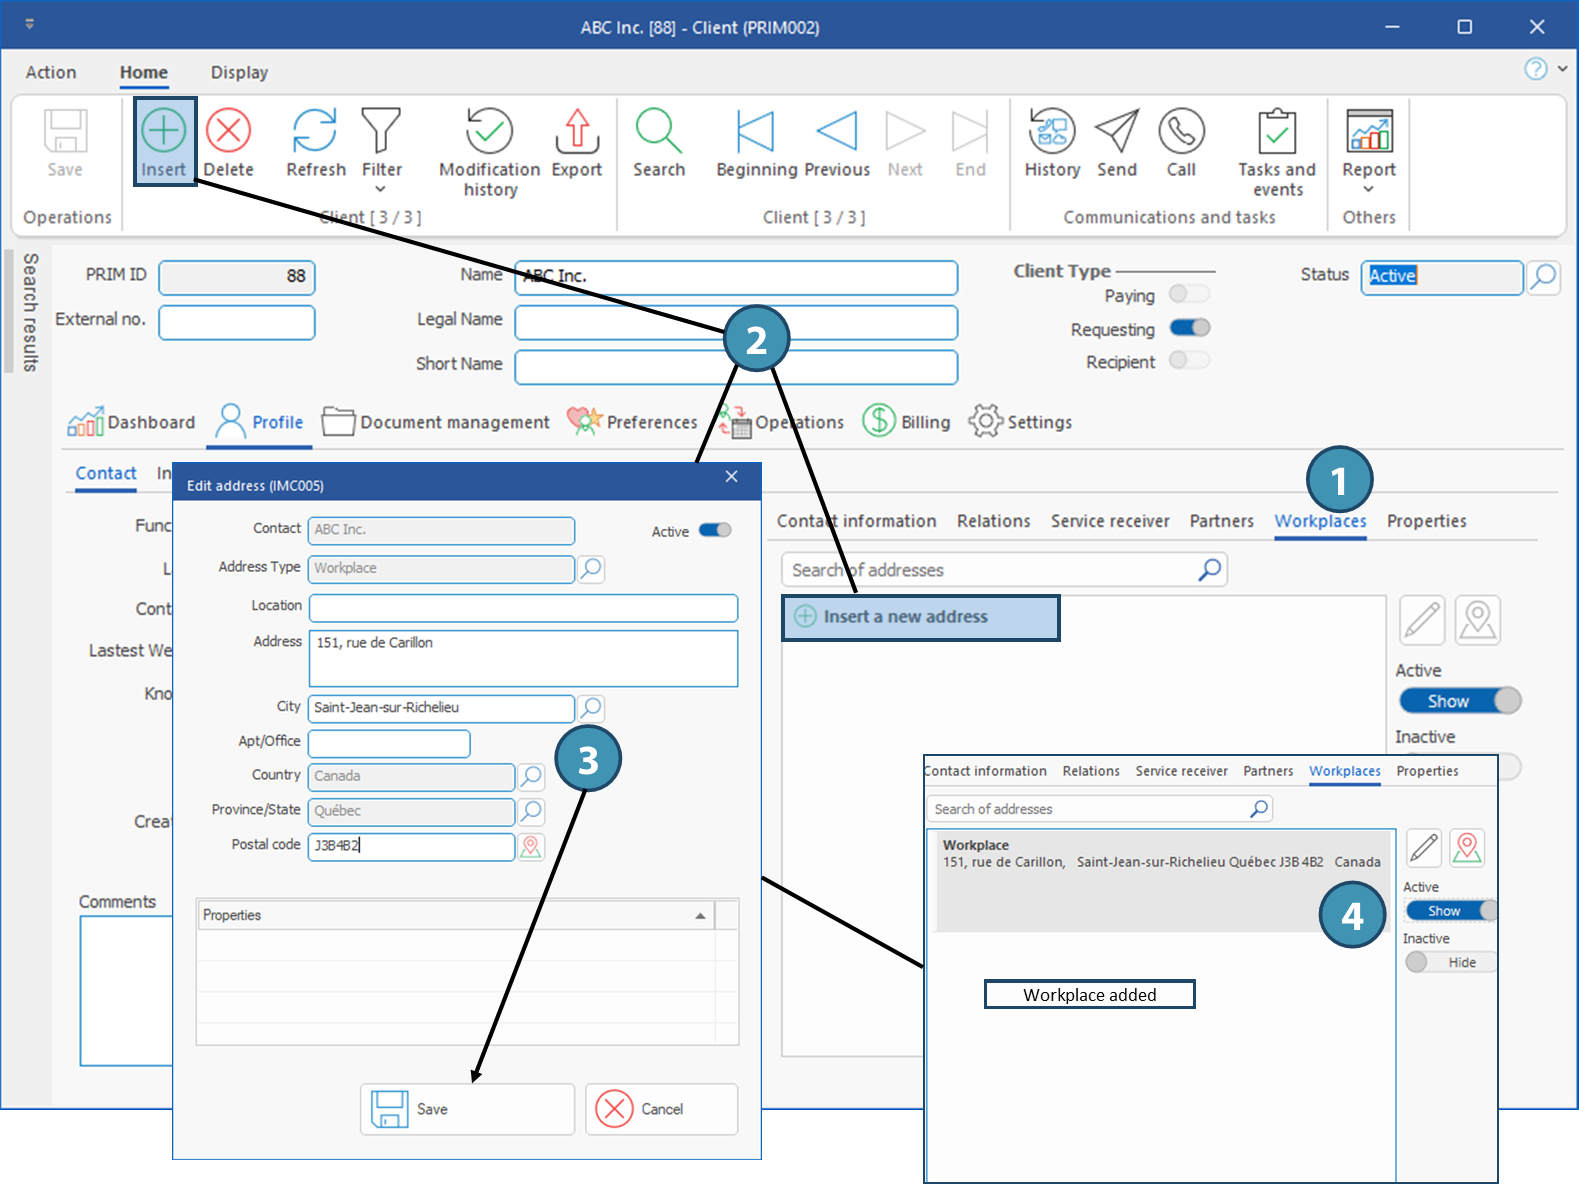
To add a workplace : 1.Click on sub-tab Workplaces. 2.Click on 3.The window Edit Address is displayed. Fill out the fields with the required information, then click on Save.
4.The workplace has been added and you will be able to select it when creating a request. You can always edit it by clicking on
|
Created with Help+Manual 8 and styled with Premium Pack Version 4 © by EC Software

 (Insert) in the
  to the right of the section.
  in the left column of the relevant line.
 (View contact) to the right of the name to open the contact's file.

 in the
 (Save)