Please enable JavaScript to view this site.

PRIM Help

View assignments on the web portal


The Assignments section lists the proposals to which the applicant is assigned.


Assignment details


Depending on the user's display choice, the presentation will differ. However, each entry presents the same information:
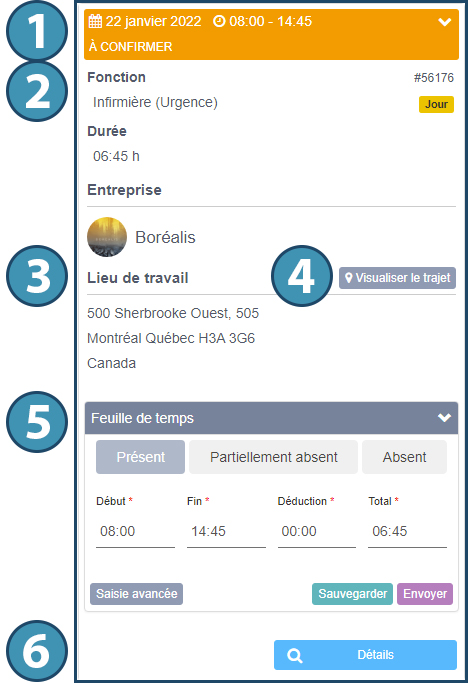


1. Shift schedule

2. Offer and customer information

3. Information concerning the place of work

4. A button to display the route on a map from the address saved in the candidate's file. By clicking on the button, you can then display the route in the Google Maps application and begin GPS navigation.

5. If applicable, an input space for the timesheet

6. A " Details" button to display offer details


Filling in the timesheet 


After completing the hours of a replacement, the candidate can log on to his or her web platform to declare the hours worked.


In the " Assignments " page, from the " Display settings " tab on the left of the page, it is possible to apply a specific filter(A) to display only those assignments for which there is a timesheet to fill in.

If the display is in "calendar" mode, simply click on the replacement at the desired date to open the information pane(B). If the display is in "tile" or "list" mode, a search using the filters and pagination allows you to find the desired shift.


When the desired shift is selected, a simplified version of the timesheet is presented(C), in which the user can:

1. Indicate if he/she was absent, and add a reason for absence if applicable

2. Enter times different from those indicated in the original request, then save , or

3. Save directly if the hours worked match those on the application.


After this, the applicant can :

4. Send the timesheet to the agency. It will then take on the status "Submitted" in PRIM Logix.

5. Open the advanced entry module if they wish to add a note, expense or document.


Fill in a detailed timesheet


By clicking on the " Advanced data entry " button, the user opens the detailed timesheet module.


In this module, the user can :


1. Indicate if he/she was absent, and add a reason for absence if applicable

2. Validate or modify start and end times, as well as any breaks.

3. Add expenses if applicable

4. Add one or more documents

5. Add a note to the agency

6. View records linked to the geolocated time/date stamp, if any. Note that these records can be displayed as lists or on a map(7).


At any time, the user can save the timesheet to resume entry at a later date(8), or conclude entry and send the timesheet to the agency(9).


Created with Help+Manual 8 and styled with Premium Pack Version 4 © by EC Software