Assign, unassign and replace a candidate
According to the type of replacement, the assignment process will be different.
•Punctual grouped replacement - From the « Grouped replacement » and « Replacements management » windows
•Recurrent grouped replacement - From the « Grouped replacement » window
 Assign a candidate to a specific request in the group
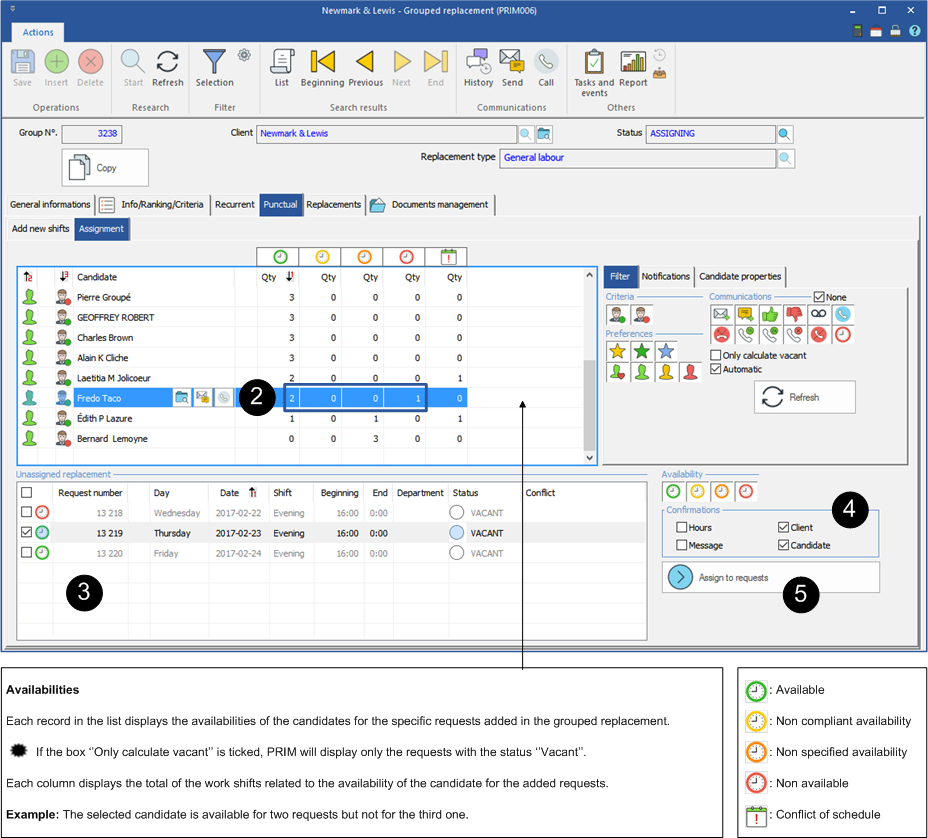
In the example below, we will assign a candidate to a specific request, the process is the same if you have several requests to fill.
You are still in grouped replacement file under the “Punctual” tab.
1.Move under the "Assignment" tab. 2.Select the candidate in the list. 3.Check one or more replacements to which you want to assign the selected candidate. 4.Check the confirmations that applies. In the example, the candidate and the client have confirmed. 5.Click on
You are still in the grouped replacement file under the “ Replacements ” tab.
1.Select the new specific request. 2.Click on the icon 3.Choose the candidate to whom you want to propose the replacement and follow the assignation process. 4.The following message will be displayed. According to your choice PRIM will apply the changes.
|
 Unassign a candidate - specific request
You are still in the grouped replacement file under the “Replacements” tab.
1.In the list, select the replacement. 2.Click on 3.In the section "Provided service", click 4.Click on 5.In the message that appears, choose "This occurrence of the group only" and click 6.The replacement takes the status "Vacant".
|
 Assign a candidate to a recurring schedule
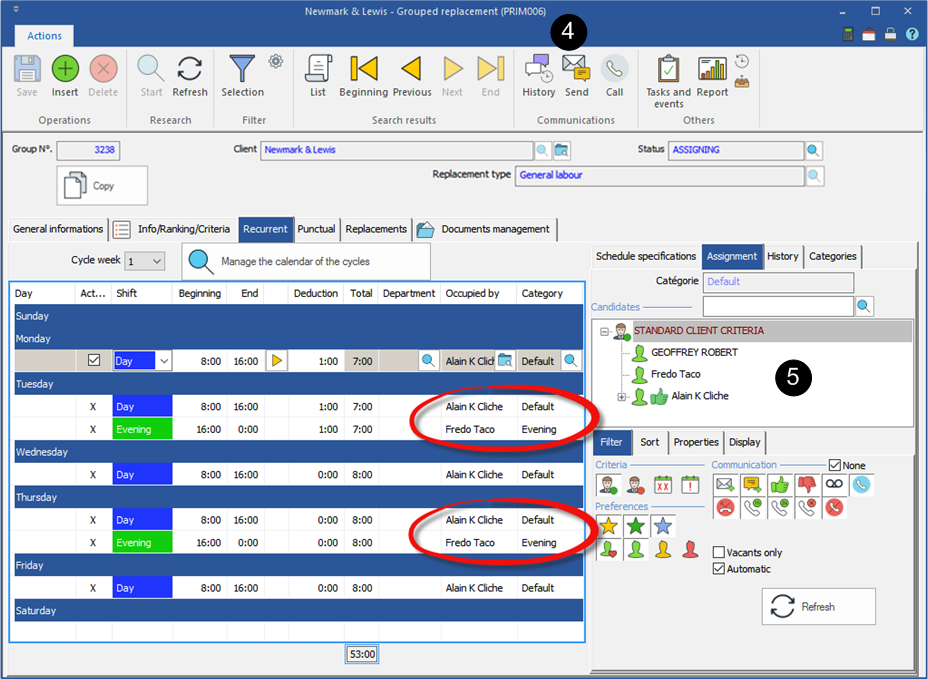
You are still in the grouped replacement file under the “Recurrent” tab.
1.Move under the tab "Assignment". 2.Choose a schedule of work. The list of candidates corresponding to the criteria of the replacement is displayed in the zone “Candidates". 3.Filter the list of candidates using the icons. 4.If you use the icons of communication, Email or SMS of the main toolbar, you will send the proposal of the recurrence, to all the candidates displayed in the list. 5.If you prefer to propose the recurrence to a single candidate, use the communication icons to the right of its name in the list, email, SMS or phone call. 6.If you contact the candidate by telephone, choose the option "Assign to selected requests", if the candidate accepts the proposal of recurrence. He will be assigned to all replacements of the category. 7.Confirm with the client to fill the replacements.
In the example below, we can see that the two candidates assigned to this group are linked to a category.
|
 Unassign a candidate - recurrence
A candidate who is assigned to the grouped replacement cancels, you will have to unassign him in order to find another candidate for your client.
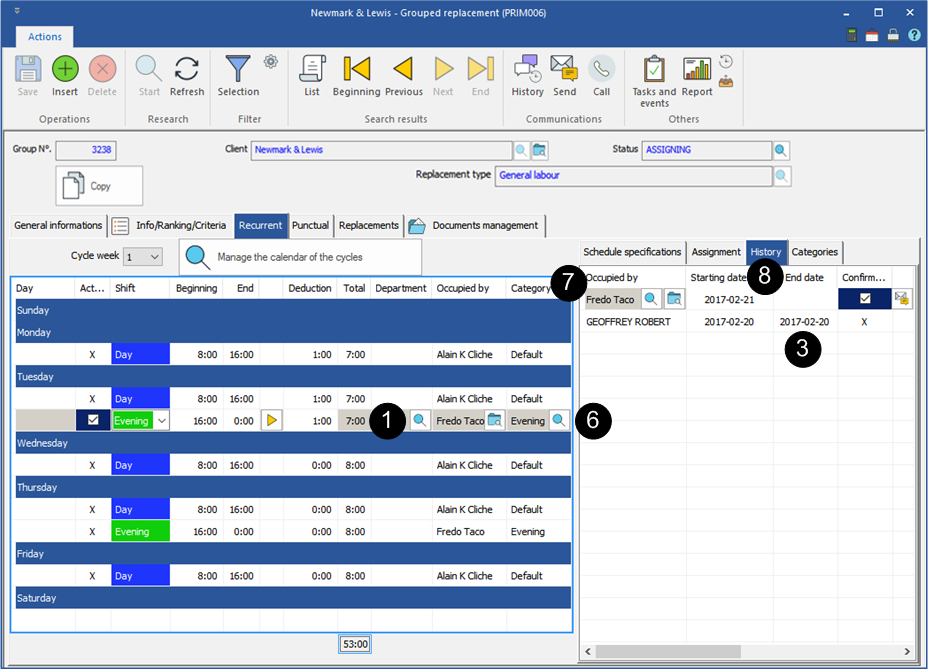
You are still in the grouped replacement file under the "Recurrent" tab.
1.In the list, select a schedule. 2.Move under the tab "History". 3.Enter an end date for the concerned candidate, the date on which the candidate stopped working. 4.Click on 5.Move you under the tab "Assignment”, select the new candidate to assign to the category. 6.Click on the icon 7.Move to the tab "History" to view the addition in the list. 8.You can change the start and end dates if needed, the start date of the new candidate must be changed first.
|
 Replace a candidate in a recurrence
You have filled all your schedule in your grouped replacement, but a candidate informs you that he will not be able to work for one day, you must replace him.
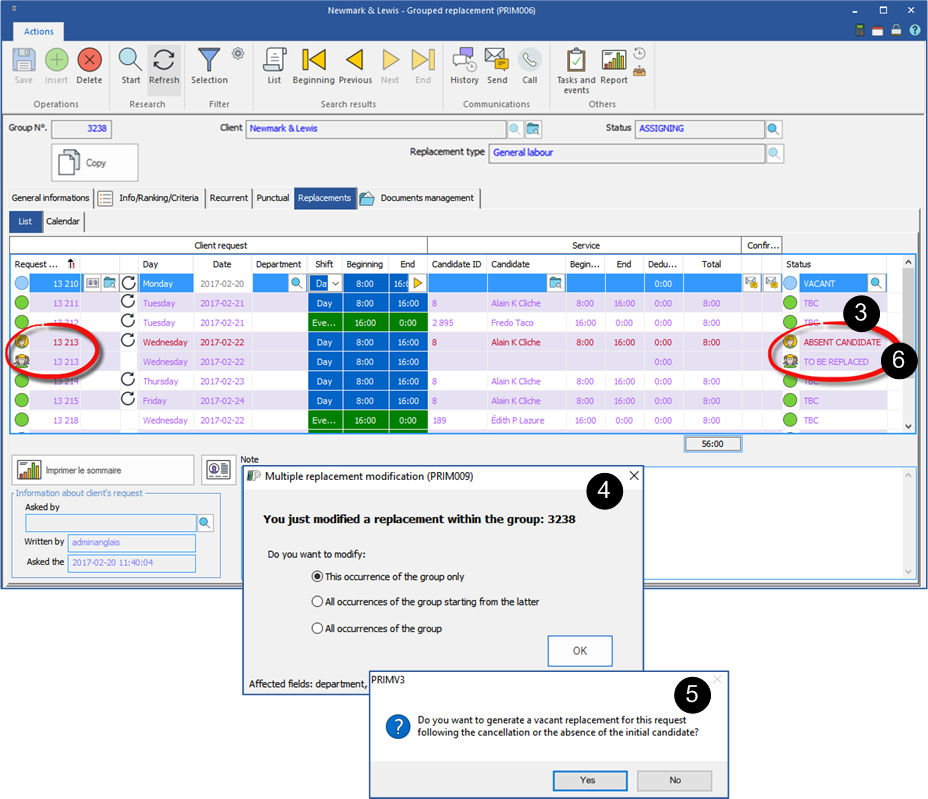
You are still in the grouped replacement file under the “Replacements” tab.
1.Move to the "List" tab. 2.Choose the replacement. 3.Change the status of the replacement for “Absent candidate" (if he did not show up to work) or “Canceled by candidate" (he has notified that he could not come to work) according to the situation. 4.The ''Multiple replacement modification'' window is displayed, choose the option ''This occurence of the group only'' and click on 5.A message is displayed asking you if you wish to generate a vacant replacement for this request, click 6.The new replacement will have the same number and will have the status "To be replaced". 7.Select this new replacement. 8.Click on the icon 9.Select the candidate and continue with the assignment process.
|


