Planner - Assign a candidate to a temporary request
PRIM Logix offers 2 additional tools for the assignation of a candidate to a request and the follow up on applications: the planner and the ATS.
 If ATS is active for a temporary request, only the candidates selected in the ATS will be displayed in the planner.
Presentation of the Planner
The planner is the tool used to assign a candidate to a replacement.
It is accessible:
•Through the Display ribbon in the "Replacement" window and in the "Replacement management" window
•Through the corresponding tab in the "Schedules" pane of the "Grouped replacements" window
For each replacement, the planner displays the list of candidates with a profile matching the request for the following reasons:
•The criteria included in candidate's file are matching the criteria of the request and the client: 

•The criteria are matching the request, but may differ from criteria of the client: 
•The candidate have been added manually. In this situation, it is possible that the criteria or the candidate don't match the criteria for the request: 
The planner is divided in multiple sections, described below.

Correspondence
The planner indicates, for each candidate, preferences that establish a correspondence between the candidate and the client. If the recipient client is different from the requester, preferences of the recipient will also be displayed. For more information, see the page about preferences.
Similarly, the correspondence section displays how the candidate matches the criteria of the request ("Mission" column) and criteria of the client ("Client" column).
Availability
This section indicates, for each candidate, the availability for the selected replacement:
 Availability of the candidate matches the schedules included in the request
 The candidiate didn't indicate any availability
 The candidate is not available for the schedule included in the request
 The candidate is already assigned to another replacement, so there is a schedule conflict
 The candidate is already assigned just before or after the replacement: might be a double shift situation
Display detailed availability
The planner allows you to display or hide the detailled availability of a candidate. To do so, activate or deactivate the corresponding button (1), at the bottom right of the pane.
Activating the detailed view will display, on the right of the planner, a calendar allowing you to see, for each candidate, the availability for the request (2).
The availability will be shows as a vertical yellow range. The available time, non available time and assignments for each candidate are displayed as horizontal strips, respectively green (available), red (not available) and blue (assigned) (3). Finally a purple horizontal band is displayed when the candidate is assigned to the request.
Place cursor over the horizontal band in order to display a tooltip with detailed availability or non availability. If the candidate is assigned to a replacement, a the tooltip includes a clickable link providing direct access to the replacement file.

Oher information displayed in the planner
The planner displays, for each candidate, multiple information related to the candidate's file (communication history, rate, candidate status, etc.). The user can decide if he wants the information to be displayed or not using filters, in order to facilitate the reading of the table or, on the contrary, to get a complete overview of the information at a glance.
Consult the page relating to display customization to learn more.
Interests related to an application
Interest buttons boutons d’intérêt servent à indiquer, pour chaque candidat, l’intérêt de l’agence, du candidat et du client :
 Indicates that interest is positive.
 Indicates that interest is negative.
 Indicates a reflexion about the application. Application is under consideration
Depending on the assignment method, the "Agency", "Candidate" and "Client" section name will be in bold or not in order to let you know what is the assignment method for this request. If only one is in bold, that means that a thumbs up from this party will have the effect of assigning the candidate.
To learn more about the assignment method, refer to the corresponding page.
Other buttons of the planner
Buttons IN the planner
These action buttons are found in the table of the planner, and are related to a specific candidate or application.
 View the resume of a candidate.
 View the file of a candidate
 Send an email or SMS to candidate
 Call the candidate
 Manually change the status of an application
 View the communication history about an application
 This button is active when the address of a contact doesn't allow to know the distance between the candidate's home and the workplace.
 View route on a map.
Buttons BELOW the planner
These action buttons are found just at the bottom of the planner:
 Add one or several candidates manually. Refer to the section "Add a candidate manually" to learn more.
 View or add a note about the interest for an application. This button is only accessible once the agency, the candidate or the client has indicated interest.
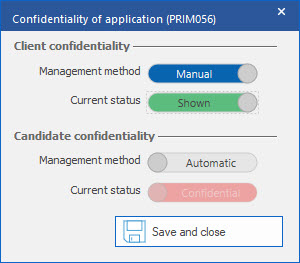
 Set up the confidentiality towards the candidate and the client. Choose a management mode for confidentiality – Automatic or Manual – then specify if you want the application to be visible by the concerned entity. For more information on automatic management of confidentiality, see the corresponding section indiquez si vous souhaitez que la candidature soit visible par l’entité concernée. Pour plus d'information sur la configuration et la gestion automatique de la confidentialité, voir la section correspondante. (Page under construction, link to be added.
As an example: If you choose to make the client Confidential, the information allowing identification will not be visible by the candidate on the Web platform.
It is also possible to display or hide the actions performed by a party on a given application. To do so, refer to the application status properties.
 Zoom in or zoom out the view in the Details section of the planner. When zooming in on the view, the calendar shows a time breakdown of each day. When zooming out, it will show a global view of days. En