|
WARNING: This section is intended for advanced users and "Super users" of PRIM Logix.
The configuration items presented in this section may indeed have an impact on your operations.
If in doubt, consult your system administrator.
Please note that only users in the appropriate security groups can access the software configuration windows. |
Create a request type
When creating a shift request, you must select a corresponding request type. In case of new needs from your clients, you might have to create a new request type to match the need.
In a request type, you must indicate the mandatory criteria that must be found in your candidates files so that they are displayed in the list of available candidates for a request. The request type must also be linked to a Salary type and a Billing type.
PRIM can use a same salary type or billing type for several request types to facilitate maintenance of the rates, if they are the same.
For example, the type of salary and invoicing "Skilled labour" could be used for driver, forklift operator or designer. There would be only one type of salary and billing to modify if there was an increase in salary or invoicing. This modification would be automatically applied at the date of the change, for new requests and for all request types using these salary or billing types.
Steps to add a new request type
Some items must be created beforehand, if they do not already exist.
•Create a new function, if needed
•Create a new salary type, if needed
•Create a new billing type, if needed
•Then, you can create the new request type
Create a request type
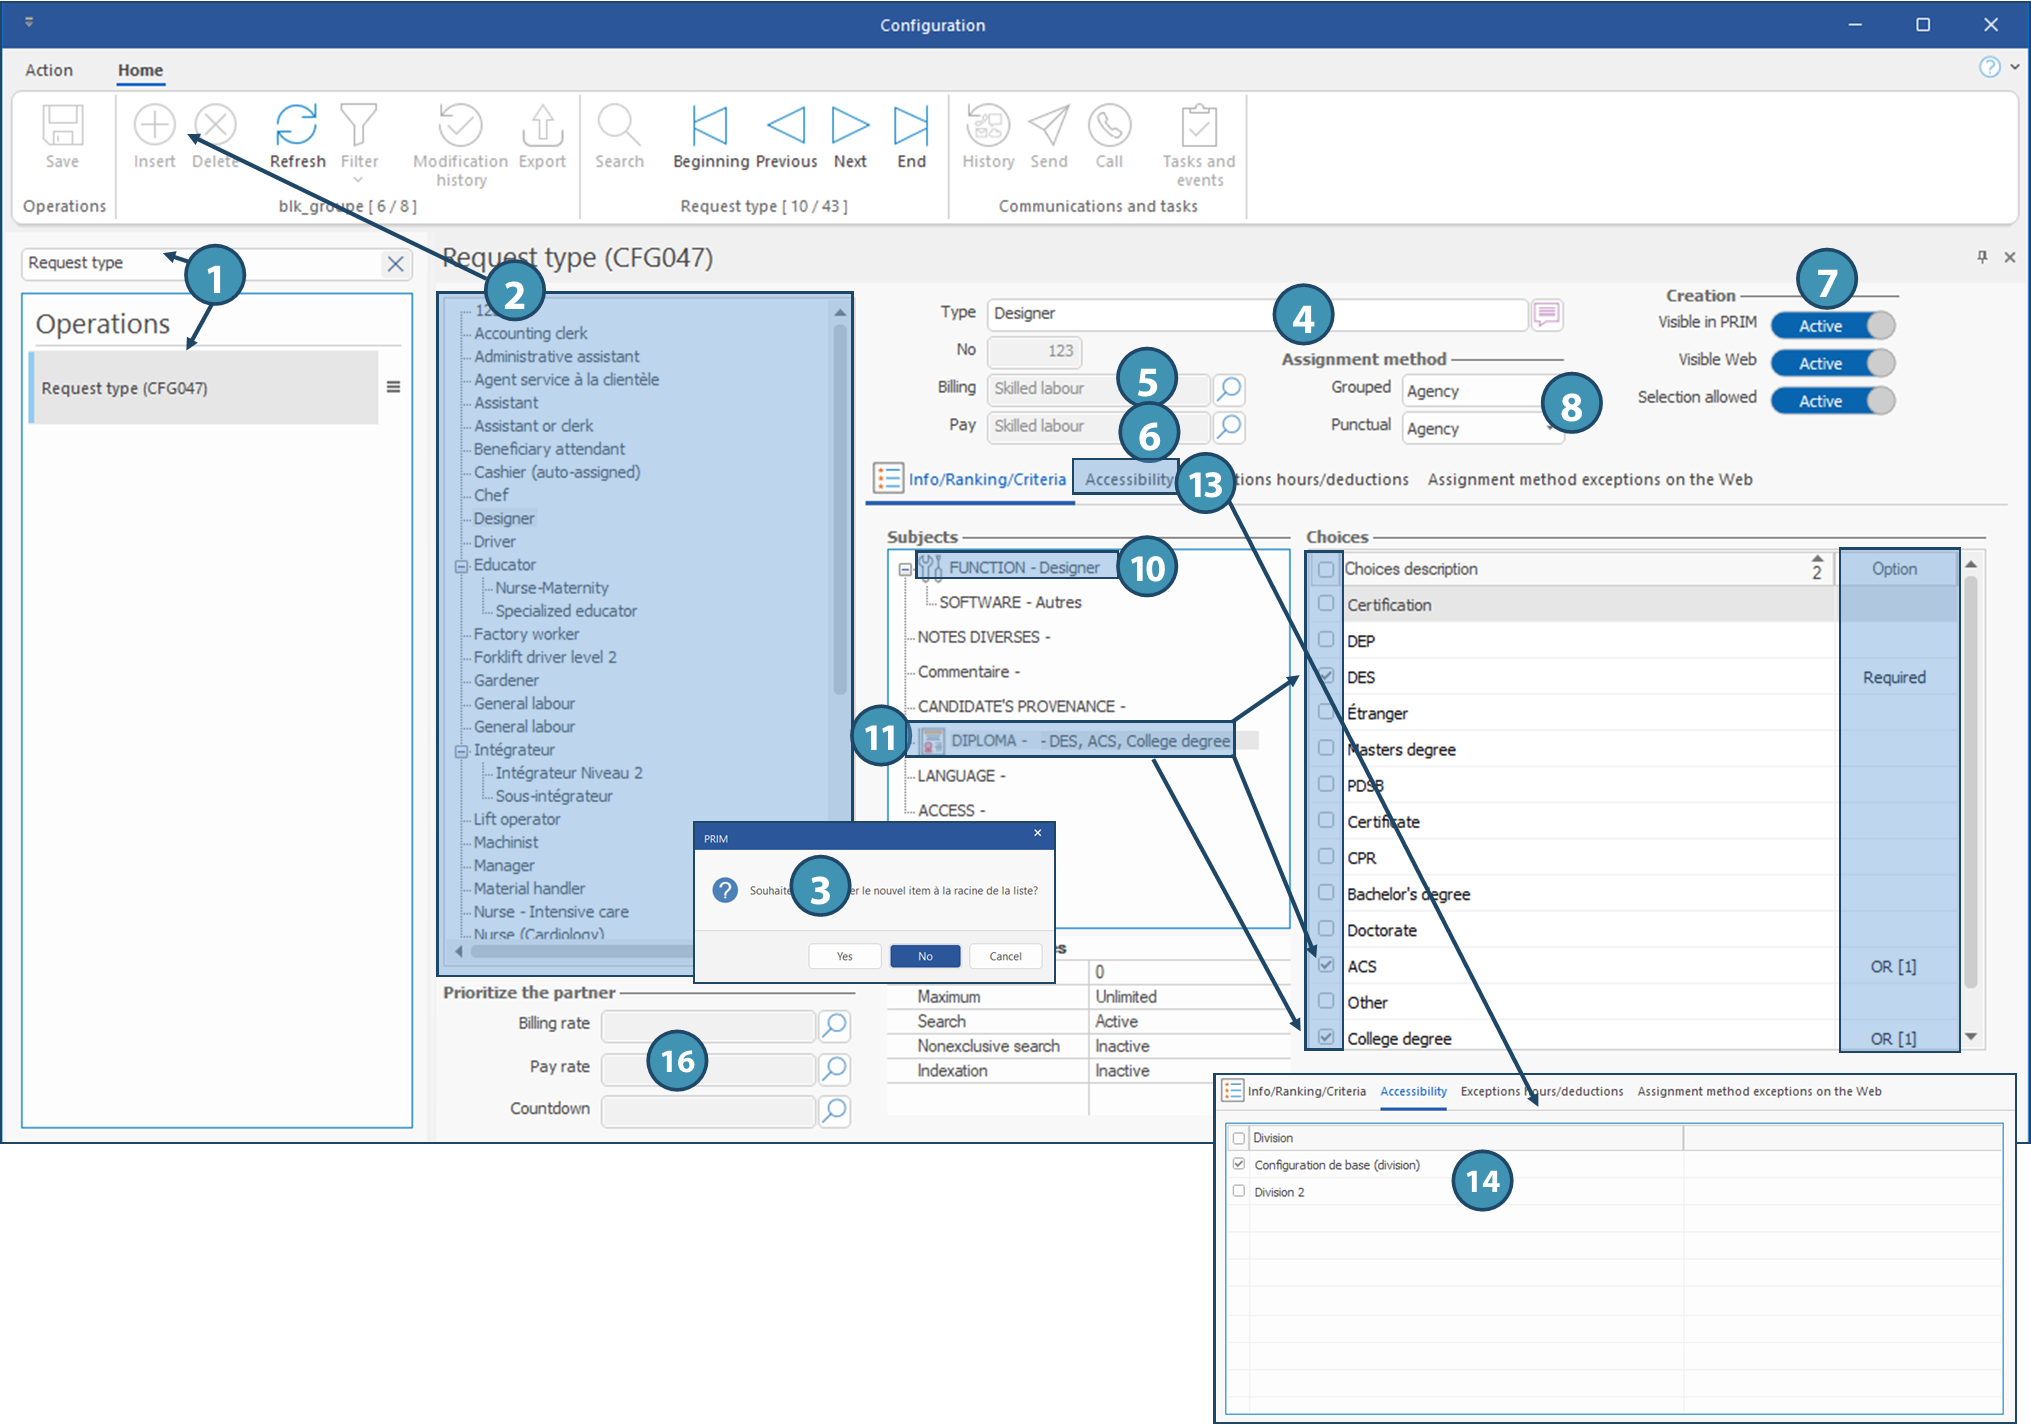
Request types are created in Request type (CFG047) pane of the configuration window, accessed by clicking on Settings in System ribbon.

1.Search and launch the Request type (CFG047) pane/window
2.Click in the zone of the window where is the list of request types and click on  (Insert) from Home ribbon.
3.A message is displayed asking you a which level you want to insert the new item. Click Yes to insert the new item at the root of the list.
 If you click on "No", the request type will be created as a sub-category of the selected type.
 It is possible to use the "Drag and drop" method with your mouse by clicking on a type of replacement to change its level in the list.
4.In the Type field, enter a name for the new request type.
5.In the Billing field, click on  to display the List of values window and select the appropriate item in proposed values.
 Value of this field corresponds to the "Billing type".
6.Repeat the operation for the field "Pay".
 Value of this field corresponds to the "Salary type".
7.Specify if the request type will be visible in PRIM and on the Web portal (client space), and if selection will be allowed when creating a request (Selection allowed).
 For instance, if you create sub-categories, you might allow only child categories to be selected and not the parent.
8.Specify the assignment method to be used, depending if it is a Grouped or Punctual request.
 It is also possible to create assignment method exceptions on the Web, depending on various conditions.
9.Click on  (Save).
10.In Subjects area, click on Function and select the function to which you want to associate the request type.
11.Click on Diploma and tick the diploma(s) canddiates must have, if applicable. Make sure to select the proper option for each time (Required, Asset, OR) cochez le ou les diplômes demandés aux candidats, s'il y a lieu. en sélectionnant pour chacun l'option appropriée (Obligatoire, Atout, OU).
 The option OR indicates that the candidates must have one or other of the diplomas associated with this option.
 If a diploma is not always required, or if it may vary depending on the request, it's better not to tick anything in the request type and select the diploma in criteria of the specific request.
12.Click on  (Save).
13.Go to Accessibility tab.
14.Tick the division(s) for which the new request type will be available.
15.Click on  (Save).
You can now select this request type for clients allowed to deal with the selected division.
 It is also possible to prevent selection of some request types by pushing the proper toggle (7) to the left and save.
16.Section Prioritize the partner : depending on your configuration, this section allows you to choose in the proposed list the type of partner where PRIM will look for the billing rate. the paid rate and the countdown, in case rates are customized in a client.

