|
Navigation: Training plan > Section 7 - Operations - Temporary > Grouped shifts (PRIM005) Define a schedule for a mission |
Scroll Prev Top Next More |
Define a Schedule for a mission
Creating a schedule involves two steps: first, you must define the schedule type and specify the settings in the Information tab. Once the template is created, you then create the time slots in the Schedule tab , based on the selected type and the defined parameters.
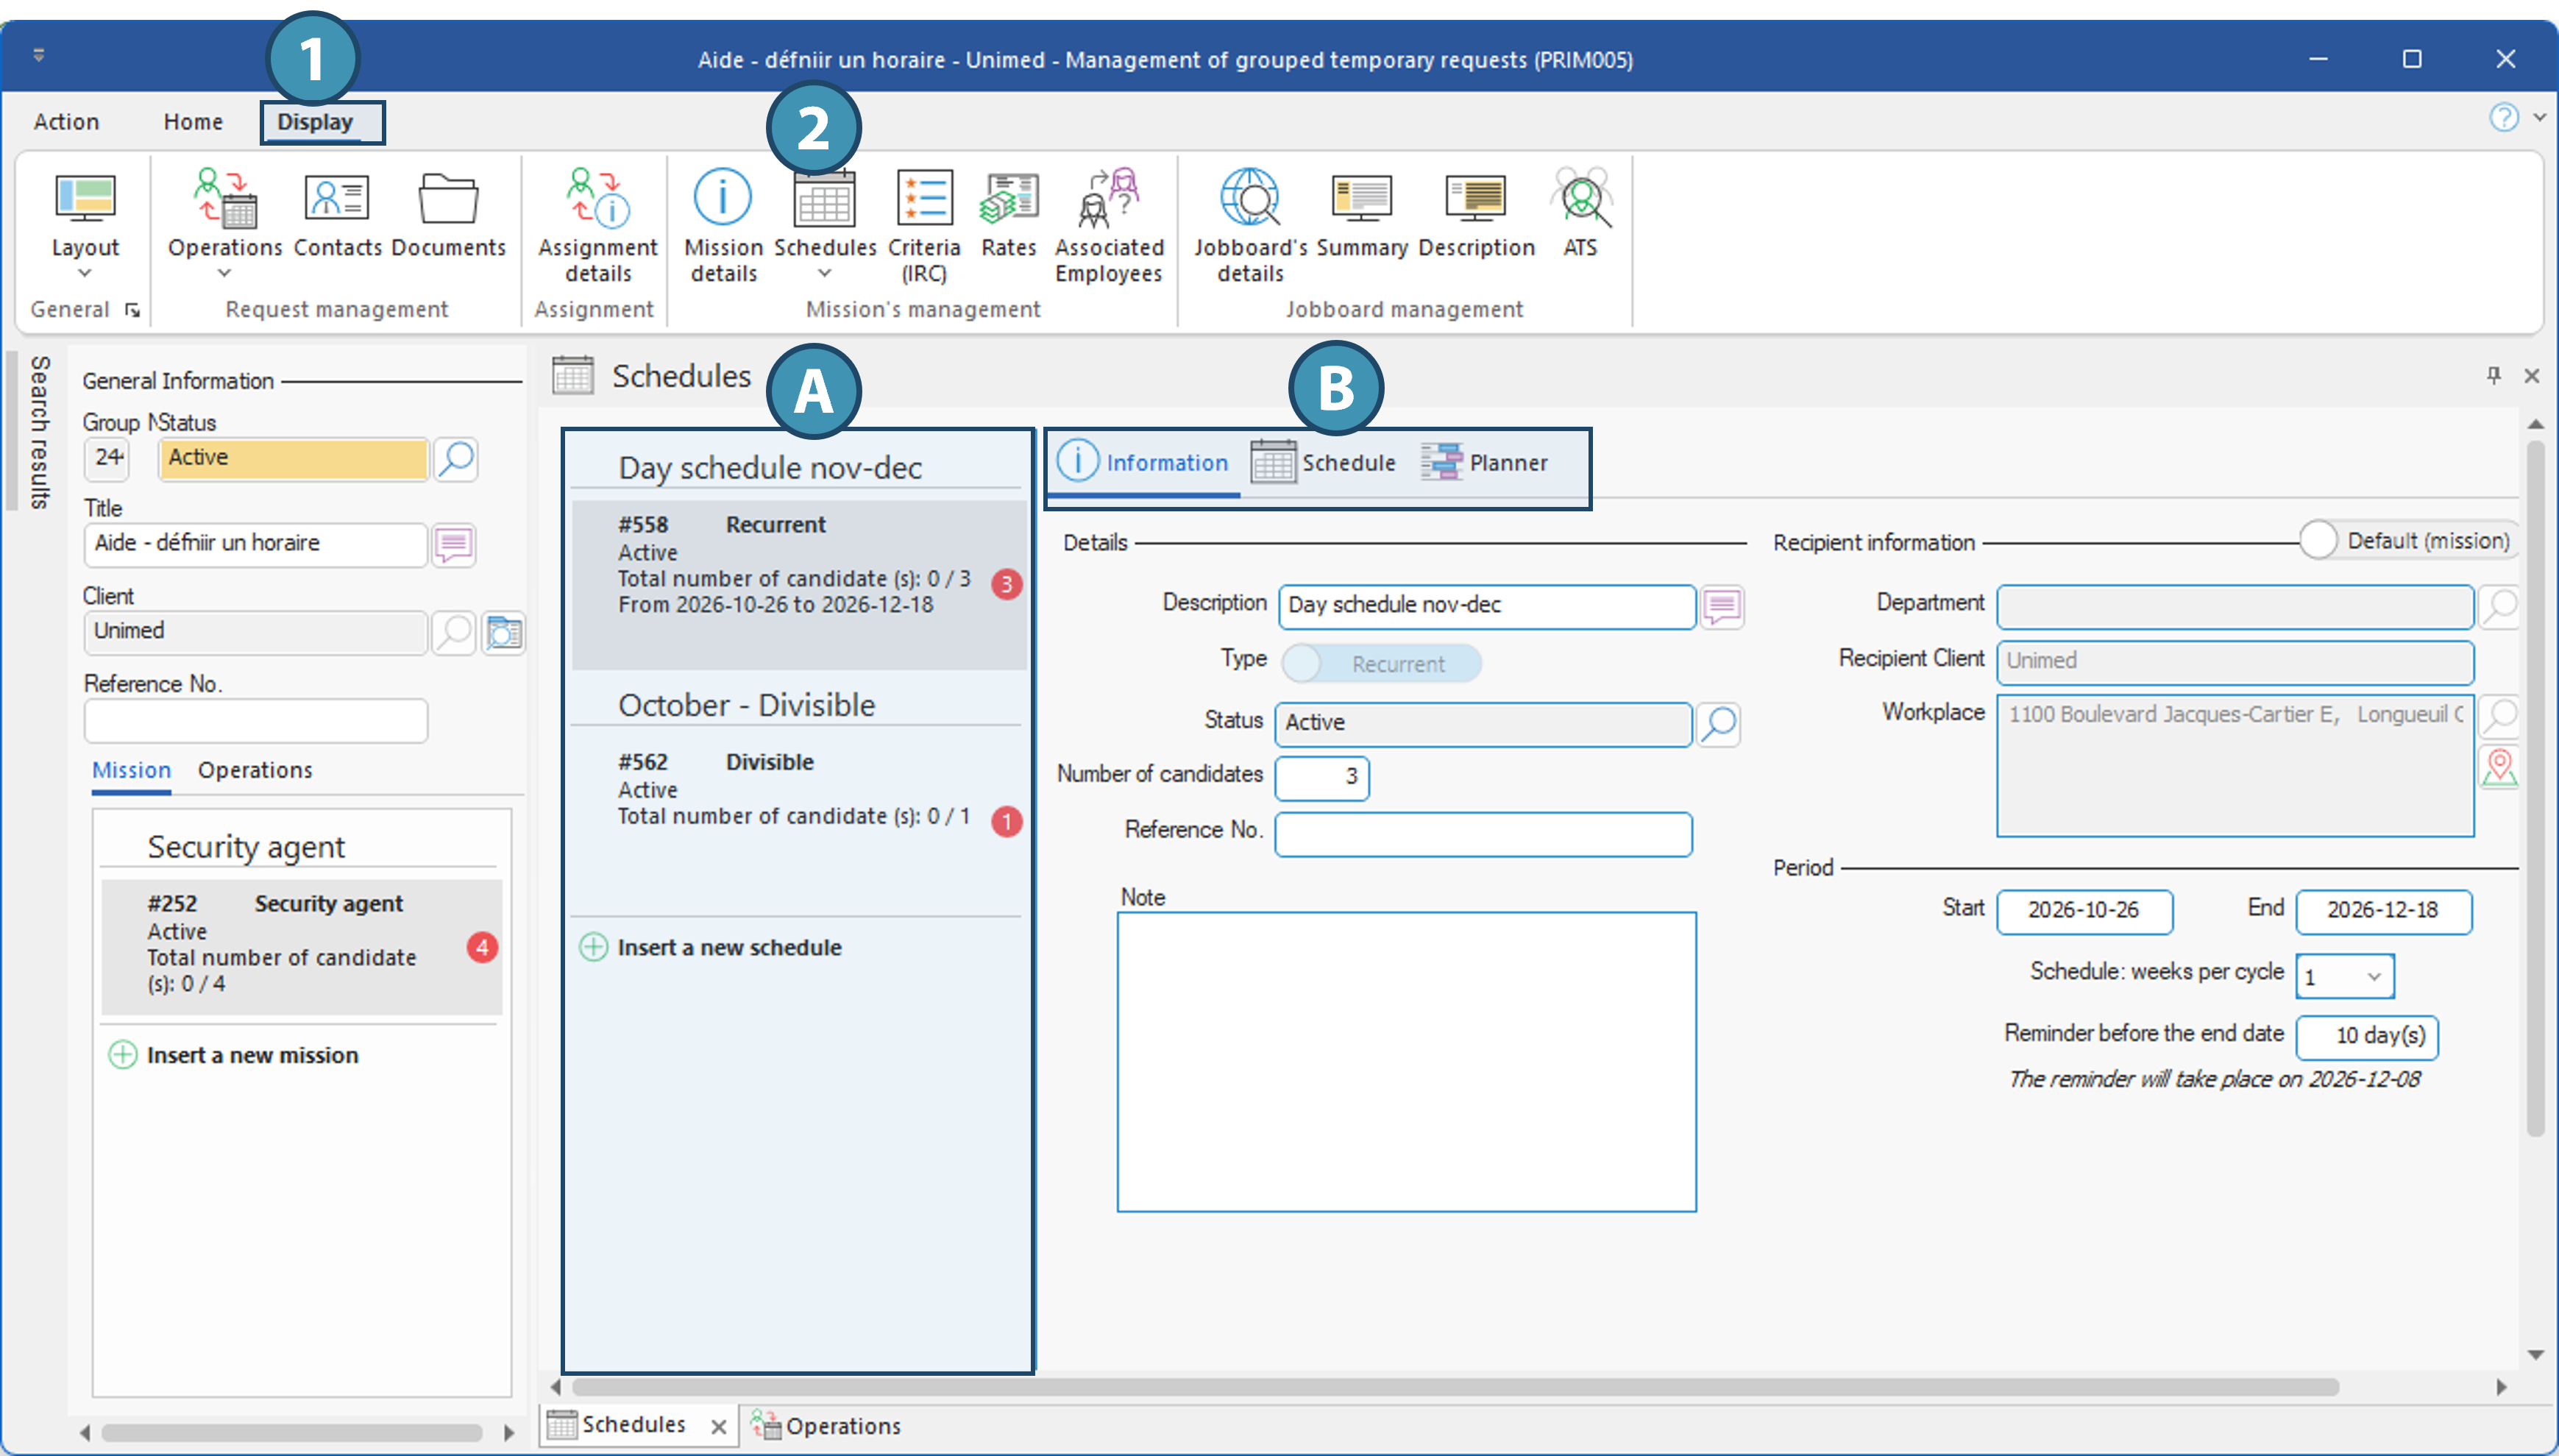
Use the Display ribbon (1) to open the Schedule pane (2). This pane is divided into two sections: a list of existing schedules (A), which is always displayed, and three tabs for creating and managing these schedules (B).
 Set the schedule type and settings
For each assignment, you can create one or more schedules. The schedules displayed are therefore those for the selected assignment.
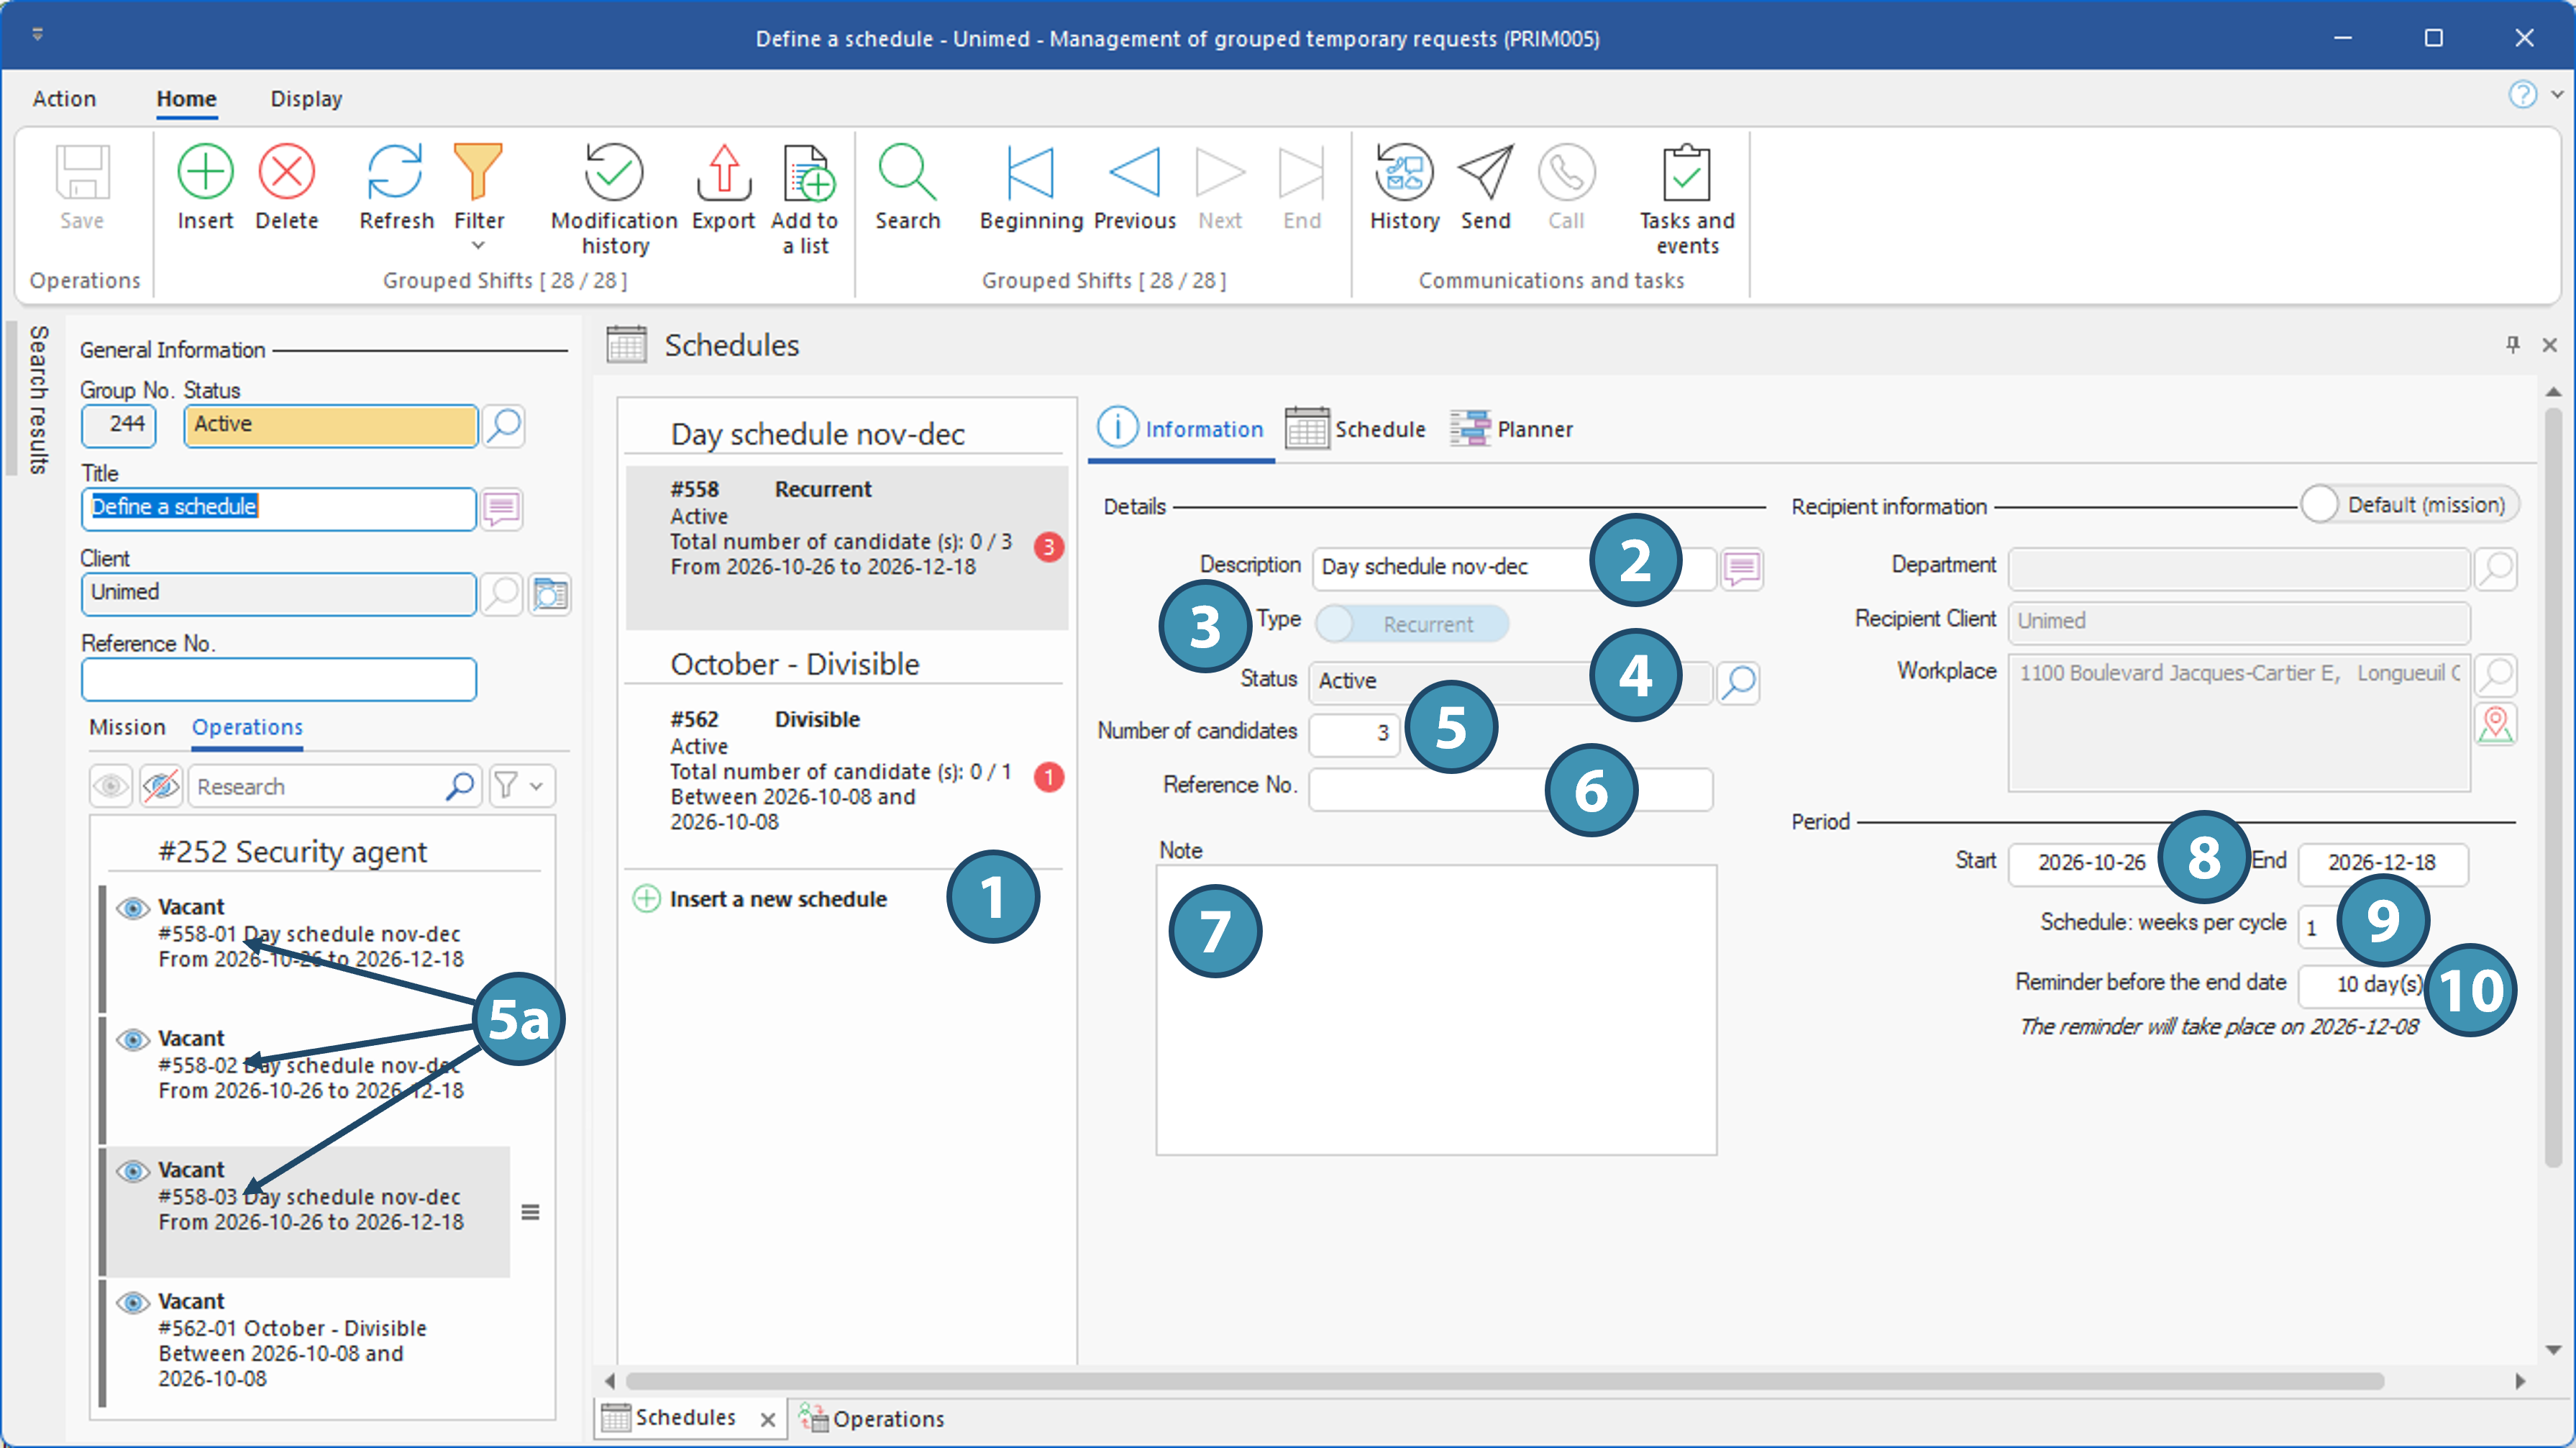
In the “Information” tab, fill in the fields to configure the schedule: 1.Click “Add a New Schedule” in the list to create a schedule. 2.Give this schedule a title, if desired. ⅰIt is always recommended to add a description: this ensures that if copies of the schedule are generated—for example, following an interruption of the original schedule—the copies will be grouped together and easily identifiable. This description is even more important for divisible one-time schedules, since each new schedule generated from the original schedule will have a distinct number, just like the shifts included in the schedule. It will therefore be impossible to link these schedules without this description. 3.Specify the type of schedule: Standard One-Time, Divisible One-Time, or Recurring. ⅰWhen the “One-time” type is selected, another button allows you to choose between “Standard” and “Split.” ⅰFor more details on the different schedule types, see the “Schedule Types” page. 4.If applicable, select the schedule’s status: only an active schedule needs to be filled. 5.Specify the number of candidates needed for this schedule. ⅰIf more than one candidate is specified, each candidate will cover the entire schedule, not just a portion of it. Each candidate constitutes an “operation.” For example, if we requested 3 candidates for schedule no. 558, once the time slots are added, this will create operations 558-01, 558-02, and 558-03 (5b), which will be visible in the “Operations” tab on the left side of the window. 6.If applicable, enter the reference number associated with this schedule. 7.If necessary, add a note regarding this schedule.
For a recurring schedule: 8.Set the start date of the schedule. An end date can also be added, but only the start date is required. 9.Set the number of weeks in the recurring schedule’s cycle. You can create schedules with cycles of up to 8 weeks. 10. If an end date has been added, you can set a reminder interval before the end date, in days. If applicable, the reminder will be created as a task in the Events and Tasks module.
|
Create schedule or add time slots
After creating the schedule template by following the previous steps, go to the Schedule tab in the same pane.
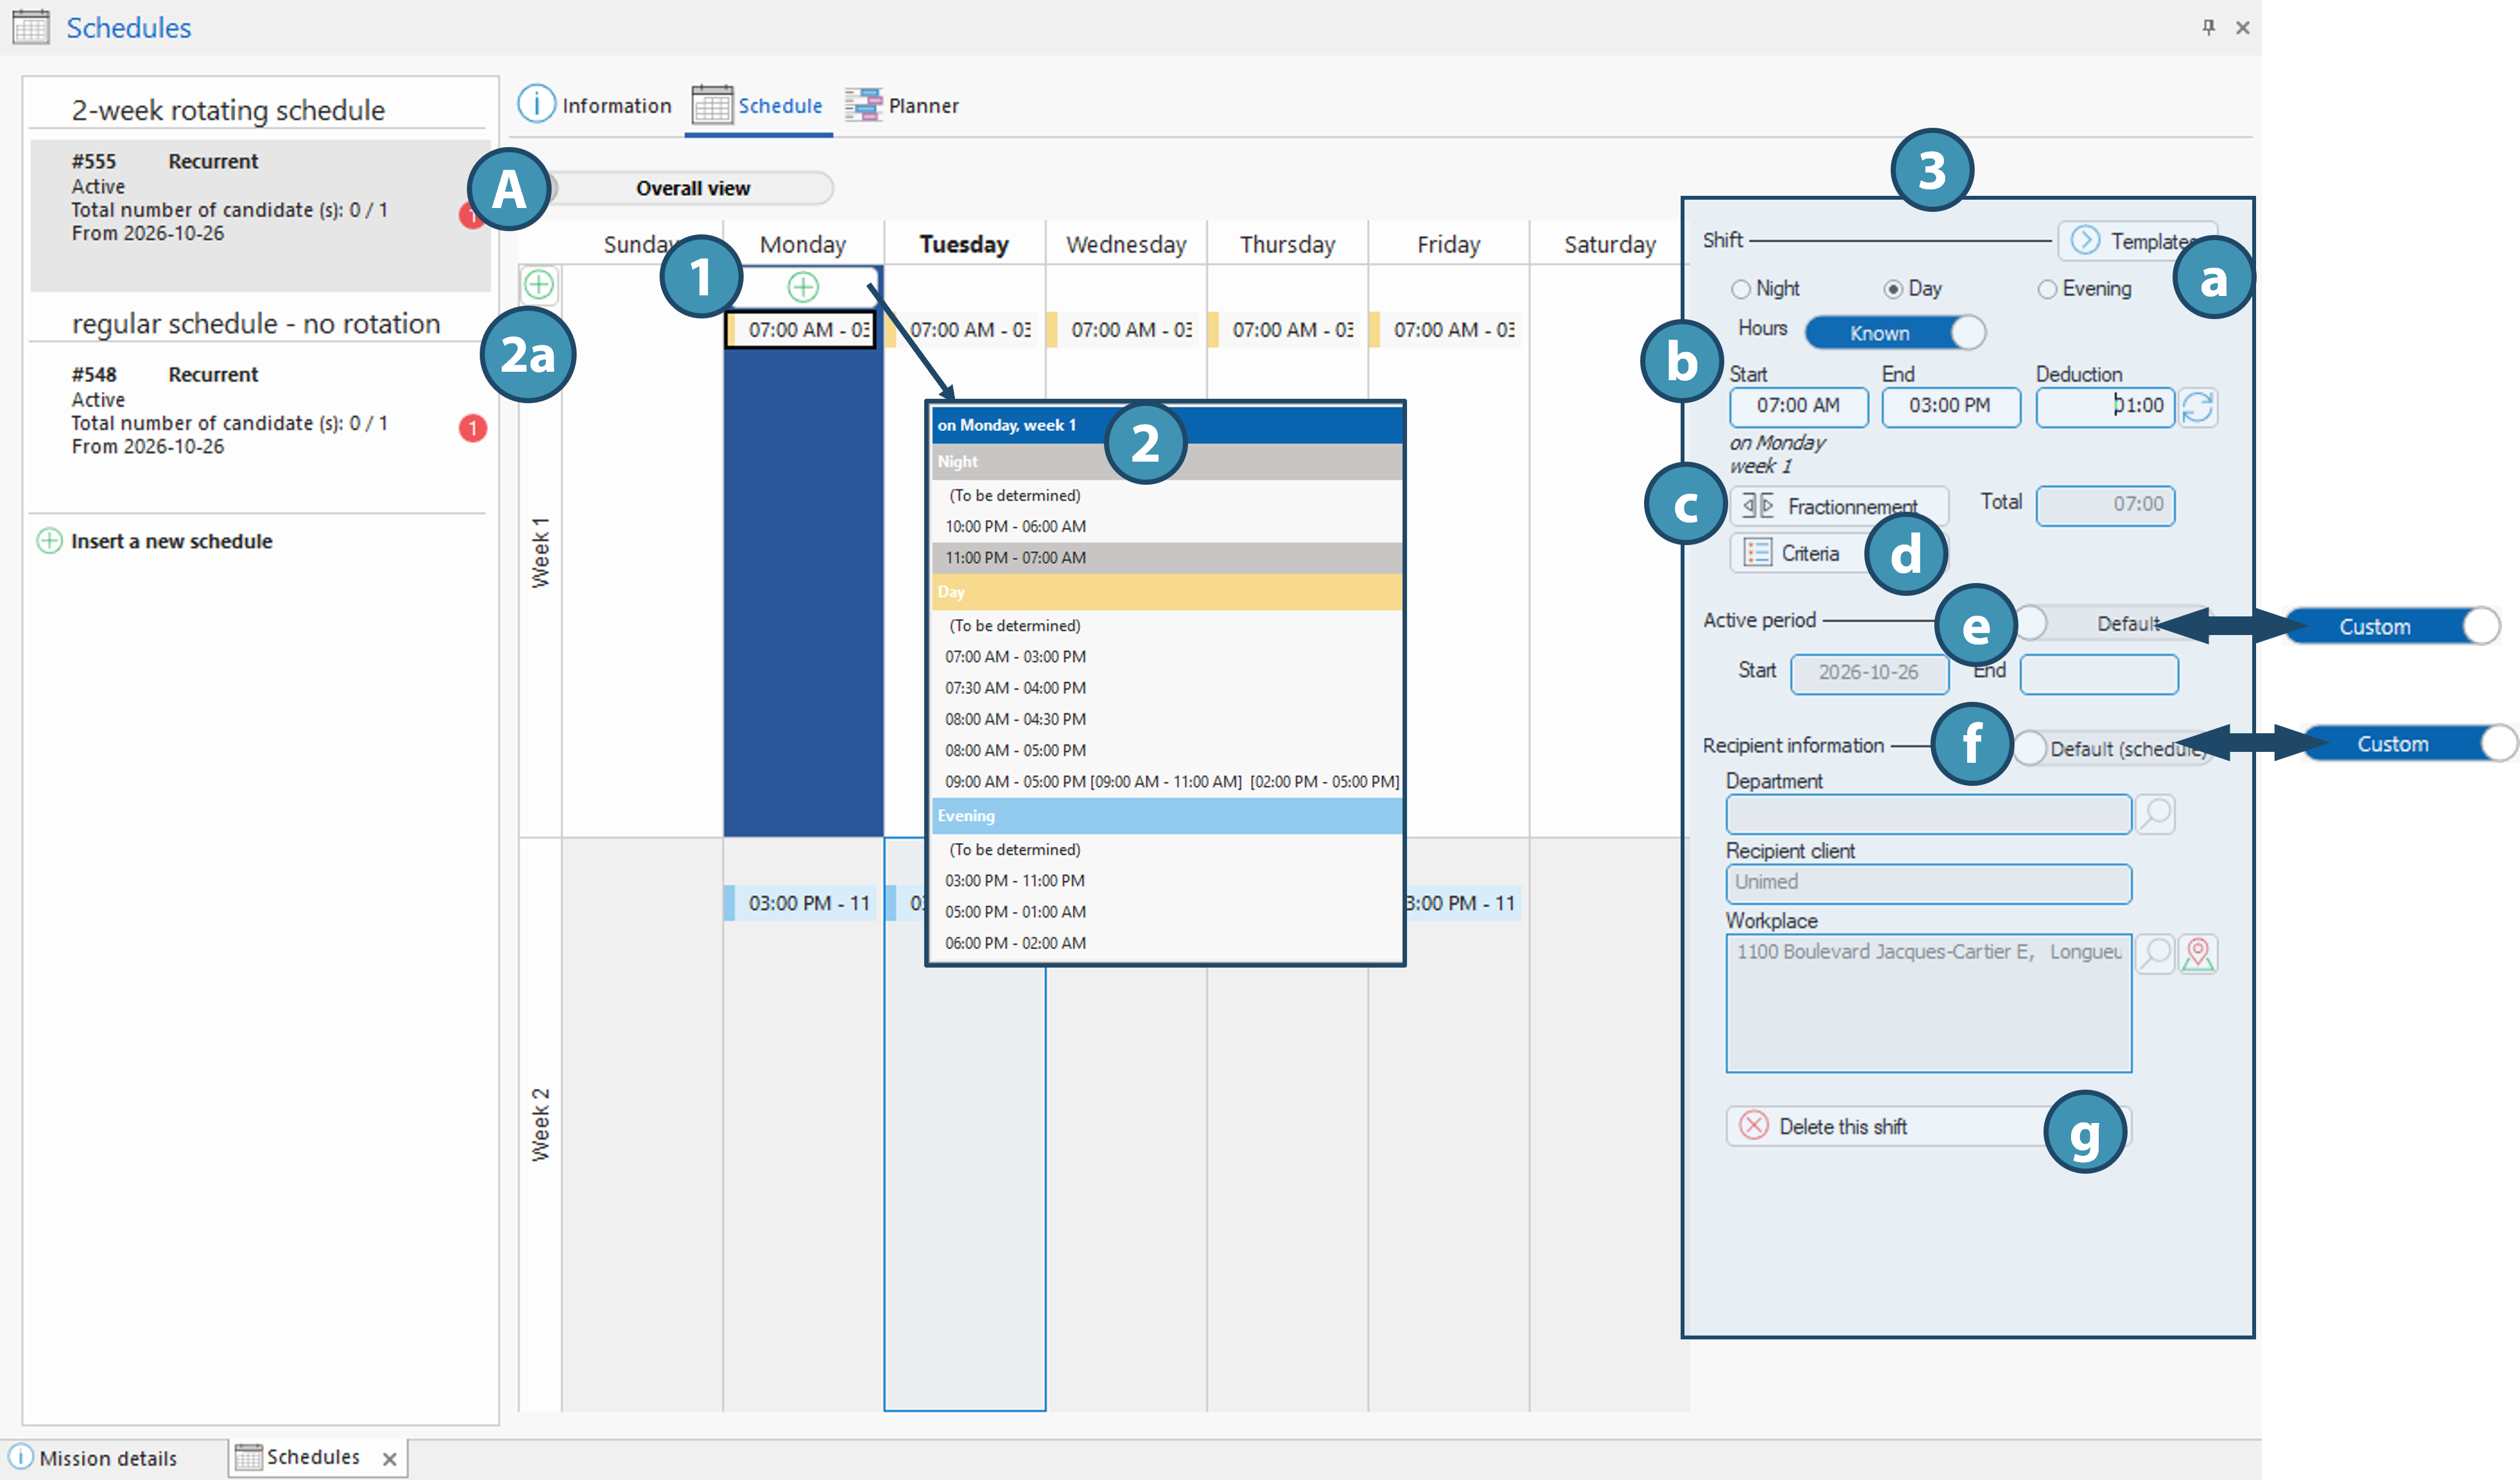
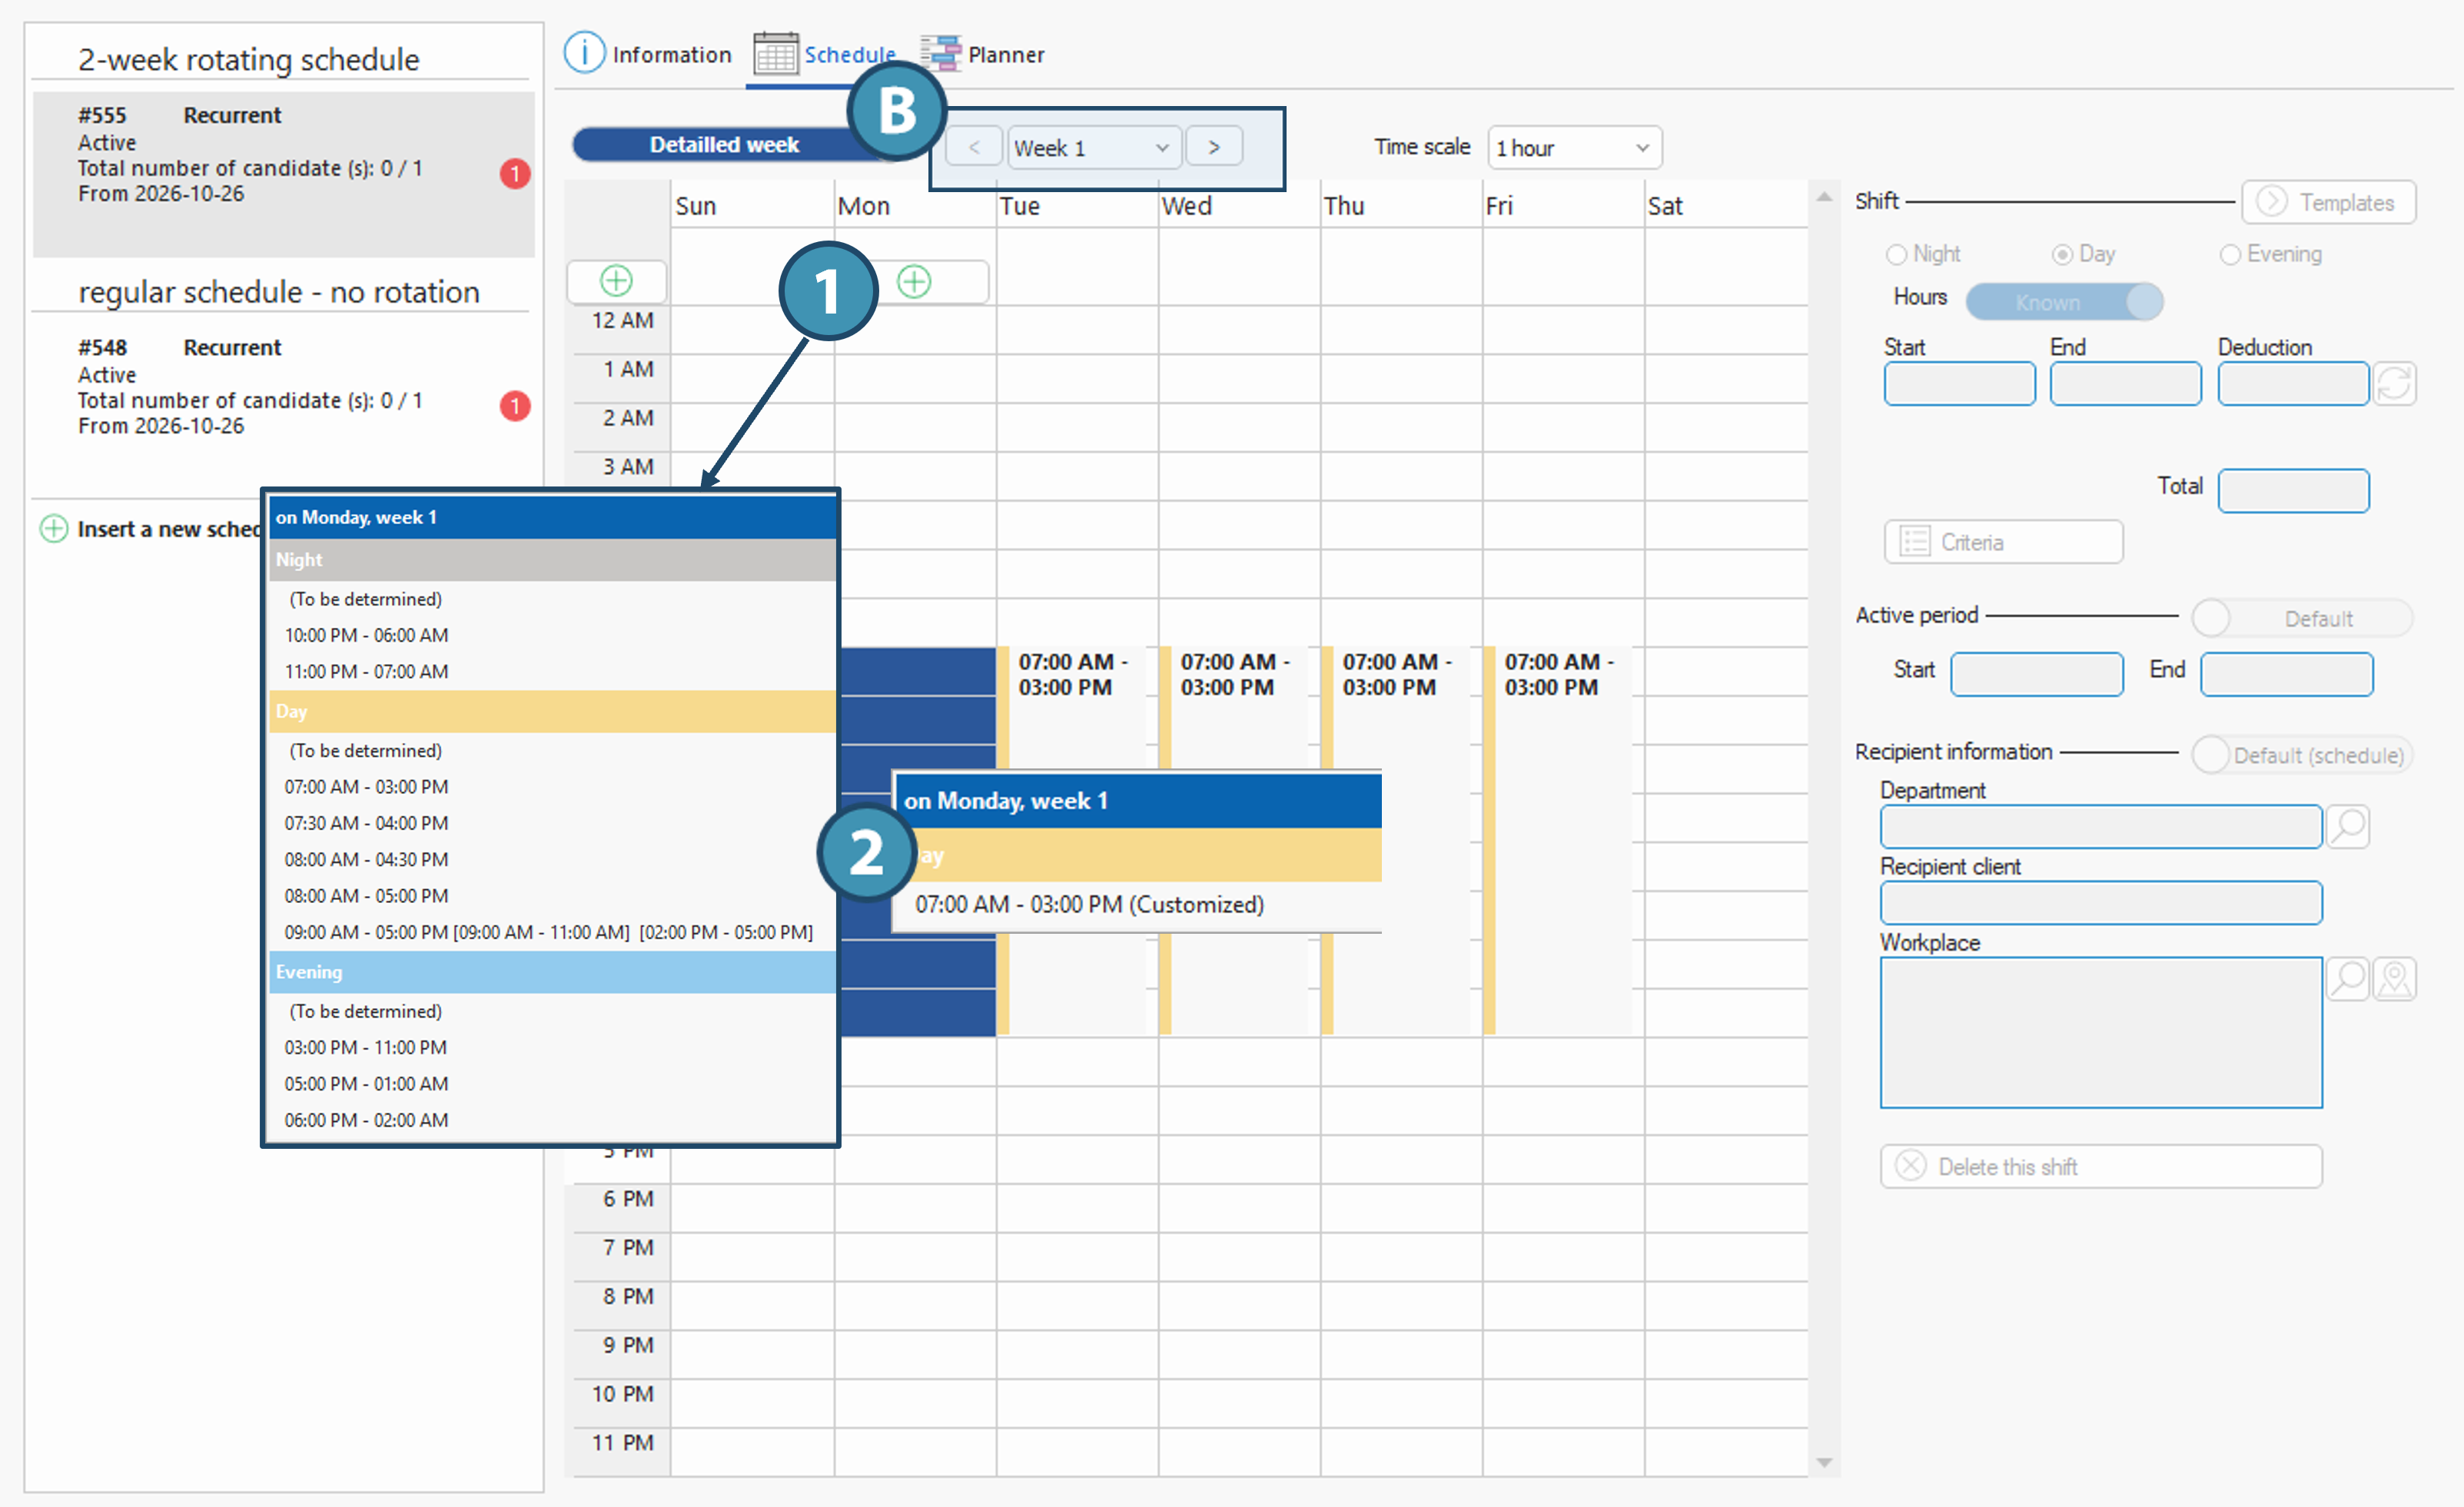
If the schedule you created is of the “Recurring” typeYou can switch between an overview (A) and a detailed weekly view (Image B). In the Detailed Weekview (Image B), use the arrows or the drop-down menu to select the desired week (1, Image B).
To add a schedule: 1.Select a day on the calendar and click the “ 2.A context menu will appear, where you can choose from various preconfigured templates or create a custom schedule. ⅰIn the detailed weekly view (B), you can also select the desired time slot and the “Custom” option. ⅰFor a recurring schedule, you can also insert a schedule template for an entire week by clicking the “ 3.Fill in or edit the information related to a selected schedule slot in the right-hand pane: a.Apply a template or select the shift type (Day, Evening, Night). b.You can choose to specify hours as “Known” or “To Be Determined.” In the latter case, only a start time is required to save the schedule. Set the start and end times. The deduction is calculated automatically based on the client’s preferences. However, it can be modified manually. c.If the schedule needs to be split into multiple periods, click the Split button to open the Working Periods (PRIM010) window and create or modify the work periods. d.Click the Criteria button to add details or notes specific to the selected shift. !This button should not be used to add candidate selection criteria, since candidates are selected at the schedule level, not the shift level. e.If necessary, you can modify a shift’s active period—for example, because a day’s schedule changes as of a certain date. ⅰFor more details on modifying a recurring schedule, see the “Editing a recurring schedule over time” section on the “Modify a Group Request” page. f.Information regarding the service provided is automatically populated from the Mission's details pane. If this information does not match for this schedule, you can customize it by clicking the corresponding button. g.You can delete a shift from the schedule by selecting it and clicking the “Delete this shift” button. !If the schedule has already started, you likely won’t be able to delete it. In that case, however, you can set an end date for the active period.
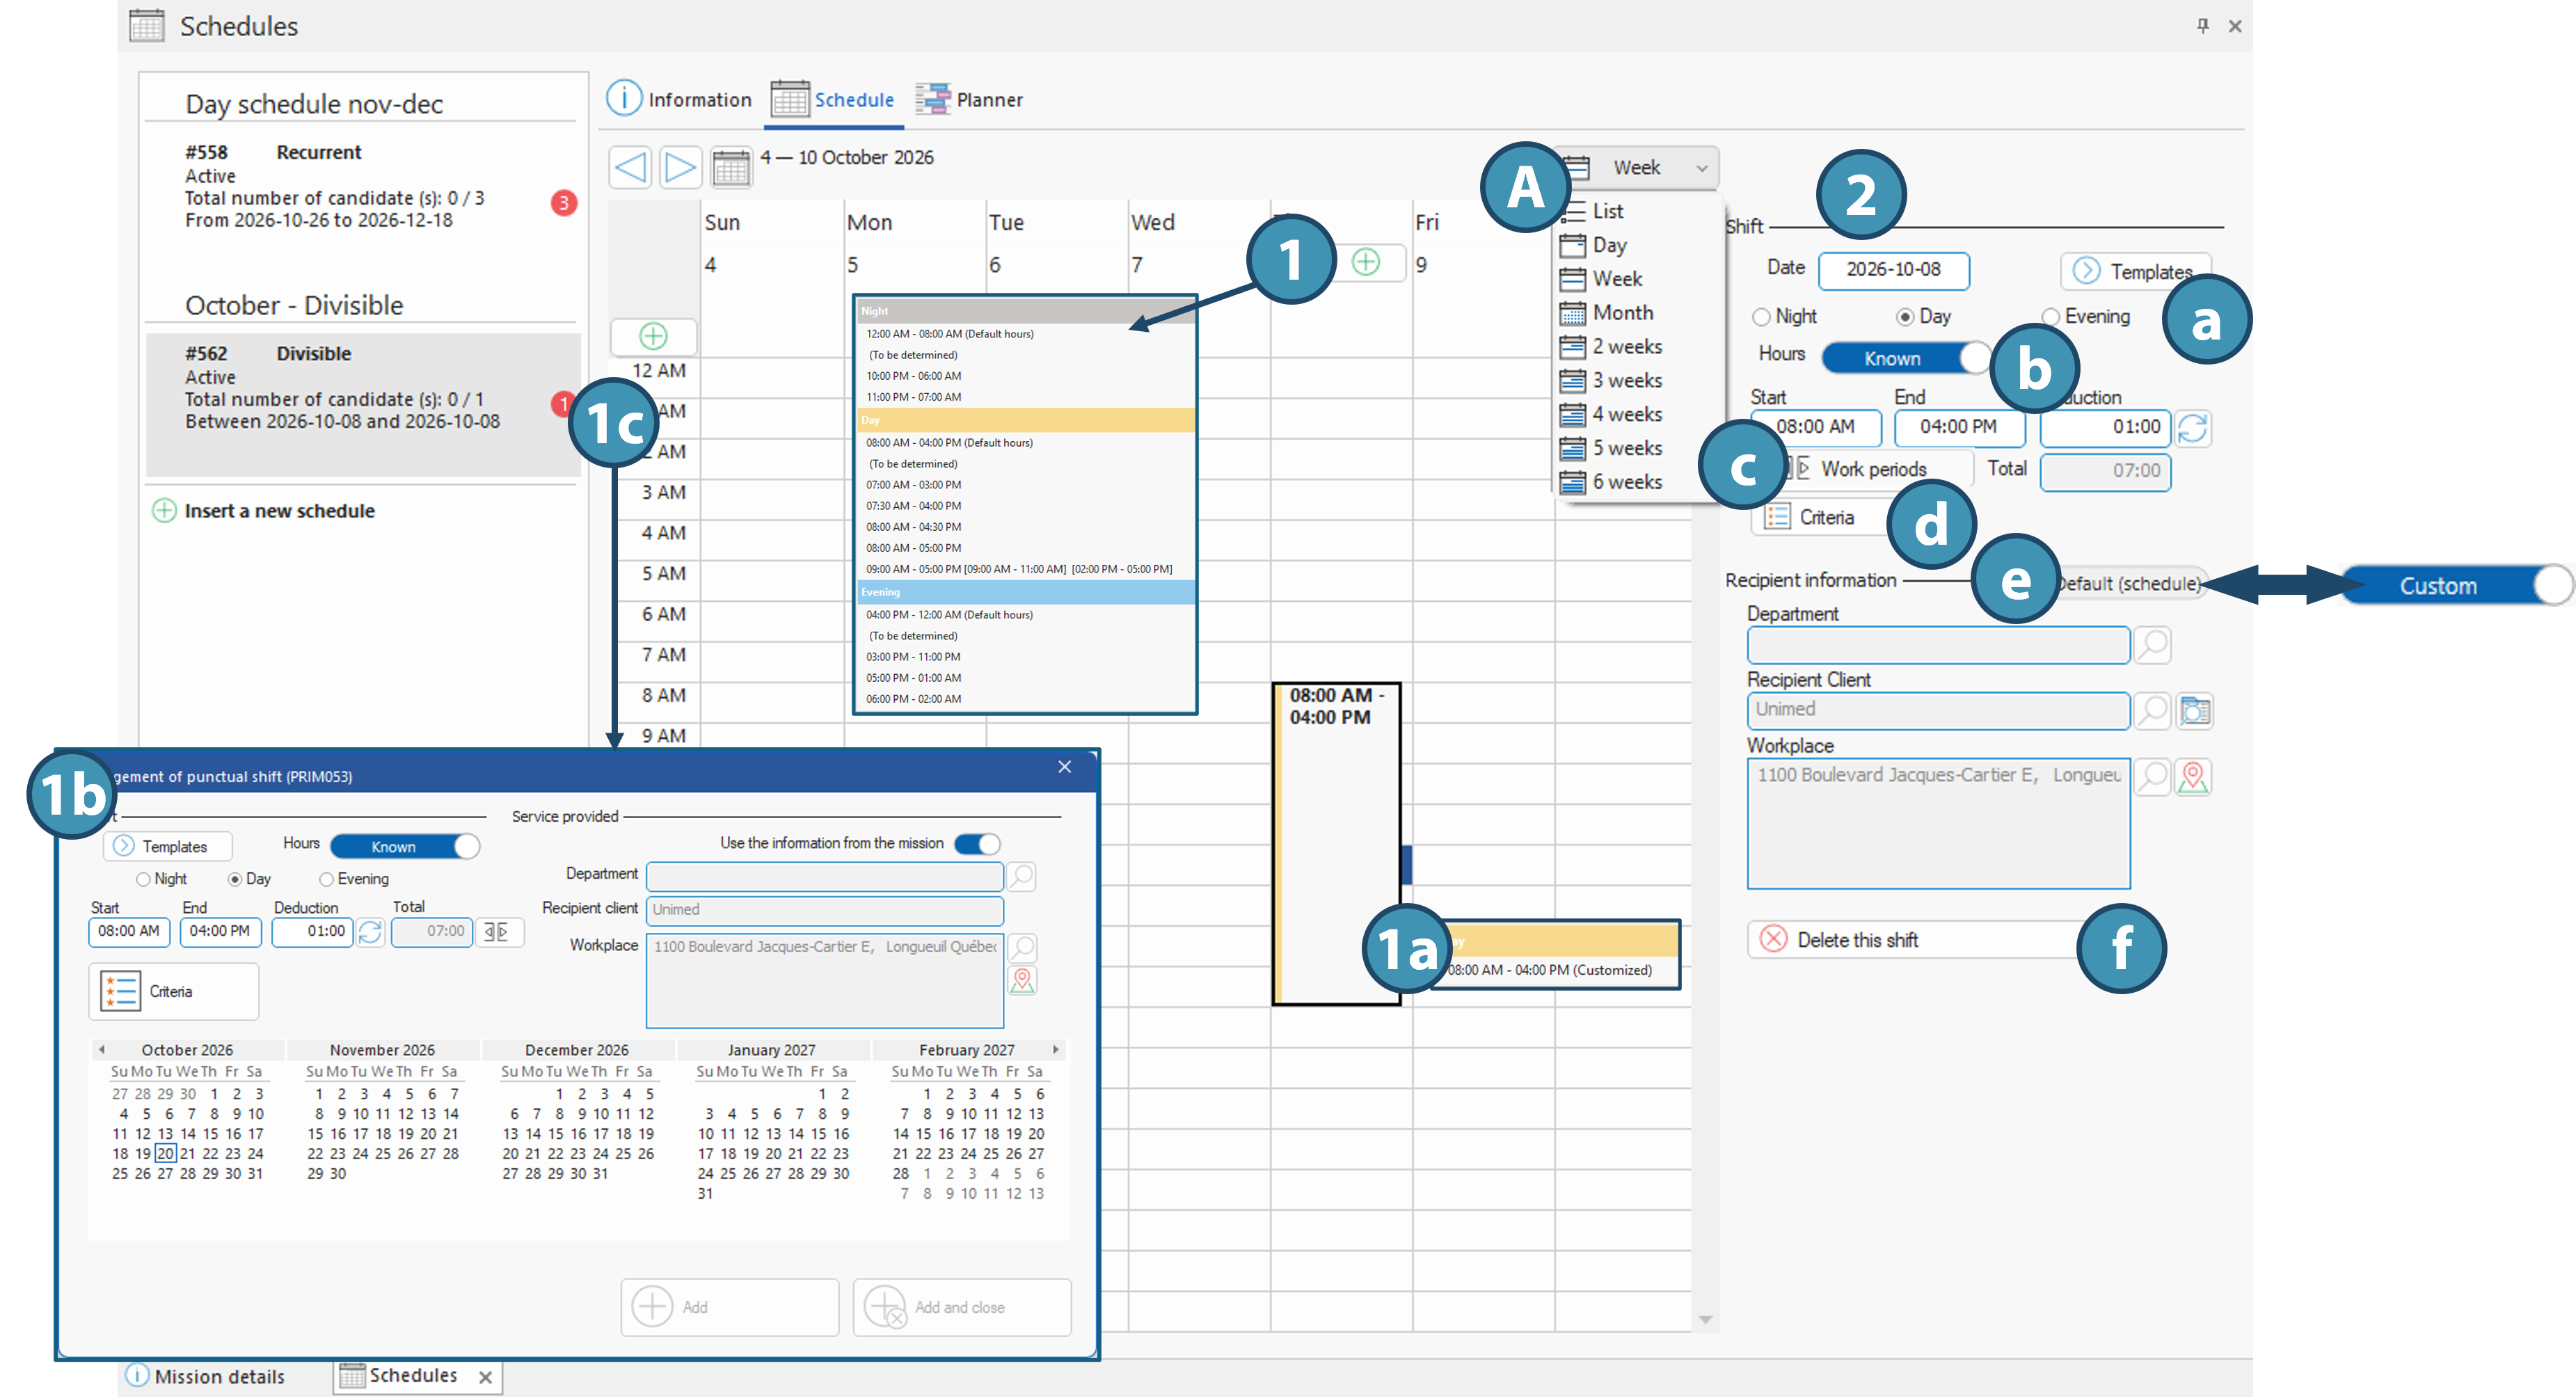
If the schedule is of the “Punctual” type:A drop-down menu allows you to switch between a daily, weekly, or monthly view, a period of 2 to 6 weeks, or a list view (A).
To add an individual schedule: 1.Select a day on the calendar and click the “ ⅰFor punctual schedules, you can use the one-time shift manager (1b) to add one or more shifts in batch. To do this, simply double-click in a column, select that column, and click the “Insert” button on the “Home” ribbon, or click the “ 2.Fill in and/or edit the information related to a schedule on the right side of the calendar: a.Apply a template or select the shift type (Day, Evening, Night). b.You can choose to specify Known or To Be Determined times. In the latter case, only a start time is required to save the schedule. Set the start and end times. The deduction is calculated automatically based on the client’s preferences. However, it can be modified manually. c.If the schedule needs to be split into multiple periods, click the Split button to open the Work Periods window (PRIM010) and create or modify the work periods. d.Click the Criteria button to add details or notes specific to the selected shift. !This button should not be used to add candidate selection criteria, since the candidate is selected at the schedule level, not the shift level. e.Information regarding the service provided is automatically populated from the Mission's details pane. If this information does not match for this schedule, you can customize it by clicking the corresponding button. f.You can delete a shift from the schedule by selecting it and clicking the “Delete this shift” button. !Depending on the shift’s status and your settings, you may not be able to delete it. If so, you can still cancel it in the “Operations” pane.
|
 ” button
Created with Help+Manual 8 and styled with Premium Pack Version 4 © by EC Software