Create a term

Contents
The creation of a term is done from the "Term" window.
![]() PRIM offers 2 locations to open this window and add a term:
PRIM offers 2 locations to open this window and add a term:
•"Quick actions" menu of the "Client" window
•"Term" window in the "Request" section of the PRIM ribbon
A client makes a request for a medium or long-term job, with the possibility of an extension. The candidate's pay will remain the responsibility of the agency and the monitoring and management of schedules will be done on a weekly basis.
Create a term is proving to be a good solution in this situation.
On the "PRIM” ribbon, click on ![]() to open the window.
to open the window.
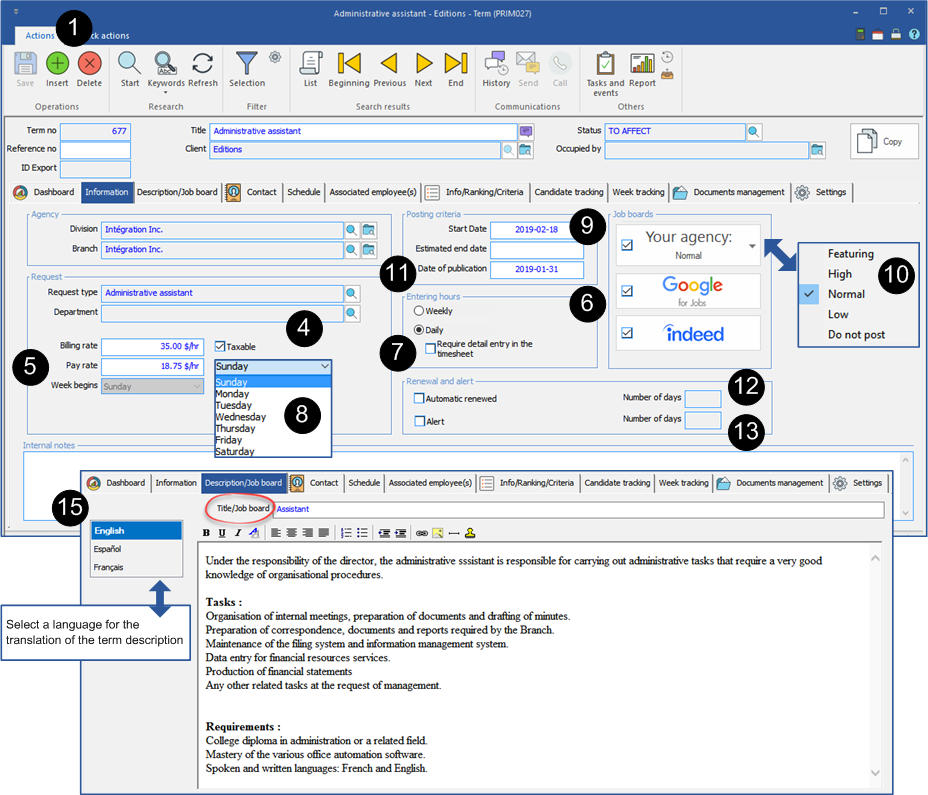
1.Click on ![]() (insert)
(insert)
2.In the selection window, enter the client's name in the search field and click on the icon ![]() (Perform search) or use this icon without entering the client's name to display the complete list.
(Perform search) or use this icon without entering the client's name to display the complete list.
![]() If there is no default division saved in the client's folder, you will have to select it in the creation process, otherwise it will be added automatically.
If there is no default division saved in the client's folder, you will have to select it in the creation process, otherwise it will be added automatically.
3.In the next window, select the type of replacement.
4.if needed, select a department and click on ![]() .
.
5.The pay and billing rates come from the configuration and are displayed automatically, however, modification is allowed.
6.Check the type of hours entry. After a candidate has been assigned, it will not be possible to make a change.
7.If you prefer to enter hours per day, you can check this box to require the detail to be entered when confirming the hours worked on the Web platform. This box refers to the window that will be displayed on the Web platform, the option button for entering hours worked will not be displayed.
8.From the list, select the start day of the work week. After saving, it will no longer be possible to modify it.
9.Change the beginning date if it is different from the current date and enter the end date if known. You will be able to change the end date of the term, if there is an extension.
10.From the list, select the priority for displaying the term on the Web platform.
11.By default, the publication date displays the start date, you can change it.
12.Check the "Automatic renewal" box to renew the term. The field "Number of days", means the number of days before the end of the term to add the following week's schedule to the system. You can change the default number displayed if it does not suit you.
13.Check the "Alert" box so that PRIM generates a task to notify you of the end of the term. You can change the default number displayed if it does not suit you.
14.Click on ![]() (Save).
(Save).
15.Under the "Description / Job board" tab, enter a description of the term and translate the text if necessary. If applicable, add a title in the "Title / Job board" field.
16.Under the tab ''Contact'', you will find the contacts listed as main contact for a term in the client's file. You can add one or remove one.
17.Under the tab "Schedule", enter the usual schedule for the term.
18.Under the tab ''Associated employee(s)'', select an employee associated to the term, if applicable.
19.Under the tab "Info/Ranking/Criteria", select the criteria corresponding to the term.
20.Under the tab "Document management", add the documents, if applicable.
21.Under the tab "Settings", complete the information, if applicable.
22.Click on ![]() (Save) to finish.
(Save) to finish.