Create batch requests
Batch replacements are created from the window Add batch requests (PRIM011).
 PRIM offers 3 locations to open this window and add replacements in batch:
•The "Action" menu of the "Client" window
•"Operations" tab - sub-tab "Replacements" of the "Client" window
•The "Add batch requests" button in the "Temp request" section of the Home ribbon.
In the example below, we will use the "Client" window.
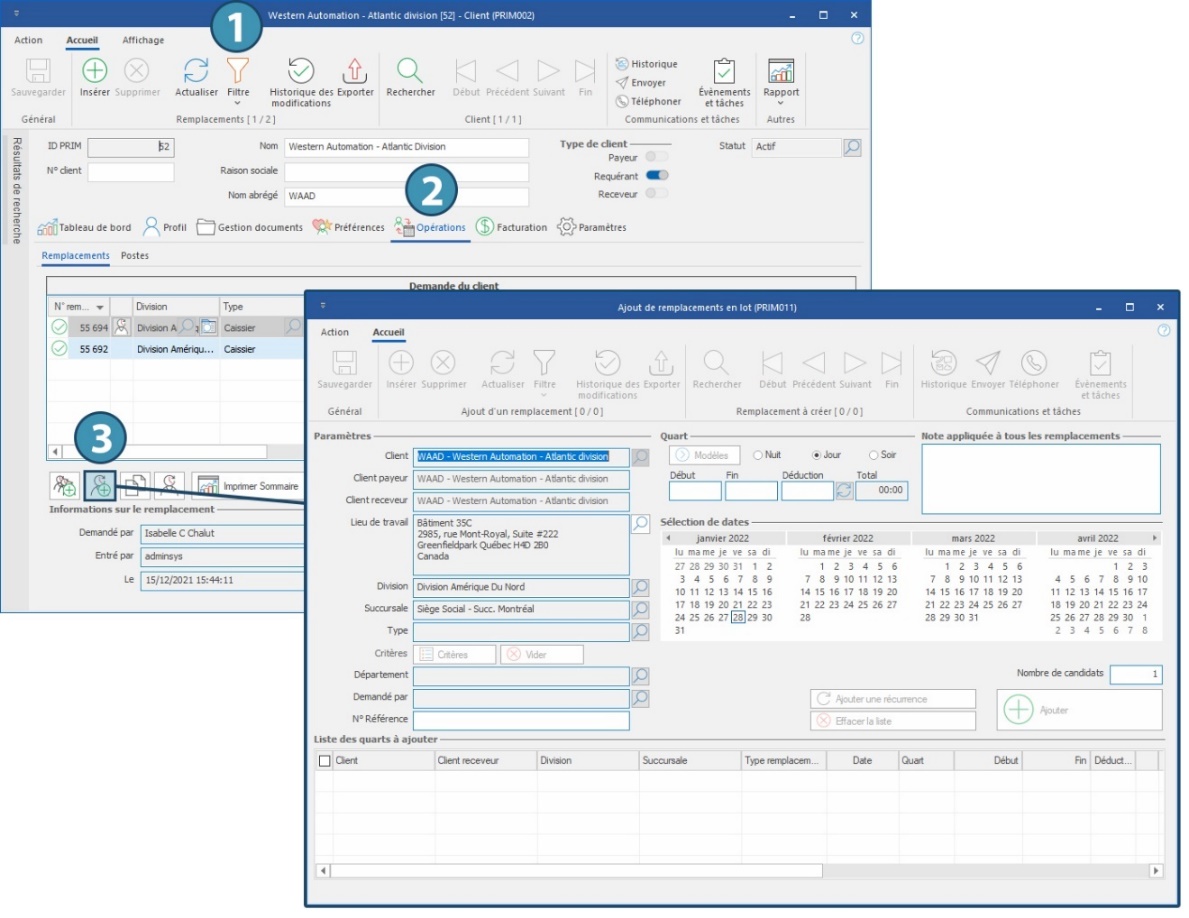
1.Open a "Client" window.
2.Click on the ''Operations'' tab and on the sub-tab "Replacements".
3.Click on  (Add batch requests). The "Add batch requests" window is displayed. Note that default information of the client is already entered.
If you open the window from the "Home" ribbon, click on the "Client" field. The value selection window is displayed, so you can select a client and click "OK".
To fill in the fields configured in PRIM Logix, click on the magnifier to open a value selection window and choose the proper item.
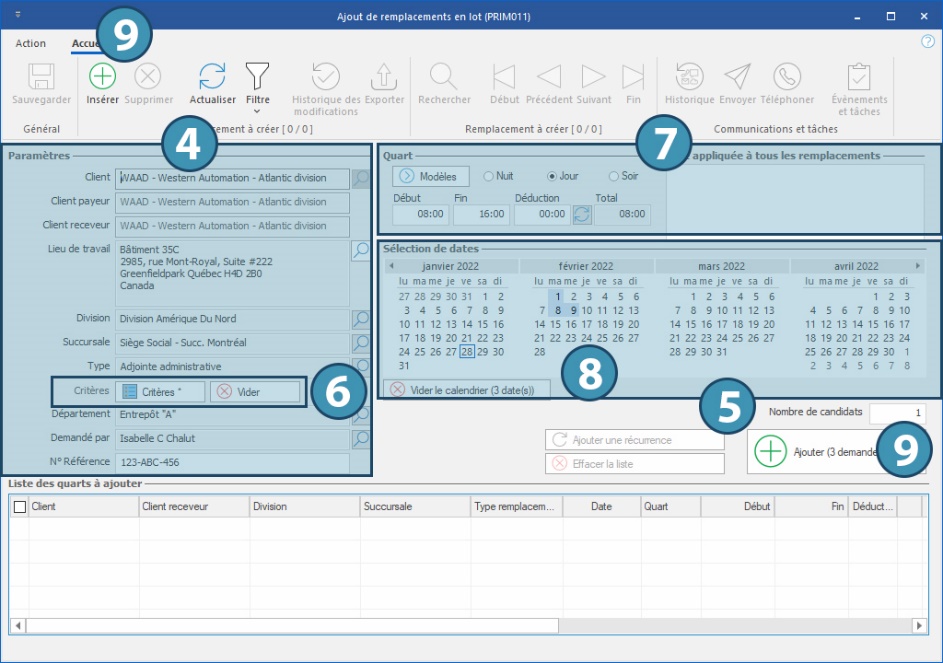
4.Fill in the information about the replacement(s):
•If applicable, select a payer partner or recipient client using the value selection windows.
•Select a workplace.
The workplace is linked to the request. Thus, in the absence of a preset configuration for the client (a unique and permanent workplace ), entering a workplace is mandatory to create the request.
•Select a division.
•Select a branch.
•Select a type of replacement.
The type of replacement is linked to the request. Thus, this field is mandatory to create the request.
•If required, select the department.
•If required, select the person who made the request.
•If required, fill in the reference number for the replacement.
5.Enter the number of candidates the client requested (if more than 1).
6.If you wish to add specific criteria to the request, click on the button "Criteria" to open the "Replacement criteria" window.
If you add specific criteria to a request, an asterisk (*) will be visible on the button. If a criterion is added, it wil be added in the column "Replacement type" of the "Replacement management" window.
 If you create several replacements in a row, don't forget to delete the criteria added if they are not required for the next replacements.
7.Select the work shift. Use the "Templates" button to apply a predefined schedule template among the request templates in system settings.
8.Click on the calendar to select the desired date. You can click on several dates to create several identical shifts for different dates right away. To cancel a date, click again on the date in the calendar, or click on "Clear calendar" to delete all the selected dates.
9.Click on the button "Add" or on "Insert" from the Home ribbon.
The requests to create are displayed in the list at the bottow of the window.
Once the request(s) are created and saved, other options are available:
•You can enter additional requests for another client.
•You can modify some settings for the requests created from the List of shifts to be added.
•You can add a recurrence to the created shifts.
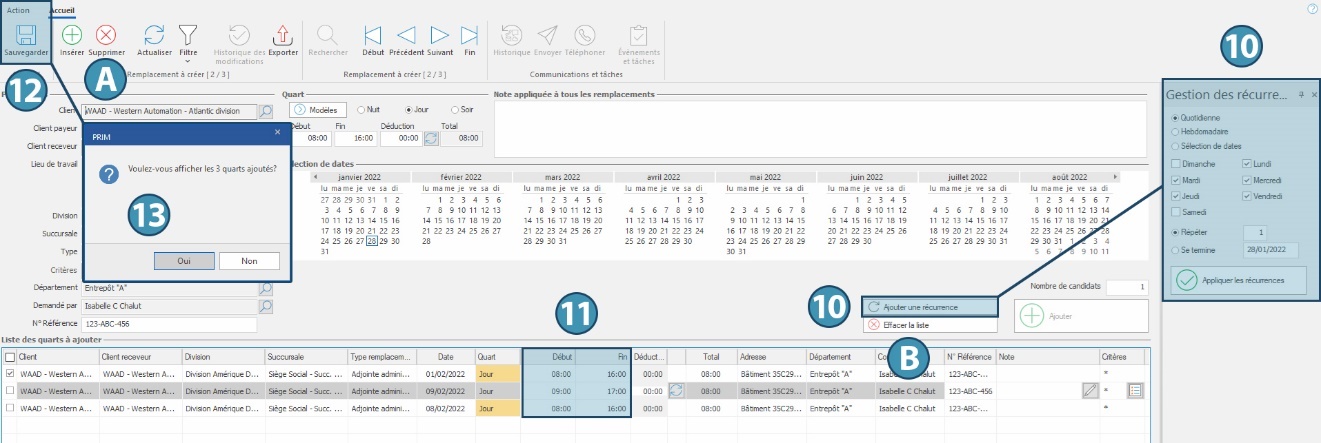
10. The button "Add a recurrence" opens the recurrence management pane. You can then set up the recurrence for one or several shifts that you just added. See section on adding recurrence to learn more.
11. You can edit start and end time of a request.
 If you want to delete one replacement before saving, use the icon "Delete" (A) in Home tab. If you want to delete every requests of the list before saving, use the button "Erase the list" in the window (B).
12. Save.
13. A message is displayed asking you if you want to display the replacements that were added. If you accept, "Replacement management" window will open, displaying only the replacements added and allowing you to begin the assignment.
The new replacements may be consulted via the "Replacement management" window or via the "Client" window, under the tab ''Operations'' and the sub-tab "Replacements".
For information about candidates assignment process, see the section on assigning candidates to a replacement.