Tab - Calendar
The Calendar tab shows everything relating to the candidate's schedule regarding temporary requests (punctual assignments or grouped requests assignments), including availability as set up in Availability mobile pane, and in the Availability management window.
Tab general presentation
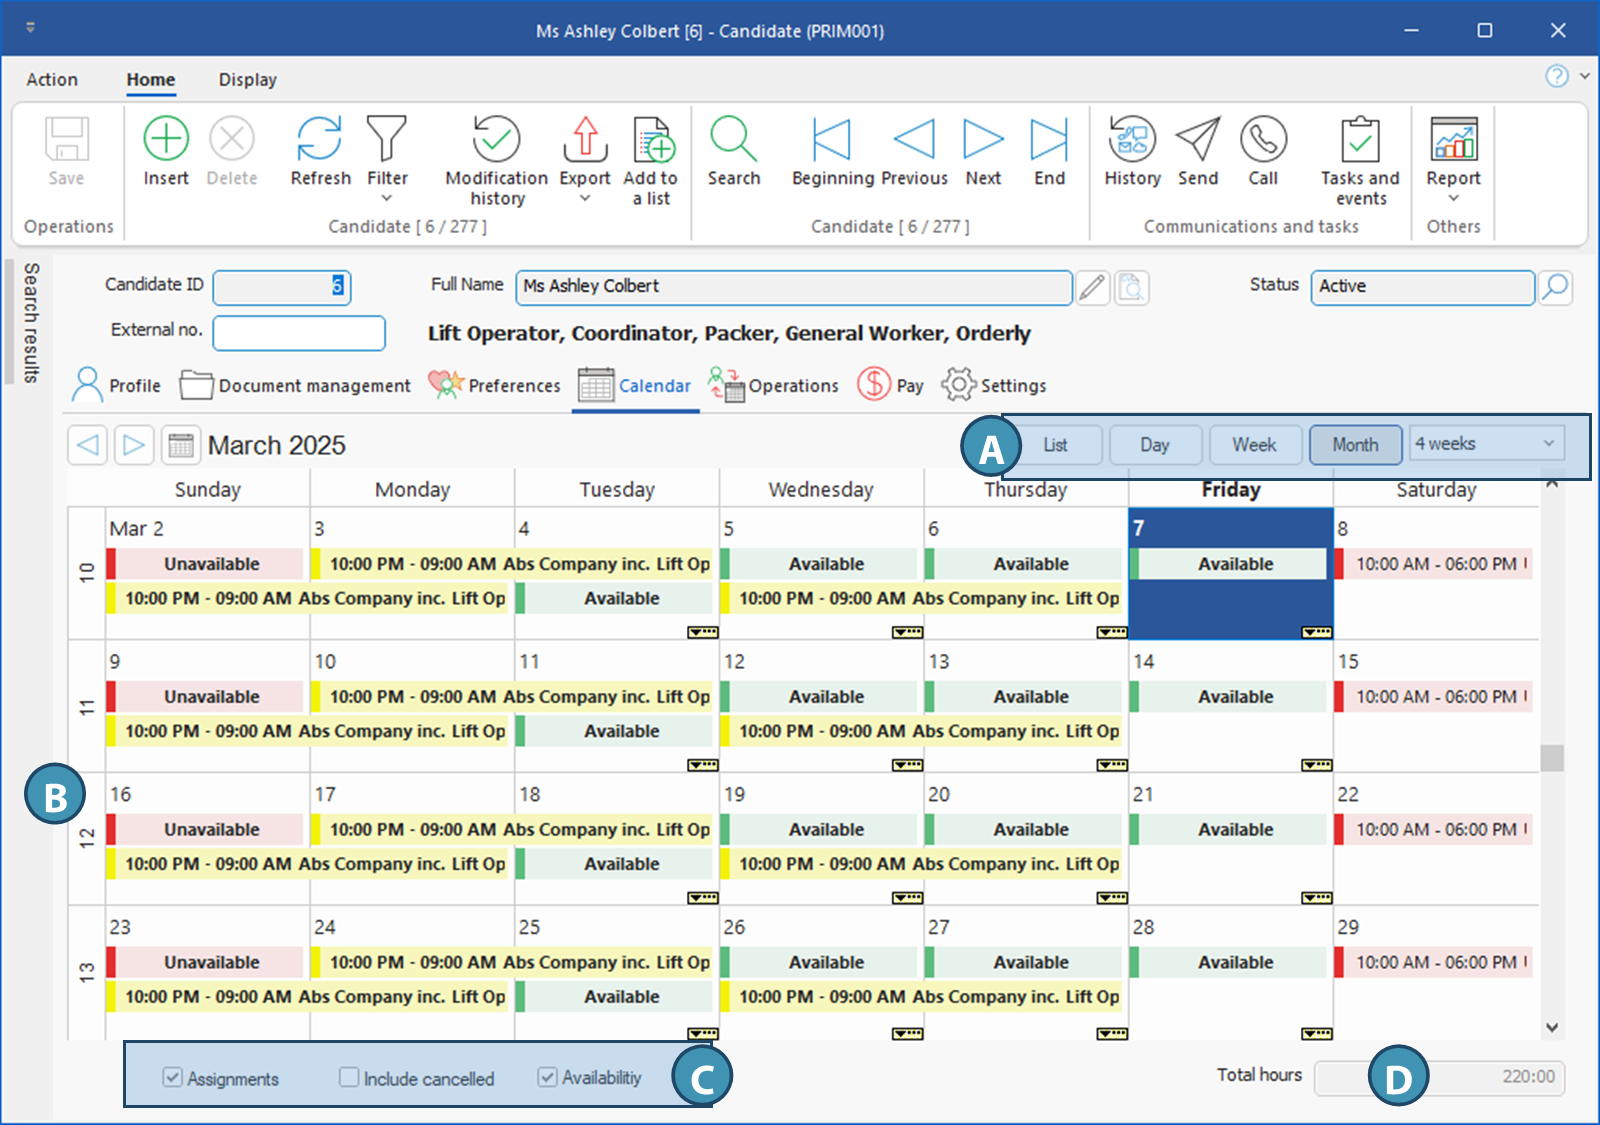
Display options (A)
This tab offers a few display or viewing options:
•List: This option allows you to view assignments only in a table, and to regroup the assignments in various ways. To learn more about this display mode, refer to the section Using the List view at the bottom of this page.
•Day: Displays calendar data for 1 day. You can browse through the days using 
 or
or  on top left of the calendar.
•Week: Displays the calendar data for a complete week. You can browse through the weeks using or on top left of the calendar.
•Month: Displays the calendar data for a complete month. You can browse through the months using or on top left of the calendar. By default, the Month view défaut is set up to 4 weeks. However, once the option selected, a field is added to allow selection of a period between 2 and 6 weeks.
•X weeks : This field is only displayed when Month is selected, allowing you to specify the number of weeks to be displayed (from 2 to 6 weeks).
Calendar view (Day, Week or Month) (B)
In calendar view, data will be displayed in various colors, providing additional information as well. Data displayed includes:
•Available time slots: The time slots when the candidate specified being available to work are displayed in green in the calendar.
- For a time range covering the whole day, only Available will be displayed. In Week or Day view, it will be displayed in the top part of the day only.
- If an availability time range is only for a part of the day, the exact hours will be specified on the time range. In Week or Day view, the time range will span over the part of the column representing the hours for the time range.
•Not available time slots: Time slots when the candidate specified he/she was not available are displayed in red in the calendar..
- For a time slot covering the whole day, only the words Not available will be displayed. In Week or Day view, it will be displayed on the top part of the day only.
- If a time slot of non-availability is only for a part of a day, the hours will be indicated in the time slot, which will cover the part of the day matching theses hours.
•Assignments: The candidate's assignments are displayed in yellow in the calendar with some information about it. Double-click on the assignment to display the shift.
• : In Month view, this button will be displayed if there is additional assignments or other information that are not displayed. Clicking on it will display a Day view for that day.
Furthermore, check boxes at the bottom of the calendar allow you to specify if you want to display Assignments, cancelled assignments (Include cancelled) and Availability.
 Tick the "Availability" check box will allow you to view "Not available" as well as "Available" time slots.
Finally, if assignments are displayed, the Total hours for the period is specified at the bottom right corner of the calendar. (D)
Presentation of the table and possible actions
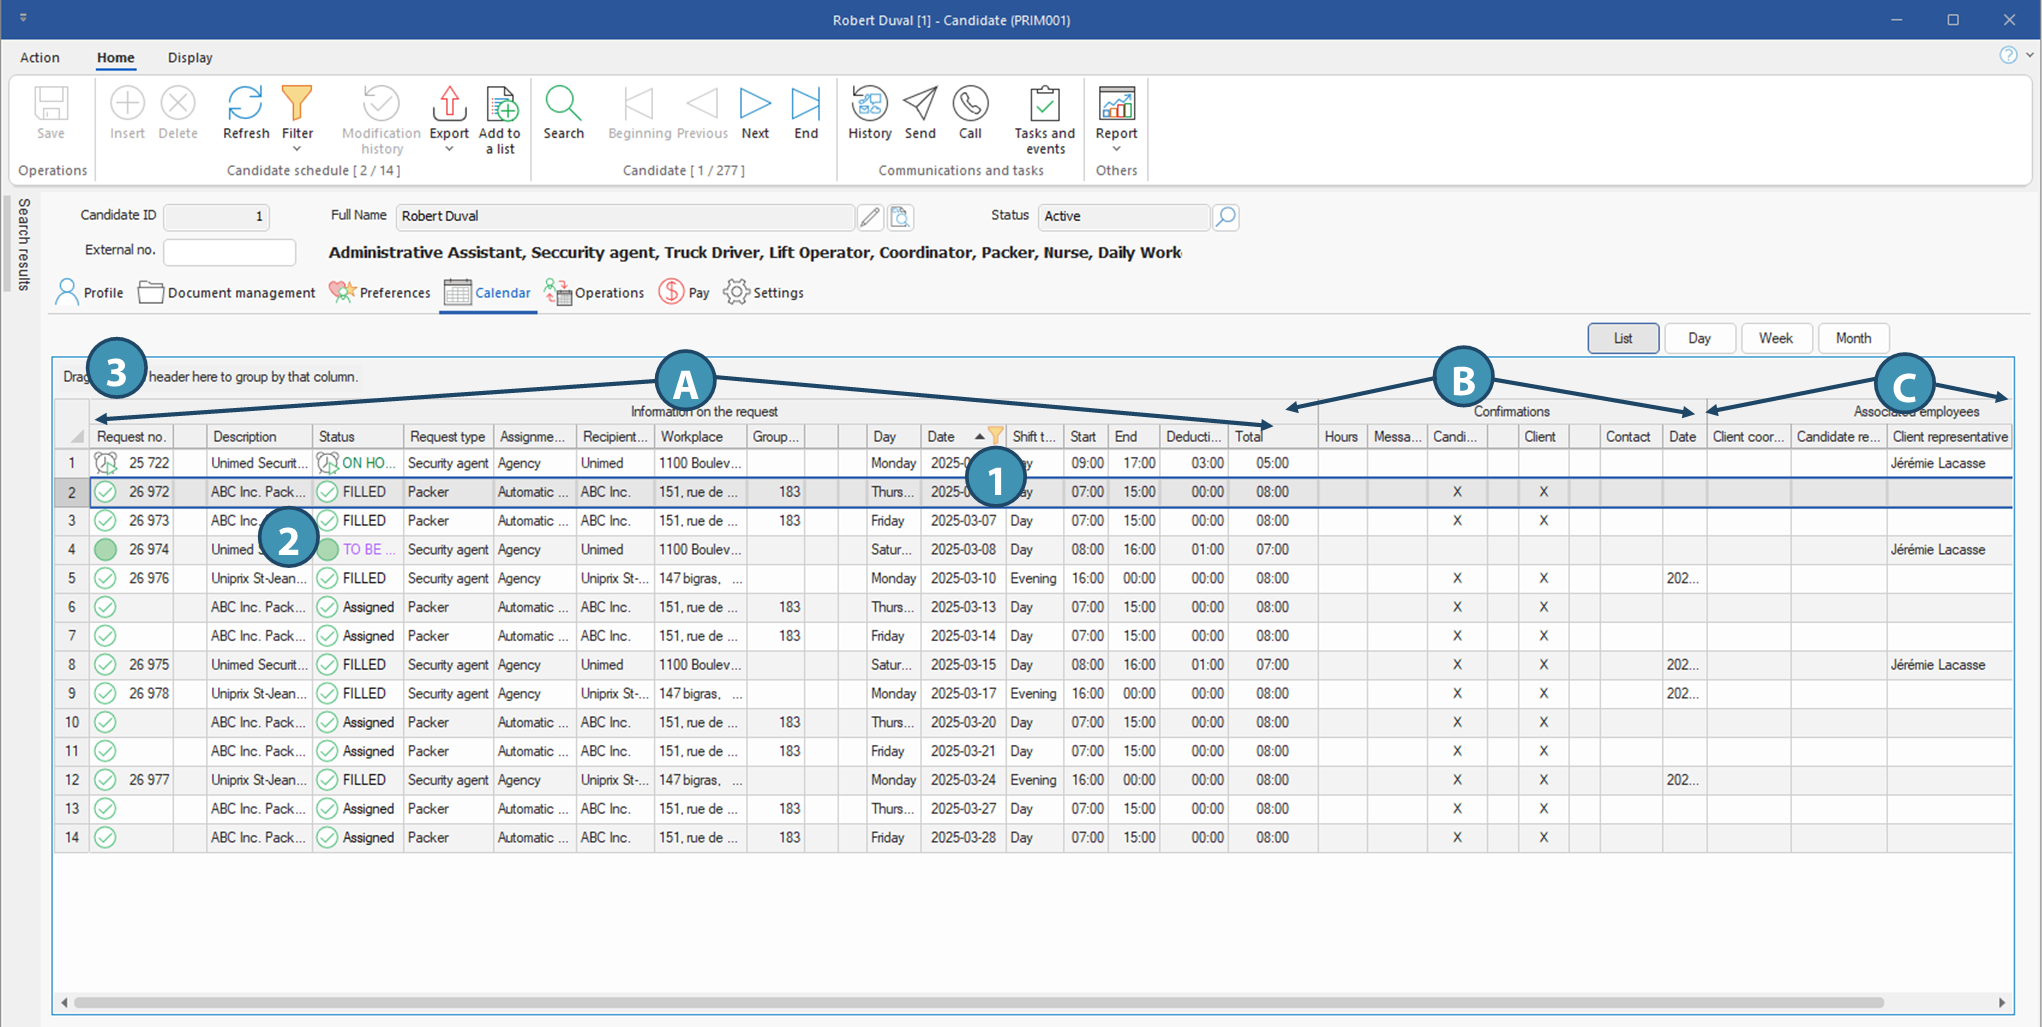
The List view allows you to display assignments as a list in a table, similar to what is found in the Operations tab or in the Shift management window.
Columns in the table are divided into sections: Information about the request (A), Confirmations (B) and Associated employees (C).
It is possible to apply filters and up to 3 sortings on column headers: a default filter is already applied on the date (1), to display only requests from -30 days to +90 days in regards to current date. Most columns are the same as in Operations tab and the Shift management window. However, the column Description displays a description of the request, just as the one displayed in calendar views (Day, Week or Month). Just hover the cursor on this column will display the complete description in a contextual bubble (2).
Furthermore, it is also possible to move the columns or to regroup data based on data in specific columns using the top section (3). Refer to Grouping grid data by column to learn more about this feature.
Finally, some actions can be performed in the table, called by the buttons below on the relevant line.

|
This button, just to the right of the Request no., allows you to open the shift file. If there is no request no. displayed, that means the shift is part of a grouped request recurrent schedule, and the specific shift has not been created yet. Clicking on the button will then open the grouped request file.
|

|
This button, which can be found in columns Description and Workplace, allows you to display the complete information in a field with longer content. Clicking on it will open a note box with the full text. .Just hover the cursor on it will display the complete description in a contextual bubble.
|

|
Allows you to view or modify the selected option in a list of values, especially the Status of the request.
|

|
Allows the user to display the file associated to an entry. You will find this button in most columns referring to a file in the system, such as the client, group (if shift is part of a grouped request) or any items linked to a file.
|

|
In confirmation section, this buttion allows you to quickly send a confirmation email to either the candidate or the client.
|

|
If the column Periods in Information about the request section is displayed, this button just to the right of the column will display the PRIM010 window, allowing you to view the working periods in a split shift.
|
Grouping grid data by column
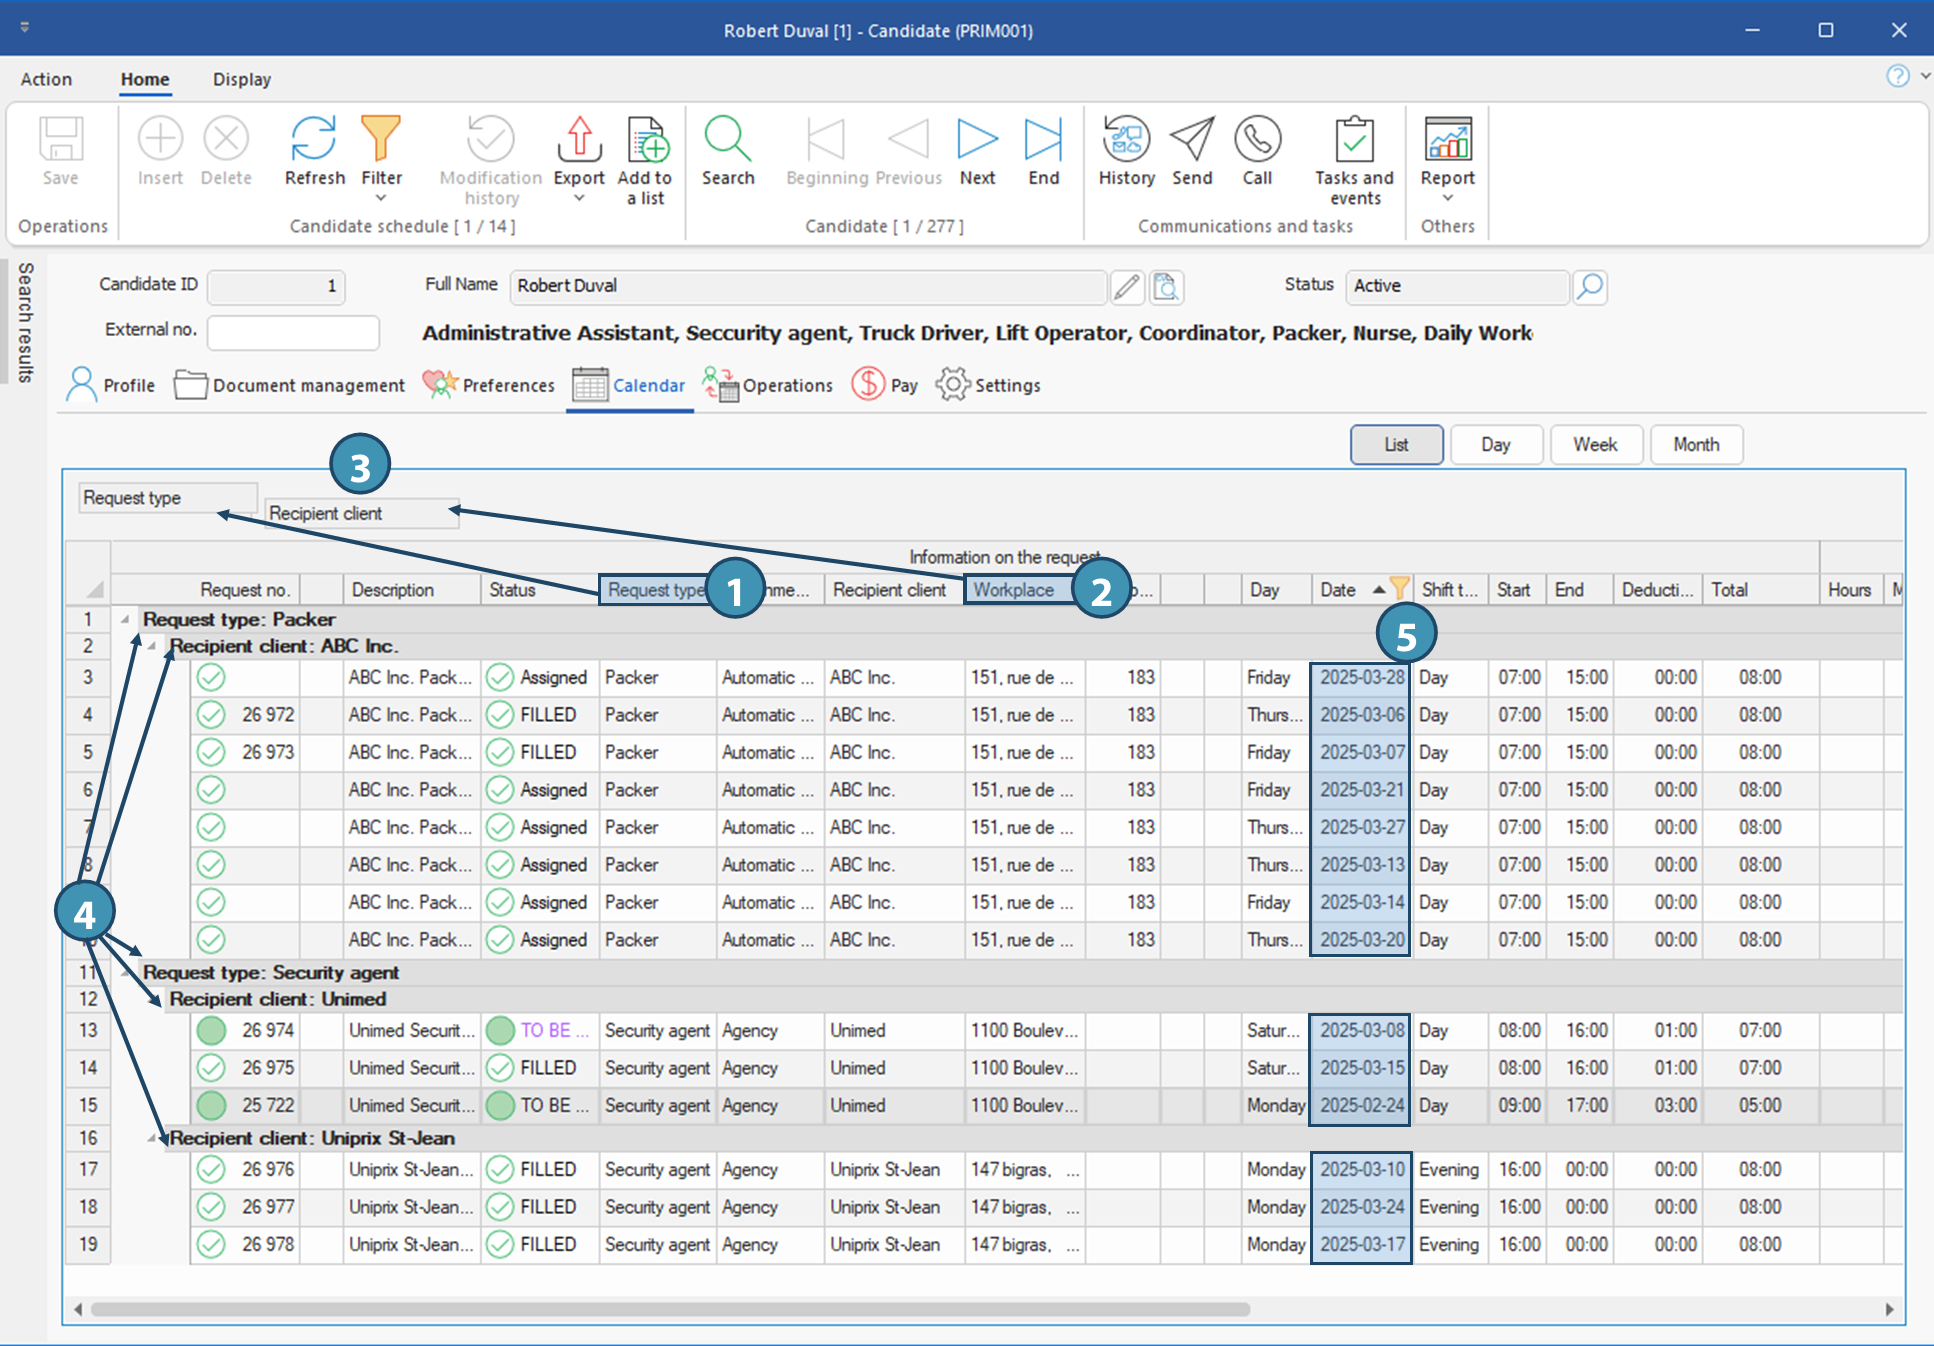
In addition to filters and sortings on column headers, the grid type used in this table allows you to regroup records using the data in one of the columns. For example, you could regroup requests by Request type in a candidate filling several functions, or by recipient client, workplace, or any other relevant column in the grid. It is therefore possible to combine several hierarchical groupings.
In the example below, we have a candidate who can work as Packer or as Security agent, so we grouped together assignments using the Request type, first then Recipient client.
1.Click on the header Request type, then, holding down the mouse button, drag the column title to the top section and release the button.
Red lines  will be displayed, showing you where the column will be moved if you release the button. This action also allows you to move the column in the table. If you want to regroup the records using this column, you must move it in the top section (3). will be displayed, showing you where the column will be moved if you release the button. This action also allows you to move the column in the table. If you want to regroup the records using this column, you must move it in the top section (3).
2.Click on the header Recipient client, then, holding down the mouse button, drag the column title to the top section and release the button.
3.The top section now shows the grouping hierarchy: first by request type, then by recipient client.
4.The data in the table have been reorganized, and the bold headings represent the groupings.
5.Any sorting applied to a column will be performed within each grouping. In our example, date sorting is therefore performed within each grouping.
|
 Using the List view