Assign a candidate and manage grouped shifts
Once the grouped shift request has been created, you will also manage the request in the same window, where serveral actions are available, including:
•Assign a candidate
•Add punctual shifts or new schedules
•Exclude a shift from a schedule
•Cancel one or more shifts, or indicate when a candidate is absent
•Confirm a candidate on a schedule
•COMING SOON: Substitution de candidat before schedule starts
•COMING SOON: Interrupt an operation (candidate on a schedule), and replace the candidate if required
Assign a candidate
The main tool used to assign a candidate to a schedule of a grouped shifts request is the planner. However, for grouped shift requests, the planner is included in the Shedules pane of the grouped request. Furthermore, it is slightly different from the planner used with punctual shift, since confirmation of assignment is done in the planner itself.
For requests requiring publication of the job offer or a more complete recruiting process, it is possible to activate and use the application trackign system (ATS), designed and used for permanent placement.
Use the planner
Generally speaking, except to confirm assignment of a candidate to a schedule of a grouped shifts request, the planner works much the same way in grouped shifts and in punctual shifts. But rather than in a separate pane, it will be found in the Schedules pane of the grouped shifts request.
See the corresponding page to see how to use the planner.
Use the ATS (Applicant Tracking system)
To learn how to use the ATS, see Jobboard management».
Add punctual requests to a schedule
In a group shifts window, it is possible to add a punctual shift to a mission that is already filled. To do so:
-If the mission has only a recurrent schedule: add a punctual schedule at the desired date.
-If the mission includes a punctual schedule: add the shift to the punctual schedule OR add a new punctual schedule.
 If the shift is added to an existing punctual schedule, the candidate will already be assigned to the shift - make sure there is no conflict with other assignments. If you create a new punctual schedule, you will need to go through assignment procedure again. It will then be possible to assign the same candidate if available, or you will be able to assign a different candidate.
To learn how to add a punctual schedule, see section Define a schedule for a mission.
Exclude a shift from a schedule
The button  allows a specific shift to be excluded from a recurring schedule. This allows it to be processed independently of other shifts in the recurrent schedule. For example, it is then possible to assign another candidate to this shift only.
This button can be accessed in the "Operations" pane, and in any list where the shifts are displayed :
-Shift window, to the right of the group number
-Shift management window
-Operations tab in Candidate and Client windows.
Click on the button to exclude the shift from the recurrent schedule. It can then be processed as a unique shift from the Shift or Shift management windows.
Cancel one or more shifts, or indicate when a candidate is absent
If a candidate assigned to a schedule of a grouped shifts request will be absent for one or more shift in the schedule, or if a shift is cancelled by the client, unless the cancellation is for the full schedule, the cancellation is done on each punctual shift involved. You just need to change the status of the concerned shift(s). You can either change the status in the Shift (PRIM014) window, or change the status of shifts in Operations pane in list mode.
Depending on the selected new status, a message might be displayed. For example, for the status "Candidate cancelled", PRIM asks if a copy of the shift should be created to allow assignation of a new candidate, taking into account any action performed in the initial shift.
In order to cancel a punctual shift, the shift must have been created in the system with an ID. Since shifts in a recurrent schedule are not created immediately, it might not be possible to change the status and cancel the shift. In such a situation, you can create the shift by accessing it in "Operations" pane (double-click on the shift in calendar views, or click on click on  in list mode). You will then be able to change the status.
Confirm a candidate to a grouped shifts schedule
Confirmation of an assignment to a grouped shifts request is done for each schedule and each candidate.
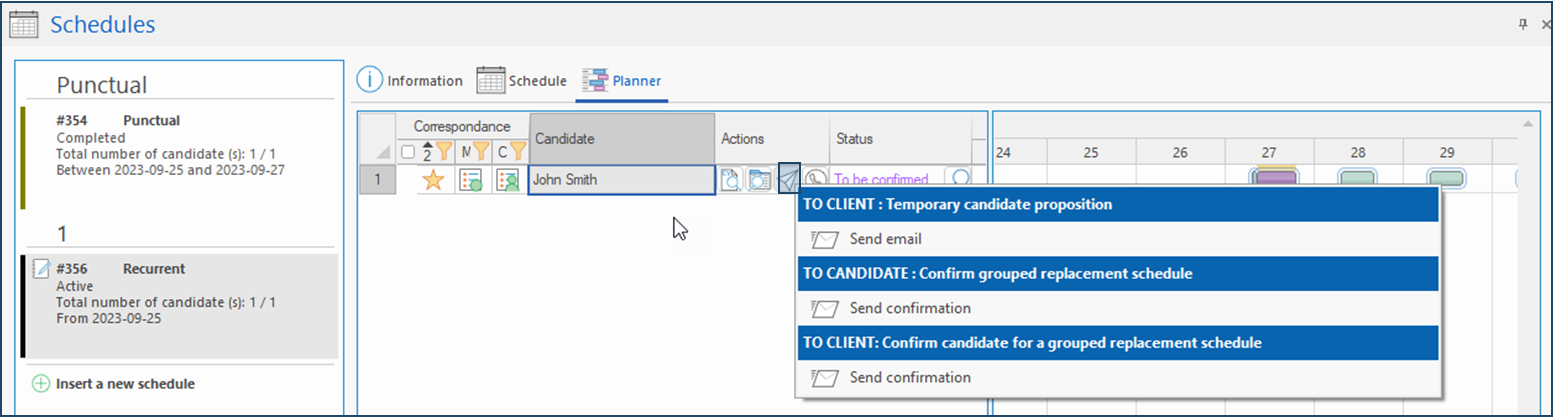
When a candidate is assigned to a schedule, button for interest in the planner are replaced with confirmation check boxes: tick the corresponding check box to validate that a contact has received confirmation for the assignment.
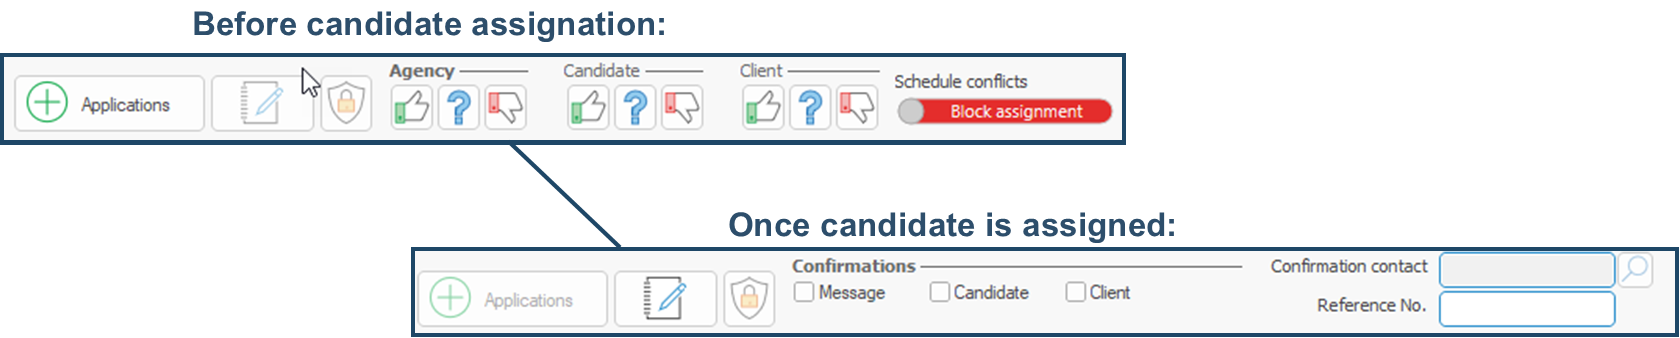
It is possible to use an email template to send a confirmation. Just click on  (Send communication) under Actions on the line of the candidate.
Note that it is also possible to tick the corresponding check boxes in the "Shift" window.
Punctual shifts included in a grouped schedule are not created at the time the schedule is created, but will generally be created one day before the shift date, or according to the delay defined in your customized configuration. However, you can force the creation of a shift by opening it from the "Operations" pane.
